hexo 博客完整部署以及魔改记录

前期基础部署

1.下载安装git

Git - Downloads (git-scm.com)

安装完成可在鼠标右键看到Git Bash

常用命令

1
2
3
git config -l  //查看所有配置
git config --system --list //查看系统配置
git config --global --list //查看用户(全局)配置

配置用户名和邮箱

1
2
git config --global user.name "你的用户名"
git config --global user.email "你的邮箱"

2.下载安装node.js

Node.js中文官网 (nodejs.org)

推荐使用nvm安装,后续如果涉及node版本更换,更为方便

nvm安装

进入官网http://nvm.uihtm.com/ 下载

解压安装,一直下一步

基础命令

nodejs历史版本下载页面

https://www.fomal.cc/posts/e593433d.html

 1
 2
 3
 4
 5
 6
 7
 8
 9
10
11
12
查询版本号
nvm -v
查询可以下载的node版本
nvm list available
安装指定版本
nvm install xxx
查看已经安装的node版本
nvm list
切换node版本(如果失败那就用管理员身份打开cmd进行切换)
nvm use xxx

nodejs这里安装的是跟视频博主一样的版本,12.19.0

修改npm源

1
npm config set registry https://registry.npm.taobao.org

3.安装hexo博客框架

Hexo官方网址

本地新建一个用于安装博客的文件夹

用git bash打开该文件夹

输入以下代码

1
npm install hexo-cli -g  或者npm install -g hexo

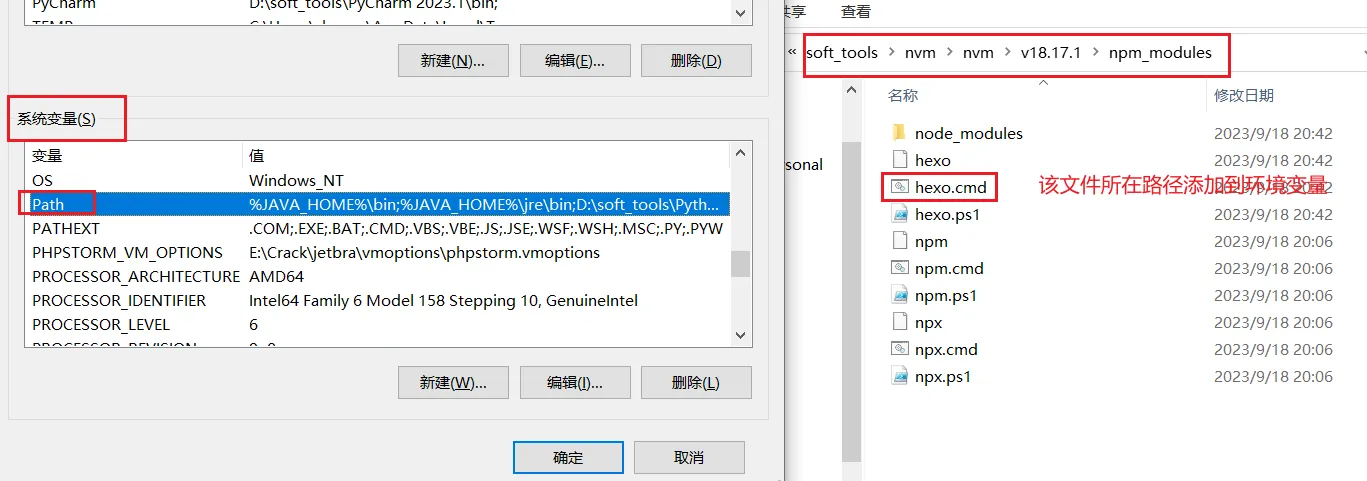
问题:bash: hexo: command not found

解决:

image-20230918204513690

4.注册GitHub账号

新建仓库

选择New repository,创建一个<用户名>.github.io的仓库。

仓库的格式必须为:<用户名>.github.io

5.上传博客到github

1
2
3
4
git config --global user.name "你的账号名称"
git config --global user.email "你的邮箱"

在新创建的Git 全局设置:中可看到

生成令牌文件

1
ssh-keygen -t rsa -C "你的邮箱"

获取密钥

1
cat ~/.ssh/id_rsa.pub

将 SSH KEY 配置到 GitHub 进入github,点击右上角头像 选择settings,进入设置页后选择 SSH and GPG keys,名字随便起,公钥填到Key那一栏

1
ssh -T git@github.com

出现successful则表示配置成功

6.初始化hexo项目

在目标路径(我这里选的路径为【C:/Hexo-Blog】)打开cmd命令窗口,执行hexo init初始化项目。

1
hexo init blog-demo(项目名)

进入blog-demo ,输入npm i安装相关依赖。

1
2
cd blog-demo  //进入blog-demo文件夹
npm i
  1. 初始化项目后,blog-demo有如下结构:

    【node_modules】:依赖包 【scaffolds】:生成文章的一些模板 【source】:用来存放你的文章 【themes】:主题 【.npmignore】:发布时忽略的文件(可忽略) 【_config.landscape.yml】:主题的配置文件 【config.yml】:博客的配置文件 【package.json】:项目名称、描述、版本、运行和开发等信息

  2. 输入hexo server或者hexo s 启动项目

  3. 打开浏览器,输入地址:http://localhost:4000/ 。

7.将静态博客挂载到GitHub Pages

安装 hexo-deployer-git

1
npm install hexo-deployer-git --save

修改 _config.yml 文件 在blog-demo目录下的_config.yml,就是整个Hexo框架的配置文件了。可以在里面修改大部分的配置。详细可参考官方的配置描述。 修改最后一行的配置,将repository修改为你自己的github项目地址即可,还有分支要改为main代表主分支(注意缩进)。

1
2
3
4
deploy:
  type: 'git'
  repository: git@github.com:ktzxy/ktzxy.github.io.git
  branch: main

修改好配置后,运行如下命令,将代码部署到 GitHub

1
2
3
4
hexo clean && hexo generate && hexo deploy  // Git BASH终端
hexo clean; hexo generate; hexo deploy  // VSCODE终端

简写:hexo cl && hexo g && hexo d
1
2
将本地主分支更名为main,方便与远程分支名称对应: git branch -M main
将本地主分支main,推至GitHub仓库的主分支main: git push -u origin main

第一步骤算是完成;直接访问https://<用户名>.github.io 即可访问成功

Github Action 实现自动化部署

使用Github Action实现全自动部署 | Akilarの糖果屋

常量名常量释义
[Blogroot]本地存放博客源码的文件夹路径
[SourceRepo]存放博客源码的私有仓库名
[SiteBlogRepo]存放编译好的博客页面的公有仓库名 Site指站点,教程中会替换成 Github、Gitee、Coding
[SiteUsername]用户名 Site指站点,教程中会替换成 Github、Gitee、Coding
[SiteToken]申请到的令牌码 Site指站点,教程中会替换成 Github、Gitee、Coding
[GithubEmail]与github绑定的主邮箱,建议使用Gmail
[TokenUser]Coding配置特有的令牌用户名
 1
 2
 3
 4
 5
 6
 7
 8
 9
10
11
12
13
14
15
16
17
# 在记事本中逐个记录,方便替换,以下为我的示例
[Blogroot]:E:\Blogroot

[SourceRepo]:ktzxy/Hexo-blog-source

[SiteBlogRepo]
  [GithubBlogRepo]:ktzxy.github.io

[SiteUsername]
  [GithubUsername]:ktzxy

[SiteToken]
  [GithubToken]:

[GithubEmail]:

[TokenUser]:

1.获取github token Github->头像(右上角)->Settings->Developer Settings->Personal access tokens->

[Blogroot]新建.github文件夹,注意开头是有个.的。然后在.github内新建workflows文件夹,再在workflows文件夹内新建autodeploy.yml,在[Blogroot]/.github/workflows/autodeploy.yml里面输入

 1
 2
 3
 4
 5
 6
 7
 8
 9
10
11
12
13
14
15
16
17
18
19
20
21
22
23
24
25
26
27
28
29
30
31
32
33
34
35
36
37
38
39
40
41
42
43
44
45
46
47
48
49
50
51
52
53
54
55
56
57
58
59
60
61
# 当有改动推送到main分支时,启动Action
name: 自动部署

on:
  push:
    branches:
      - main #2020年10月后github新建仓库默认分支改为main,注意更改
  release:
    types:
      - published

jobs:
  deploy:
    runs-on: ubuntu-latest
    steps:
      - name: 检查分支
        uses: actions/checkout@v2
        with:
          ref: main #2020年10月后github新建仓库默认分支改为main,注意更改

      - name: 安装 Node
        uses: actions/setup-node@v3 # 升级为v3,推荐新版
        with:
          node-version: "21.5.0"

      - name: 安装 Hexo
        run: |
          export TZ='Asia/Shanghai'
          npm install hexo-cli -g

      - name: 缓存 Hexo 依赖
        uses: actions/cache@v4
        id: cache
        with:
          path: |
            node_modules
            ~/.npm # 缓存npm加速依赖安装
          key: ${{ runner.OS }}-${{ hashFiles('**/package-lock.json') }}

      - name: 安装依赖
        if: steps.cache.outputs.cache-hit != 'true'
        run: |
          npm install

      - name: 生成静态文件
        run: |
          hexo clean
          hexo generate

      - name: 部署 #此处master:master 指从本地的master分支提交到远程仓库的master分支,若远程仓库没有对应分支则新建一个。如有其他需要,可以根据自己的需求更改。
        run: |
          cd ./public
          git init
          git checkout -b main
          git config --local user.name "${{ secrets.GITHUBUSERNAME }}"
          git config --local user.email "${{ secrets.GITHUBEMAIL }}"
          git add .
          git commit -m "${{ github.event.head_commit.message }} $(date '+%Z %Y-%m-%d %A %H:%M:%S') Updated By Github Actions"
          git push --force --quiet "https://${{ secrets.GITHUBUSERNAME }}:${{ secrets.GITHUBTOKEN }}@github.com/${{ secrets.GITHUBUSERNAME }}/${{ secrets.GITHUBUSERNAME }}.github.io.git" main:main
          #git push --force --quiet "https://${{ secrets.TOKENUSER }}:${{ secrets.CODINGTOKEN }}@e.coding.net/${{ secrets.CODINGUSERNAME }}/${{  secrets.CODINGBLOGREPO }}.git" master:master #coding部署写法,需要的自行取消注释
          #git push --force --quiet "https://${{ secrets.GITEEUSERNAME }}:${{ secrets.GITEETOKEN }}@gitee.com/${{ secrets.GITEEUSERNAME }}/${{ secrets.GITEEUSERNAME }}.git" master:master #gitee部署写法,需要的自行取消注释

之后需要自己到仓库的Settings->Secrets->actions 下添加环境变量,变量名参考脚本中出现的,依次添加

例如,需要部署在githubpage上,那么脚本中必要的变量为 GITHUBUSERNAMEGITHUBEMAILGITHUBTOKEN,因此添加这三条变量。变量具体内容释义可以查看本文开头。

重新设置远程仓库和分支

  1. 删除或者先把[Blogroot]/themes/butterfly/.git移动到非博客文件夹目录下,原因是主题文件夹下的.git文件夹的存在会导致其被识别成子项目,从而无法被上传到源码仓库。
  2. 在博客根目录[Blogroot]路径下运行指令
1
2
3
4
5
git init #初始化
git remote add origin git@github.com:[GithubUsername]/[SourceRepo].git #[SourceRepo]为存放源码的github私有仓库
git checkout -b main # 切换到master分支,
#2020年10月后github新建仓库默认分支改为main,注意更改
# 如果不是,后面的所有设置的分支记得保持一致

添加屏蔽项 因为能够使用指令进行安装的内容不包括在需要提交的源码内,所有我们需要将这些内容添加到屏蔽项,表示不上传到github上。这样可以显著减少需要提交的文件量和加快提交速度。 打开[Blogroot]/.gitignore,输入以下内容:

 1
 2
 3
 4
 5
 6
 7
 8
 9
10
.DS_Store
Thumbs.db
db.json
*.log
node_modules/
public/
.deploy*/
.deploy_git*/
.idea
themes/butterfly/.git
  1. 如果不是butterfly主题,记得替换最后一行内容为你自己当前使用的主题。
  2. 之后再运行git提交指令,将博客源码提交到github上。牢记下方的三行指令,以后都是通过这个指令进行提交。
1
2
3
4
git add .
git commit -m "github action update" #引号内的内容可以自行更改作为提交记录。
git push origin main
#2020年10月后github新建仓库默认分支改为main,注意更改

静态页面托管网站

Netlify部署

使用第三方托管平台部署博客 | Akilarの糖果屋

安装主题

Themes | Hexo

在博客根目录里,打开Git Bash工具,运行

1
2
3
4
git clone -b master https://github.com/jerryc127/hexo-theme-butterfly themes/butterfly

#npm安装 或者
npm i hexo-theme-butterfly

应用主题

修改站点配置文件_config.yml,把主题改为butterfly

1
theme: butterfly

如果你没有pug以及stylus的渲染器,请下载安装,这两个渲染器是Butterfly生成基础页面所需的依赖包:

1
npm install hexo-renderer-pug hexo-renderer-stylus --save

为了减少升级主题后带来的不便,请使用以下方法(建议,可以不做,高度魔改的一般都不会升级主题了,不然魔改的会被覆盖掉) 把主题文件夹中的 _config.yml 复制到 Hexo 根目录里(我这里路径为【C:/Hexo-Blog/blog-demo】),同时重新命名为 _config.butterfly.yml。以后只需要在 _config.butterfly.yml进行配置即可生效。Hexo会自动合併主题中的_config.yml_config.butterfly.yml里的配置,如果存在同名配置,会使用_config.butterfly.yml的配置,其优先度较高

基础用法说明

Front-matter

Front-matter 是 markdown 文件最上方以---分隔的区域,用于指定个别档案的变数。

  • Page Front-matter 用于页面配置
  • Post Front-matter 用于文章页配置

如果标注可选的参数,可根据自己需要添加,不用全部都写

Page Front-matter:

 1
 2
 3
 4
 5
 6
 7
 8
 9
10
11
12
13
14
15
---
title:
date:
updated:
type:
comments:
description:
keywords:
top_img:
mathjax:
katex:
aside:
aplayer:
highlight_shrink:
---
写法解释
title【必需】页面标题
date【必需】页面创建日期
type【必需】标籤、分类和友情链接三个页面需要配置
updated【可选】页面更新日期
description【可选】页面描述
keywords【可选】页面关键字
comments【可选】显示页面评论模块(默认 true)
top_img【可选】页面顶部图片
mathjax【可选】显示mathjax(当设置mathjax的per_page: false时,才需要配置,默认 false)
kates【可选】显示katex(当设置katex的per_page: false时,才需要配置,默认 false)
aside【可选】显示侧边栏 (默认 true)
aplayer【可选】在需要的页面加载aplayer的js和css,请参考文章下面的音乐 配置
highlight_shrink【可选】配置代码框是否展开(true/false)(默认为设置中highlight_shrink的配置)

Post Front-matter:

 1
 2
 3
 4
 5
 6
 7
 8
 9
10
11
12
13
14
15
16
17
18
19
20
21
22
23
24
25
---
title:
date:
updated:
tags:
categories:
keywords:
description:
top_img:
comments:
cover:
toc:
toc_number:
toc_style_simple:
copyright:
copyright_author:
copyright_author_href:
copyright_url:
copyright_info:
mathjax:
katex:
aplayer:
highlight_shrink:
aside:
---
写法解释
title【必需】文章标题
date【必需】文章创建日期
updated【可选】文章更新日期
tags【可选】文章标籤
categories【可选】文章分类
keywords【可选】文章关键字
description【可选】文章描述
top_img【可选】文章顶部图片
cover【可选】文章缩略图(如果没有设置top_img,文章页顶部将显示缩略图,可设为false/图片地址/留空)
comments【可选】显示文章评论模块(默认 true)
toc【可选】显示文章TOC(默认为设置中toc的enable配置)
toc_number【可选】显示toc_number(默认为设置中toc的number配置)
toc_style_simple【可选】显示 toc 简洁模式
copyright【可选】显示文章版权模块(默认为设置中post_copyright的enable配置)
copyright_author【可选】文章版权模块的文章作者
copyright_author_href【可选】文章版权模块的文章作者链接
copyright_url【可选】文章版权模块的文章连结链接
copyright_info【可选】文章版权模块的版权声明文字
mathjax【可选】显示mathjax(当设置mathjax的per_page: false时,才需要配置,默认 false)
katex【可选】显示katex(当设置katex的per_page: false时,才需要配置,默认 false)
aplayer【可选】在需要的页面加载aplayer的js和css,请参考文章下面的音乐 配置
highlight_shrink【可选】配置代码框是否展开(true/false)(默认为设置中highlight_shrink的配置)
aside【可选】显示侧边栏 (默认 true)

标签页

  1. 前往你的Hexo博客根目录,打开Git Bash执行如下命令:

    1
    
    hexo new page tags
    
  2. [BlogRoot]\source\会生成一个含有index.md文件的tags文件夹。

  3. 修改[BlogRoot]\source\tags\index.md,添加type: "tags"

    1
    2
    3
    4
    5
    
    ---
    title: tags
    date: 2023-09-23 21:38:05
    type: "tags"
    ---
    

友情链接

  1. 前往你的Hexo博客根目录,打开cmd命令窗口执行如下命令:

    1
    
    hexo new page link
    
  2. [BlogRoot]\source\会生成一个含有index.md文件的link文件夹

  3. 修改[BlogRoot]\source\link\index.md,添加type: "link"

    1
    2
    3
    4
    5
    6
    
    MARKDOWN
    ---
    title: link
    date: 2022-10-28 12:00:00
    type: "link"
    ---
    
  4. 前往[BlogRoot]\source\_data创建一个link.yml文件(如果沒有 _data 文件夹,请自行创建),并写入如下信息(根据你的需要写):

     1
     2
     3
     4
     5
     6
     7
     8
     9
    10
    11
    12
    13
    14
    15
    16
    17
    18
    19
    20
    21
    22
    23
    
    - class_name: 友情鏈接
      class_desc: 那些人,那些事
      link_list:
        - name: Hexo
          link: https://hexo.io/zh-tw/
          avatar: https://d33wubrfki0l68.cloudfront.net/6657ba50e702d84afb32fe846bed54fba1a77add/827ae/logo.svg
          descr: 快速、簡單且強大的網誌框架
    
    - class_name: 網站
      class_desc: 值得推薦的網站
      link_list:
        - name: Youtube
          link: https://www.youtube.com/
          avatar: https://i.loli.net/2020/05/14/9ZkGg8v3azHJfM1.png
          descr: 視頻網站
        - name: Weibo
          link: https://www.weibo.com/
          avatar: https://i.loli.net/2020/05/14/TLJBum386vcnI1P.png
          descr: 中國最大社交分享平台
        - name: Twitter
          link: https://twitter.com/
          avatar: https://i.loli.net/2020/05/14/5VyHPQqR6LWF39a.png
          descr: 社交分享平台
    

    class_name和class_desc支持 html 格式,如不需要,也可以留空。

图库 undo

图库页面只是普通的页面,你只需要hexo new page xxx创建你的页面就行。

然后使用外挂标签 galleryGroup,具体用法请查看对应的内容。

1
2
3
4
5
6
<div class="gallery-group-main">

{% galleryGroup '封面专区' '本站用作文章封面的图片,不保证分辨率' '/box/Gallery/photo' https://source.fomal.cc/img/default_cover_61.webp %}

{% galleryGroup '背景专区' '收藏的一些的背景与壁纸,分辨率很高' '/box/Gallery/wallpaper' https://source.fomal.cc/img/dm11.webp %}
</div>

子页面 undo

子页面也是普通的页面,你只需要hexo new page xxx创建你的页面就行。

然后使用标签外挂 gallery,具体用法请查看对应的内容。

 1
 2
 3
 4
 5
 6
 7
 8
 9
10
11
12
13
14
{% gallery %} 
![p1]( https://source.fomal.cc/img/default_cover_1.webp ) 
![p2]( https://source.fomal.cc/img/default_cover_2.webp ) 
![p3]( https://source.fomal.cc/img/default_cover_3.webp ) 
![p4]( https://source.fomal.cc/img/default_cover_4.webp ) 
![p5]( https://source.fomal.cc/img/default_cover_5.webp ) 
![p6]( https://source.fomal.cc/img/default_cover_6.webp ) 
![p7]( https://source.fomal.cc/img/default_cover_7.webp ) 
![p8]( https://source.fomal.cc/img/default_cover_8.webp ) 
![p9]( https://source.fomal.cc/img/default_cover_9.webp ) 
![p10]( https://source.fomal.cc/img/default_cover_10.webp ) 
![p11]( https://source.fomal.cc/img/default_cover_11.webp ) 
![p12]( https://source.fomal.cc/img/default_cover_12.webp ) 
{% endgallery %}

404页面

enable改为true

1
2
3
4
5
# A simple 404 page
error_404:
  enable: true
  subtitle: "页面沒有找到"
  background: 

hexo 博客基础配置

语言

修改站点配置文件_config.yml,默认语言是 en 。 主题支持三种语言:

  • default(en)
  • zh-CN (简体中文)
  • zh-TW (繁体中文)

网站资料

修改网站各种资料,例如标题、副标题和邮箱等个人资料,请修改站点配置文件_config.yml。部分参数如下,详细参数可参考官方的配置描述

参数描述
title网站标题
subtitle描述
description网站描述
keywords网站的关键词。支持多个关键词
author您的名字
language网站使用的语言。对于简体中文用户来说,使用不同的主题可能需要设置成不同的值,请参考你的主题的文档自行设置,常见的有 zh-Hans和 zh-CN。
timezone网站时区。Hexo 默认使用您电脑的时区。请参考 时区列表 进行设置,如 America/New_York, Japan, 和 UTC 。一般的,对于中国大陆地区可以使用 Asia/Shanghai

导航菜单

修改主题配置文件_config.butterfly.yml

  • 必须是 /xxx/,后面||分开,然后写图标名,如果不想显示图标,图标名可不写
  • 若主题版本大于 v4.0.0,可以直接在子目录里添加 hide 隐藏子目录,如下面的List
 1
 2
 3
 4
 5
 6
 7
 8
 9
10
menu:
  Home: / || fas fa-home
  Archives: /archives/ || fas fa-archive
  Tags: /tags/ || fas fa-tags
  Categories: /categories/ || fas fa-folder-open
  List||fas fa-list||hide:
   Music: /music/ || fas fa-music
    Movie: /movies/ || fas fa-video
  Link: /link/ || fas fa-link
  About: /about/ || fas fa-heart
  • 文字可自行更改,中英文都可以
 1
 2
 3
 4
 5
 6
 7
 8
 9
10
11
menu:
  首页: / || fas fa-home
  时间轴: /archives/ || fas fa-archive
  标签: /tags/ || fas fa-tags
  分类: /categories/ || fas fa-folder-open
  清单||fa fa-heartbeat:
    音乐: /music/ || fas fa-music
    照片: /Gallery/ || fas fa-images
    电影: /movies/ || fas fa-video
  友链: /link/ || fas fa-link
  关于: /about/ || fas fa-heart

代码

代码高亮主题

Butterfly支持 6 种代码高亮样式:

  • darker
  • pale night
  • light
  • ocean
  • mac
  • mac light

修改主题配置文件_config.butterfly.yml。中的highlight_theme属性。

1
highlight_theme: darker

代码复制

修改主题配置文件_config.butterfly.yml中的highlight_copy属性,true表示可以复制。

1
highlight_copy: true

代码框展开/关闭

修改主题配置文件_config.butterfly.yml。中的highlight_shrink属性。

1
highlight_shrink: true #代码框不展开,需点击 '>' 打开

代码换行

在默认情况下,Hexo 在编译的时候不会实现代码自动换行。如果你不希望在代码块的区域里有横向滚动条的话,那么你可以考虑开启这个功能。

修改主题配置文件_config.butterfly.yml。中的code_word_wrap属性。

1
code_word_wrap: true

代码高度限制

可配置代码高度限制,超出的部分会隐藏,并显示展开按钮。

1
highlight_height_limit: false # unit: px
  1. 单位是px,直接添加数字,如 200
  2. 实际限制高度为highlight_height_limit + 30 px ,多增加 30px 限制,目的是避免代码高度只超出highlight_height_limit 一点时,出现展开按钮,展开没内容。
  3. 不适用于隐藏后的代码块( css 设置 display: none)。

社交图标

Butterfly支持font-awesome v6图标。

书写格式:图标名:url || 描述性文字

1
2
3
4
5
social:
  GitHub: https://github.com/shaunzhao-yu || icon-github || faa-tada
  Email: mailto:2251511764@qq.com || icon-mail || faa-tada
  CSDN: https://blog.csdn.net/qq_46087070 || fa-book-open || faa-tada
  QQ: https://res.abeim.cn/api/qq/?qq=2251511764 || icon-QQ || faa-tada

顶部图

如果不要显示顶部图,可直接配置 disable_top_img: true

配置解释
index_img主页的 top_img
default_top_img默认的 top_img,当页面的 top_img 没有配置时,会显示 default_top_img
archive_img归档页面的 top_img
tag_imgtag子页面 的 默认 top_img
tag_per_imgtag子页面的 top_img,可配置每个 tag 的 top_img
category_imgcategory 子页面 的 默认 top_img
category_per_imgcategory 子页面的 top_img,可配置每个 category 的 top_img

修改主题配置文件_config.butterfly.yml

1
index_img: xxx.png

其它页面 (tags/categories/自建页面)和文章页的top_img,请到对应的 md 页面设置front-matter中的top_img

文章置顶与封面

  1. 你可以直接在文章的front-matter区域里添加sticky: 1属性来把这篇文章置顶。数值越大,置顶的优先级越大。

  2. 文章的markdown文档上,在Front-matter添加cover,并填上要显示的图片地址。如果不配置cover,可以设置显示默认的cover;如果不想在首页显示cover,可以设置为false。 修改主题配置文件_config.butterfly.yml

     1
     2
     3
     4
     5
     6
     7
     8
     9
    10
    
    cover:
      # 是否显示文章封面
      index_enable: true
      aside_enable: true
      archives_enable: true
      # 封面显示的位置
      # 三个值可配置 left , right , both
      position: both
      # 当没有设置cover时,默认的封面显示
      default_cover: 
    

    当配置多张图片时,会随机选择一张作为cover,此时写法应为:

    1
    2
    3
    4
    
    default_cover:
      - https://fastly.jsdelivr.net/gh/jerryc127/CDN@latest/cover/default_bg.png
      - https://fastly.jsdelivr.net/gh/jerryc127/CDN@latest/cover/default_bg2.png
      - https://fastly.jsdelivr.net/gh/jerryc127/CDN@latest/cover/default_bg3.png
    

文章页相关配置

文章meta显示

post_meta这个属性用于显示文章的相关信息的,修改主题配置文件_config.butterfly.yml

 1
 2
 3
 4
 5
 6
 7
 8
 9
10
11
12
13
post_meta:
  page:
    date_type: both # created or updated or both 主页文章日期是创建日或者更新日或都显示
    date_format: relative # date/relative 显示日期还是相对日期
    categories: true # true or false 主页是否显示分类
    tags: true # true or false 主页是否显示标签
    label: true # true or false 显示描述性文字
  post:
    date_type: both # created or updated or both 文章页日期是创建日或者更新日或都显示
    date_format: relative # date/relative 显示日期还是相对日期
    categories: true # true or false 文章页是否显示分类
    tags: true # true or false 文章页是否显示标签
    label: true # true or false 显示描述性文字

文章版权和协议许可

修改主题配置文件_config.butterfly.yml

1
2
3
4
5
6
post_copyright:
  enable: true
  decode: false
  author_href:
  license: CC BY-NC-SA 4.0
  license_url: https://creativecommons.org/licenses/by-nc-sa/4.0/

由于Hexo 4.1开始,默认对网址进行解码,以至于如果是中文网址,会被解码,可设置decode: true来显示中文网址。如果有文章(例如:转载文章)不需要显示版权,可以在文章页Front-matter中单独设置

1
copyright: false

文章打赏

修改主题配置文件_config.butterfly.yml

 1
 2
 3
 4
 5
 6
 7
 8
 9
10
reward:
  enable: true
  coinAudio: https://cdn.cbd.int/akilar-candyassets@1.0.36/audio/aowu.m4a
  QR_code:
    - img: https://fastly.jsdelivr.net/gh/shaunzhao-yu/img@main/photos/202310072330878.png
      link:
      text: wechat
    - img: https://fastly.jsdelivr.net/gh/shaunzhao-yu/img@main/photos/202310072330877.png
      link:
      text: alipay

文章目录TOC

修改主题配置文件_config.butterfly.yml

1
2
3
4
5
6
toc:
  post: true # 文章页是否显示 TOC
  page: false # 普通页面是否显示 TOC
  number: true	 # 是否显示章节数
  expand: false	# 是否展开 TOC
  style_simple: false # for post 简洁模式(侧边栏只显示 TOC, 只对文章页有效 )

相关文章推荐

相关文章推荐的原理是根据文章tags的比重来推荐,修改主题配置文件_config.butterfly.yml

1
2
3
4
related_post:
  enable: true
  limit: 6 # 显示推荐文章数目
  date_type: created # or created or updated 文章日期显示创建日或者更新日

文章锚点

开启文章锚点后,当你在文章页进行滚动时,文章链接会根据标题ID进行替换。

注意: 每替换一次,会留下一个歷史记录。所以如果一篇文章有很多锚点的话,网页的歷史记录会很多。

修改主题配置文件_config.butterfly.yml

1
2
3
# anchor
# when you scroll in post , the url will update according to header id.
anchor: true

文章过期提醒

可设置是否显示文章过期提醒,以更新时间为基准。

1
2
3
4
5
6
7
8
# Displays outdated notice for a post (文章过期提醒)
noticeOutdate:
  enable: true
  style: flat # style: simple/flat
  limit_day: 365 # 距离更新时间多少天才显示文章过期提醒
  position: top # position: top/bottom
  message_prev: It has been # 天数之前的文字
  message_next: days since the last update, the content of the article may be outdated. # 天数之后的文字

文章分页按钮

修改主题配置文件_config.butterfly.yml

1
2
3
4
5
6
# post_pagination (分页)
# value: 1 || 2 || false	# false:为关闭分页按钮;1:下一篇显示的是旧文章;2:下一篇显示的是新文章
# 1: The 'next post' will link to old post
# 2: The 'next post' will link to new post
# false: disable pagination
post_pagination: false

头像

1
2
3
avatar:
  img: /assets/head.jpg
  effect: false # true则会一直转圈

文章内容复制相关配置

1
2
3
4
5
6
7
# copy settings
# copyright: Add the copyright information after copied content (复制的内容后面加上版权信息)
copy:
  enable: true	# 是否开启网站复制权限
  copyright:	# 复制的内容后面加上版权信息
    enable: true	# 是否开启复制版权信息添加
    limit_count: 50	# 字数限制,当复制文字大于这个字数限制时,将在复制的内容后面加上版权信息

修改主题配置文件_config.butterfly.yml

 1
 2
 3
 4
 5
 6
 7
 8
 9
10
11
12
13
14
15
16
17
18
19
20
21
22
23
24
25
26
27
28
29
30
31
32
33
34
35
36
37
38
39
40
41
42
43
44
45
46
47
# 注释掉所有的的,添加下面的
# footer_beautify
# 页脚计时器:[Native JS Timer](https://akilar.top/posts/b941af/)
# 页脚徽标:[Add Github Badge](https://akilar.top/posts/e87ad7f8/)
footer_beautify:
  enable:
    timer: true # 计时器开关
    bdage: true # 徽标开关
  priority: 5 #过滤器优先权
  enable_page: all # 应用页面
  exclude: #屏蔽页面
    # - /posts/
    # - /about/
  layout: # 挂载容器类型
    type: id
    name: footer-wrap
    index: 0
  # 计时器部分配置项
  runtime_js: /js/runtime.js
  runtime_css: /css/runtime.css
  # 徽标部分配置项
  swiperpara: 3 #若非0,则开启轮播功能,每行徽标个数
  bdageitem:
    - link: https://hexo.io/ #徽标指向网站链接
      shields: https://img.shields.io/badge/Frame-Hexo-blue?style=flat&logo=hexo #徽标API
      message: 博客框架为Hexo_v5.4.0 #徽标提示语
    - link: https://butterfly.js.org/
      shields: https://img.shields.io/badge/Theme-Butterfly-6513df?style=flat&logo=bitdefender
      message: 主题版本Butterfly_v4.9.0
    - link: https://www.jsdelivr.com/
      shields: https://img.shields.io/badge/CDN-jsDelivr-orange?style=flat&logo=jsDelivr
      message: 本站使用JsDelivr为静态资源提供CDN加速
    - link: https://vercel.com/
      shields: https://img.shields.io/badge/Hosted-Vercel-brightgreen?style=flat&logo=Vercel
      message: 本站采用双线部署,默认线路托管于Vercel
    - link: https://vercel.com/
      shields: https://img.shields.io/badge/Hosted-Coding-0cedbe?style=flat&logo=Codio
      message: 本站采用双线部署,联通线路托管于Coding
    - link: https://github.com/
      shields: https://img.shields.io/badge/Source-Github-d021d6?style=flat&logo=GitHub
      message: 本站项目由Github托管
    - link: http://creativecommons.org/licenses/by-nc-sa/4.0/
      shields: https://img.shields.io/badge/Copyright-BY--NC--SA%204.0-d42328?style=flat&logo=Claris
      message: 本站采用知识共享署名-非商业性使用-相同方式共享4.0国际许可协议进行许可
  swiper_css: https://npm.elemecdn.com/hexo-butterfly-swiper/lib/swiper.min.css
  swiper_js: https://npm.elemecdn.com/hexo-butterfly-swiper/lib/swiper.min.js
  swiperbdage_init_js: https://npm.elemecdn.com/hexo-butterfly-footer-beautify/lib/swiperbdage_init.min.js

对于部分人需要写 ICP 的,也可以写在custom_text里。

1
custom_text: <a href="icp链接"><img class="icp-icon" src="icp图片"><span>备案号:xxxxxx</span></a>

右下角按钮

简繁转换

修改主题配置文件_config.butterfly.yml

 1
 2
 3
 4
 5
 6
 7
 8
 9
10
11
12
13
translate:
  enable: false
  # 默认按钮显示文字(网站是简体,应设置为'default: 繁')
  default: 繁
  # the language of website (1 - Traditional Chinese/ 2 - Simplified Chinese)
  # 网站默认语言,1: 繁体中文, 2: 简体中文
  defaultEncoding: 2
  # Time delay 延迟时间,若不在前, 要设定延迟翻译时间, 如100表示100ms,默认为0
  translateDelay: 0
  # 当文字是简体时,按钮显示的文字
  msgToTraditionalChinese: '繁'
  # 当文字是繁体时,按钮显示的文字
  msgToSimplifiedChinese: '簡'

夜间模式

修改主题配置文件_config.butterfly.yml

 1
 2
 3
 4
 5
 6
 7
 8
 9
10
# dark mode
darkmode:
  enable: false
  # dark 和 light 两种模式切换按钮
  button: true
  # Switch dark/light mode automatically (自動切換 dark mode和 light mode)
  # autoChangeMode: 1  Following System Settings, if the system doesn't support dark mode, it will switch dark mode between 6 pm to 6 am
  # autoChangeMode: 2  Switch dark mode between 6 pm to 6 am
  # autoChangeMode: false
  autoChangeMode: false

阅读模式

阅读模式下会去掉除文章外的内容,避免干扰阅读。只会出现在文章页面,右下角会有阅读模式按钮。

修改主题配置文件_config.butterfly.yml

1
readmode: true

侧边栏设置

排版

可自行决定哪个项目需要显示,可决定位置,也可以设置不显示侧边栏。

修改主题配置文件_config.butterfly.yml,下面是本人博客的配置项可以参考

 1
 2
 3
 4
 5
 6
 7
 8
 9
10
11
12
13
14
15
16
17
18
19
20
21
22
23
24
25
26
27
28
29
30
31
32
33
34
35
36
37
38
39
40
41
42
43
44
45
46
47
48
49
50
aside:
  enable: true
  hide: false
  button: true
  mobile: true # display on mobile
  position: right # left or right
  display:
    archive: true
    tag: true
    category: true
  card_author:
    enable: true
    description:
    button:
      enable: true
      icon: # fab fa-github
      text: 🛴前往小家...	#可以改
      link: https://github.com/fomalhaut1998	#可以改
  card_announcement:
    enable: true
    content: <center>主域名:<br><a href="https://www.fomal.cc"><b><font color="#5ea6e5">fomal.cc</font></b></a>&nbsp;|&nbsp;<a href="https://www.fomal.cn"><b><font color="#5ea6e5">fomal.cn</font></b></a><br>备用域名:<br><a href="https://blog.fomal.cc"><b><font color="#5ea6e5">blog.fomal.cc</font></b></a><br><a href="https://aa.fomal.cc"><b><font color="#5ea6e5">aa.fomal.cc</font></b></a><br><a href="https://bb.fomal.cc"><b><font color="#5ea6e5">bb.fomal.cc</font></b></a><br><a href="mailto:admin@fomal.cn">📬:<b><font color="#a591e0">admin@fomal.cn</font></b></a></center>	#公告栏内容
  card_recent_post:
    enable: false
    limit: 3 # if set 0 will show all
    sort: date # date or updated
    sort_order: # Don't modify the setting unless you know how it works
  card_categories:
    enable: false
    limit: 8 # if set 0 will show all
    expand: none # none/true/false
    sort_order: # Don't modify the setting unless you know how it works
  card_tags:
    enable: false
    limit: 20 # if set 0 will show all
    color: true
    sort_order: # Don't modify the setting unless you know how it works
  card_archives:
    enable: false
    type: monthly # yearly or monthly
    format: MMMM YYYY # eg: YYYY年MM月
    order: -1 # Sort of order. 1, asc for ascending; -1, desc for descending
    limit: 8 # if set 0 will show all
    sort_order: # Don't modify the setting unless you know how it works
  card_webinfo:
    enable: true
    post_count: true
    last_push_date: true
    sort_order: # Don't modify the setting unless you know how it works
  card_weibo:
    enable: true

访问人数(UV 和 PV)

修改主题配置文件_config.butterfly.yml

1
2
3
4
busuanzi:
  site_uv: true  # 本站总访客数
  site_pv: true  # 本站总访问量 
  page_pv: true  # 本文总阅读量

运行时间

修改主题配置文件_config.butterfly.yml

1
2
3
4
5
6
7
8
# Time difference between publish date and now (網頁運行時間)
# Formal: Month/Day/Year Time or Year/Month/Day Time
runtimeshow:
  enable: false
  publish_date: 21/9/2023 00:00:00
  ##网页开通时间
  #格式: 月/日/年 时间
  #也可以写成 年/月/日 时间

最新评论%

v3.1.0 以上支持。如果未配置任何评论,前先不要开启该功能。

最新评论只会在刷新时才会去读取,并不会实时变化。 由于 API 有 访问次数限制,为了避免调用太多,主题默认存取期限为 10 分鐘。也就是説,调用后资料会存在 localStorage 里,10分鐘内刷新网站只会去 localStorage 读取资料。 10 分鐘期限一过,刷新页面时才会去调取 API 读取新的数据。(3.6.0 新增了 storage 配置,可自行配置缓存时间)。

修改主题配置文件_config.butterfly.yml

1
2
3
4
5
6
7
# Aside widget - Newest Comments
newest_comments:
  enable: true
  sort_order: # Don't modify the setting unless you know how it works
  limit: 6  # 显示的数量
  storage: 10 # 设置缓存时间,单位 分钟 
  avatar: true # 是否显示头像

网站背景

修改主题配置文件_config.butterfly.yml

1
2
3
4
# 图片格式 url(http://xxxxxx.com/xxx.jpg)
# 颜色(HEX值/RGB值/颜色单词/渐变色)
# 留空 不显示背景
background: url(https://source.fomal.cc/img/dm1.webp)

如果你的网站根目录不是'/',使用本地图片时,需加上你的根目录。 例如:网站是 https://yoursite.com/blog,引用一张img/xx.png图片,则设置backgroundurl(/blog/img/xx.png)

打字效果 %

详见:activate-power-mode

修改主题配置文件_config.butterfly.yml

1
2
3
4
5
6
7
# Typewriter Effect (打字效果)
# https://github.com/disjukr/activate-power-mode
activate_power_mode:
  enable: false
  colorful: true # open particle animation (冒光特效)
  shake: true #  open shake (抖動特效)
  mobile: false

修改主题配置文件_config.butterfly.yml

1
2
# footer是否显示图片背景(与top_img一致)
footer_bg: true
  • 留空/false:显示默认的颜色
  • 图片链接:显示所配置的图片
  • 颜色包括HEX值 - #0000FF | RGB值 - rgb(0,0,255) | 颜色单词 - orange | 渐变色 - linear-gradient( 135deg, #E2B0FF 10%, #9F44D3 100%):对应的颜色
  • true:显示跟 top_img 一样

背景特效

可设置每次刷新更换彩带,或者每次点击更换彩带。详细配置可查看canvas_ribbon

修改主题配置文件_config.butterfly.yml

好看的彩带背景,会飘动。 修改主题配置文件_config.butterfly.yml

1
2
3
canvas_fluttering_ribbon:
  enable: true
  mobile: true # false 手机端不显示 true 手机端显示

鼠标点击效果

烟花

zIndex建议只在-19999上选。 -1 代表烟火效果在底部。 9999 代表烟火效果在前面。

修改主题配置文件_config.butterfly.yml

1
2
3
4
fireworks:
  enable: true
  zIndex: 9999 # -1 or 9999
  mobile: false

爱心

修改主题配置文件_config.butterfly.yml

1
2
3
4
# 点击出現爱心
click_heart:
  enable: true
  mobile: false

自定义字体和字体大小

全局字体

修改主题配置文件_config.butterfly.yml中的font-family属性即可,如不需要配置,请留空。

 1
 2
 3
 4
 5
 6
 7
 8
 9
10
11
# Global font settings
# Don't modify the following settings unless you know how they work (非必要不要修改)
font:
  global-font-size: '15px'
  code-font-size: '14px'
  # -apple-system, BlinkMacSystemFont, "Segoe UI" , "Helvetica Neue" , Lato, Roboto, "PingFang SC" , "Microsoft JhengHei" , "Microsoft YaHei" , sans-serif
  # Wenkai, consolas, -apple-system, 'Quicksand', 'Nimbus Roman No9 L', 'PingFang SC', 'Hiragino Sans GB', 'Noto Serif SC', 'Microsoft Yahei', 'WenQuanYi Micro Hei', 'ST Heiti', sans-serif;
  font-family: var(--global-font), Consolas_1, -apple-system, 'Quicksand', 'Nimbus Roman No9 L', 'PingFang SC', 'Hiragino Sans GB', 'Noto Serif SC', 'Microsoft Yahei', 'WenQuanYi Micro Hei', 'ST Heiti', sans-serif;
  # consolas, ZhuZiAWan_light, "Microsoft YaHei", Menlo, "PingFang SC", "Microsoft JhengHei", sans-serif
  # Consolas_1, ZhuZiAWan_light, "Microsoft YaHei", Menlo, "PingFang SC", "Microsoft JhengHei", sans-serif
  code-font-family: Consolas_1, var(--global-font), "Microsoft YaHei", Menlo, "PingFang SC", "Microsoft JhengHei", sans-serif

Blog 标题字体

修改主题配置文件_config.butterfly.yml中的blog_title_font属性即可,如不需要配置,请留空。 如不需要使用网络字体,只需要把font_link留空就行。

1
2
3
4
5
6
7
# Font settings for the site title and site subtitle
# https://fonts.googleapis.com/css?family=Titillium+Web&display=swap
# Titillium Web, 'PingFang SC' , 'Hiragino Sans GB' , 'Microsoft JhengHei' , 'Microsoft YaHei' , sans-serif
# 左上角網站名字 主頁居中網站名字
blog_title_font:
  font_link: 
  font-family: var(--global-font)

网站副标题

可设置主页中显示的网站副标题或者喜欢的座右铭。

修改主题配置文件_config.butterfly.yml中的subtitle

 1
 2
 3
 4
 5
 6
 7
 8
 9
10
11
12
13
14
15
16
17
18
# the subtitle on homepage (主頁subtitle)
subtitle:
  enable: true
  # Typewriter Effect (打字效果)
  effect: true
  # loop (循環打字)
  loop: true
  # source 調用第三方服務
  # source: false 關閉調用
  # source: 1  調用一言網的一句話(簡體) https://hitokoto.cn/
  # source: 2  調用一句網(簡體) http://yijuzhan.com/
  # source: 3  調用今日詩詞(簡體) https://www.jinrishici.com/
  # subtitle 會先顯示 source , 再顯示 sub 的內容
  source: false
  # 如果關閉打字效果,subtitle 只會顯示 sub 的第一行文字
  sub:
    - "Welcome to Fomalhaut🥝のTiny Home!🤣🤣🤣"
    - "Hope you have a nice day!🍭🍭🍭"

页面加载动画preloader

当进入网页时,因为加载速度的问题,可能会导致top_img图片出现断层显示,或者网页加载不全而出现等待时间,开启preloader后,会显示加载动画,等页面加载完,加载动画会消失。

1
2
# 加载动画 Loading Animation
preloader: true

字数统计

注意必须要安装依赖才能设置为true,否则会报错!

  1. 安装插件:在你的博客根目录,打开cmd命令窗口执行npm install hexo-wordcount --save
  2. 开启配置:修改主题配置文件_config.butterfly.yml中的wordcount
1
2
3
4
5
wordcount:
  enable: false
  post_wordcount: true
  min2read: true
  total_wordcount: true

图片大图查看模式

只能开启一个。 如果你并不想为某张图片添加大图查看模式,你可以使用 html 格式引用图片,并为图片添加 no-lightbox class 名,例如:<img src="xxxx.jpg" class="no-lightbox">

fancybox(推荐)

修改主题配置文件_config.butterfly.ymlfancybox属性

1
2
# fancybox http://fancyapps.com/fancybox/3/
fancybox: true

Pjax%

当用户点击链接,通过 ajax 更新页面需要变化的部分,然后使用 HTML5 的 pushState 修改浏览器的 URL 地址。这样可以不用重复加载相同的资源(css/js), 从而提升网页的加载速度。

 1
 2
 3
 4
 5
 6
 7
 8
 9
10
11
# Pjax [Beta]
# It may contain bugs and unstable, give feedback when you find the bugs.
# https://github.com/MoOx/pjax
pjax: 
  enable: true
  # 对于一些第三方插件,有些并不支持 pjax 。
  # 你可以把网页加入到 exclude 里,这个网页会被 pjax 排除在外。
  # 点击该网页会重新加载网站。
  exclude: 
    - /music/
    - /no-pjax/

注意:使用 pjax 后,一些自己DIY的js可能会无效,跳转页面时需要重新调用(例如朋友圈、说说等),具体请参考Pjax文档

Inject

如想添加额外的 js/css/meta 等等东西,可以在 Inject 里添加,head(</body>标签之前), bottom(</html>标签之前)。

1
2
3
4
5
6
7
8
# Inject
# Insert the code to head (before '</head>' tag) and the bottom (before '</body>' tag)
# 插入代码到头部 </head> 之前 和 底部 </body> 之前
inject:
  head:
    - <link rel="stylesheet" href="/xxx.css">
  bottom:
    - <script src="xxxx"></script>

hexo魔改

配置文章链接转数字或字母

参考

1
npm install hexo-abbrlink --save

在_config.yml文件中替换

1
permalink: posts/:abbrlink.html

并在最后加入

1
2
3
4
# 文章链接转数字或字母:https://github.com/rozbo/hexo-abbrlink
abbrlink:
  alg: crc32      #support crc16(default) and crc32
  rep: hex        #support dec(default) and hex

本地搜索系统

  1. 安装依赖:前往博客根目录

    1
    
    npm install hexo-generator-search --save
    

    注入配置:修改站点配置文件_config.yml,添加如下代码:

    1
    2
    3
    4
    5
    
    # 本地搜索:https://github.com/wzpan/hexo-generator-search
    search:
      path: search.xml
      field: all
      content: true
    

    主题中开启搜索:在主题配置文件_config.butterfly.yml中修改以下内容:

    1
    2
    3
    
    local_search:
    -  enable: false
    +  enable: true
    

    重新编译运行,即可看到效果:前往博客根目录,打开cmd命令窗口依次执行如下命令:

    1
    
    hexo cl && hexo g && hexo s
    

百度主动推送 undo

1
npm install hexo-baidu-url-submit --save

在_config.yml文件中添加如下

1
2
3
4
5
6
deploy:
  - type: 'git'
    repository: 
      github: git@github.com:ktzxy/ktzxy.github.io.git
    branch: main
  - type: baidu_url_submitter #这是新加的百度主动推送
1
2
3
4
5
6
7
# 百度主动推送
# https://github.com/huiwang/hexo-baidu-url-submit
baidu_url_submit:
  count: 1        # 提交最新的多少个链接
  host: blog.anheyu.com  # 在百度站长平台中添加的域名
  token: Rgem9kAECSLflQq6   # 秘钥
  path: baidu_urls.txt   # 文本文档的地址, 新链接会保存在此文本文档里

Live2D教程(店长)

安装

  1. 在Hexo根目录[BlogRoot]下打开终端,输入以下指令安装必要插件:

    1
    
    npm install --save hexo-helper-live2d
    
  2. 打开站点配置文件[BlogRoot]\config.yml 搜索live2d,按照如下注释内容指示进行操作。 如果没有搜到live2d的配置项,就直接把以下内容复制到最底部。

     1
     2
     3
     4
     5
     6
     7
     8
     9
    10
    11
    12
    13
    14
    15
    16
    17
    18
    19
    20
    21
    22
    23
    24
    
    # Live2D
    ## https://github.com/EYHN/hexo-helper-live2d
    live2d:
      enable: true #开关插件版看板娘
      scriptFrom: local # 默认
      pluginRootPath: live2dw/ # 插件在站点上的根目录(相对路径)
      pluginJsPath: lib/ # 脚本文件相对与插件根目录路径
      pluginModelPath: assets/ # 模型文件相对与插件根目录路径
      # scriptFrom: jsdelivr # jsdelivr CDN
      # scriptFrom: unpkg # unpkg CDN
      # scriptFrom: https://npm.elemecdn.com/live2d-widget@3.x/lib/L2Dwidget.min.js # 你的自定义 url
      tagMode: false # 标签模式, 是否仅替换 live2d tag标签而非插入到所有页面中
      debug: false # 调试, 是否在控制台输出日志
      model:
        use: live2d-widget-model-shizuku # npm-module package name
        # use: wanko # 博客根目录/live2d_models/ 下的目录名
        # use: ./wives/wanko # 相对于博客根目录的路径
        # use: https://npm.elemecdn.com/live2d-widget-model-wanko@1.0.5/assets/wanko.model.json # 你的自定义 url
      display:
        position: right #控制看板娘位置
        width: 150 #控制看板娘大小
        height: 300 #控制看板娘大小
      mobile:
        show: false # 手机中是否展示
    
  3. 完成后保存修改,在Hexo根目录下运行指令。

    1
    2
    3
    
    hexo clean
    hexo g
    hexo s
    

之所以必须要使用hexo clean是因为我们需要清空缓存重新生成静态页面,不然看板娘没被加入生成的静态页面里,是不会出现的。

更换

  1. 同样是在Hexo根目录[BlogRoot]下,打开终端,选择想要的看板娘进行安装,例如我这里用到的是 live2d-widget-model-koharu,一个Q版小正太。其他的模型也可以在模型预览里查看以供选择。

  2. Hexo添加Live2D看板娘+模型预览_hexo博客看板娘预览-CSDN博客

  3. 输入指令

    1
    2
    3
    
    npm install --save live2d-widget-model-koharu
    
    #npm install --save live2d-widget-model-shizuku
    
  4. 然后在站点配置文件[BlogRoot]\_config.yml里找到model项修改为期望的模型

    1
    2
    3
    
    model:
      use: live2d-widget-model-shizuku
      # 默认为live2d-widget-model-wanko
    
  5. 之后按部就班的运行

    1
    2
    3
    
    hexo clean
    hexo g
    hexo s
    

    就能在localhost:4000上查看效果了。

卸载看板娘

卸载插件和卸载模型的指令都是通过npm进行操作的。在博客根目录[BlogRoot]打开终端,输入:

1
2
npm uninstall hexo-helper-live2d #卸载看板娘插件
npm uninstall live2d-widget-model-modelname #卸载看板娘模型。记得替换modelname为看板娘名称

卸载后为了保证配置项不出错,记得把[BlogRoot]\_config.yml里的配置项给注释或者删除掉。

sitemap

1
2
npm install hexo-generator-sitemap --save
npm install hexo-generator-baidu-sitemap --save-dev

站点配置文件[BlogRoot]\_config.yml

 1
 2
 3
 4
 5
 6
 7
 8
 9
10
11
# https://github.com/hexojs/hexo-generator-sitemap
# Sitemap主要是为了让搜索引擎更加了解清楚你的网站结构,通过你的网站结构更改对你网站的抓取策略,同时更深层次的抓取你的链接。让你的网站有更多的收录。
sitemap:
  path: sitemap.xml
  rel: false
  tags: true
  categories: true

# https://github.com/coneycode/hexo-generator-baidu-sitemap
baidusitemap:
    path: baidusitemap.xml

Rss

1
npm install hexo-generator-feed --save
1
2
3
4
5
6
7
# https://github.com/hexojs/hexo-generator-feed
#Feed Atom
feed:
    type: atom
    path: atom.xml
    limit: 20
rss: /atom.xml

*追番插件(vmid未设置)undo

1
npm install hexo-bilibili-bangumi --save
 1
 2
 3
 4
 5
 6
 7
 8
 9
10
11
12
13
14
15
16
17
18
19
20
21
22
23
24
25
26
27
28
29
30
31
32
# 追番插件
# https://github.com/HCLonely/hexo-bilibili-bangumi
bangumi: # 追番设置
  enable: true
  path:
  vmid: 372204786
  title: '追番列表'
  quote: '生命不息,追番不止!'
  show: 1
  lazyload: false
  loading:
  metaColor:
  color:
  webp:
  progress:
  extra_options:
    key: value
cinema: # 追剧设置
  enable: false
  path:
  vmid: 372204786
  title: '追剧列表'
  quote: '生命不息,追剧不止!'
  show: 1
  lazyload: true
  loading:
  metaColor:
  color:
  webp:
  progress:
  extra_options:
    key: value

番剧更新

1
hexo bangumi -u

aplayer音乐播放器

  1. 在博客根目录[BlogRoot]下打开终端,运行以下指令:

    1
    
    npm install hexo-tag-aplayer --save
    
  2. 在网站配置文件_config.yml中修改aplayer 配置项为:

    1
    2
    3
    4
    5
    
    # APlayer 吸底音乐
    # https://github.com/MoePlayer/hexo-tag-aplayer/blob/master/docs/README-zh_cn.md
    aplayer:
      meting: true
      asset_inject: false
    
  3. 在主题配置文件_config.butterfly.yml中修改aplayerInject配置项为:

    1
    2
    3
    4
    
    # Inject the css and script (aplayer/meting)
    aplayerInject:
      enable: true
      per_page: false
    
  4. 在你想要加入音乐播放器的页面加入以下语句:

    1
    2
    
    # aplayer音乐
    - <div class="aplayer no-destroy" data-id="8152976493" data-server="netease" data-type="playlist"   data-order="list" data-fixed="true" data-preload="auto" data-autoplay="false" data-mutex="true" ></div>
    

    其中data-id为歌单ID可以换为你喜欢的歌曲,其他参数见详情页这里不再赘述!

pwa配置 undo 有问题

插件安装

 1
 2
 3
 4
 5
 6
 7
 8
 9
10
11
12
13
14
15
16
17
18
19
npm install --global gulp-cli # 全局安装gulp命令集
npm install workbox-build gulp --save # 安装workbox和gulp插件

# 压缩html插件
npm install gulp-htmlclean --save-dev
npm install --save gulp-htmlmin
# 压缩css插件
npm install gulp-clean-css --save-dev
# 压缩js插件
# 使用babel压缩js,与terser二选一
npm install --save-dev gulp-uglify
npm install --save-dev gulp-babel @babel/core @babel/preset-env
# 使用terser压缩js,与babel二选一 推荐
npm install gulp-terser --save-dev
npm install --save-dev gulp-babel @babel/core @babel/preset-env
# 压缩图片插件
npm install --save-dev gulp-imagemin
# 压缩字体插件(font-min仅支持压缩ttf格式的字体包)
npm install gulp-fontmin --save-dev

关于 font-min 的补充说明,在本文中,是通过读取所有编译好的 html 文件(./public/*/.html)中的字符,然后匹配原有字体包内./public/fonts/.ttf 字体样式,输出压缩后的字体包到./public/fontsdest/目录。所以最终引用字体的相对路径应该是/fontsdest/.ttf。而本地测试时,如果没有运行 gulp,自然也就不会输出压缩字体包到 public 目录,也就看不到字体样式。

gulp-terser 只会直接压缩 js 代码,所以不存在因为语法变动导致的错误 。事实上,当我们使用 jsdelivr 的 CDN 服务时,只需要在 css 或者 js 的后缀前添加.min,例如 example.js->example.min.js,JsDelivr 就会自动使用 terser 帮我们压缩好代码。

在 package.json 中添加

1
"type": "module",

创建gulpfile.js 在 Hexo 的根目录,创建一个gulpfile.js文件,打开[Blogroot]/gulpfile.js,

  1
  2
  3
  4
  5
  6
  7
  8
  9
 10
 11
 12
 13
 14
 15
 16
 17
 18
 19
 20
 21
 22
 23
 24
 25
 26
 27
 28
 29
 30
 31
 32
 33
 34
 35
 36
 37
 38
 39
 40
 41
 42
 43
 44
 45
 46
 47
 48
 49
 50
 51
 52
 53
 54
 55
 56
 57
 58
 59
 60
 61
 62
 63
 64
 65
 66
 67
 68
 69
 70
 71
 72
 73
 74
 75
 76
 77
 78
 79
 80
 81
 82
 83
 84
 85
 86
 87
 88
 89
 90
 91
 92
 93
 94
 95
 96
 97
 98
 99
100
101
102
103
104
105
106
107
108
109
110
111
112
113
114
115
116
117
118
119
120
121
122
123
124
125
126
127
128
129
130
131
/*
 * @Description: gulp
 * @Author: 蓝桉
 * pwa配置文件
 */
import gulp from "gulp";
import cleanCSS from "gulp-clean-css";
import htmlmin from "gulp-htmlmin";
import htmlclean from "gulp-htmlclean";
import workbox from "workbox-build";
import fontmin from "gulp-fontmin";

// 若使用babel压缩js,则取消下方注释,并注释terser的代码
// var uglify = require('gulp-uglify');
// var babel = require('gulp-babel');

// 若使用terser压缩js
import terser from "gulp-terser";

//pwa
gulp.task("generate-service-worker", () => {
  return workbox.injectManifest({
    swSrc: "./sw-template.js",
    swDest: "./public/sw.js",
    globDirectory: "./public",
    globPatterns: [
      // 缓存所有以下类型的文件,极端不推荐
      // "**/*.{html,css,js,json,woff2,xml}"
      // 推荐只缓存404,主页和主要样式和脚本。
      "404.html",
      "index.html",
      "js/main.js",
      "css/index.css",
    ],
    modifyURLPrefix: {
      "": "./",
    },
  });
});

//minify js babel
// 若使用babel压缩js,则取消下方注释,并注释terser的代码
// gulp.task('compress', () =>
//   gulp.src(['./public/**/*.js', '!./public/**/*.min.js'])
// 		.pipe(babel({
// 			presets: ['@babel/preset-env']
// 		}))
//     .pipe(uglify().on('error', function(e){
//       console.log(e);
//     }))
// 		.pipe(gulp.dest('./public'))
// );

// minify js - gulp-tester
// 若使用terser压缩js
gulp.task("compress", () =>
  gulp
    .src([
      "./public/**/*.js",
      "!./public/**/*.min.js",
      "!./public/js/custom/galmenu.js",
      "!./public/js/custom/gitcalendar.js",
    ])
    .pipe(terser())
    .pipe(gulp.dest("./public"))
);

//css
gulp.task("minify-css", () => {
  return gulp
    .src("./public/**/*.css")
    .pipe(
      cleanCSS({
        compatibility: "ie11",
      })
    )
    .pipe(gulp.dest("./public"));
});

// 压缩 public 目录内 html
gulp.task("minify-html", () => {
  return gulp
    .src("./public/**/*.html")
    .pipe(htmlclean())
    .pipe(
      htmlmin({
        removeComments: true, //清除 HTML 註释
        collapseWhitespace: true, //压缩 HTML
        collapseBooleanAttributes: true, //省略布尔属性的值 <input checked="true"/> ==> <input />
        removeEmptyAttributes: true, //删除所有空格作属性值 <input id="" /> ==> <input />
        removeScriptTypeAttributes: true, //删除 <script>  type="text/javascript"
        removeStyleLinkTypeAttributes: true, //删除 <style>  <link>  type="text/css"
        minifyJS: true, //压缩页面 JS
        minifyCSS: true, //压缩页面 CSS
        minifyURLs: true,
      })
    )
    .pipe(gulp.dest("./public"));
});

//压缩字体
function minifyFont(text, cb) {
  gulp
    .src("./public/fonts/*.ttf") //原字体所在目录
    .pipe(
      fontmin({
        text: text,
      })
    )
    .pipe(gulp.dest("./public/fontsdest/")) //压缩后的输出目录
    .on("end", cb);
}

gulp.task("mini-font", cb => {
  var buffers = [];
  gulp
    .src(["./public/**/*.html"]) //HTML文件所在目录请根据自身情况修改
    .on("data", function (file) {
      buffers.push(file.contents);
    })
    .on("end", function () {
      var text = Buffer.concat(buffers).toString("utf-8");
      minifyFont(text, cb);
    });
});

// 执行 gulp 命令时执行的任务
gulp.task(
  "default",
  gulp.series("generate-service-worker", gulp.parallel("compress", "minify-html", "minify-css", "mini-font"))
);

创建在 Hexo 的根目录,创建一个sw-template.js文件,打开[Blogroot]/sw-template.js,输入以下内容:

  1
  2
  3
  4
  5
  6
  7
  8
  9
 10
 11
 12
 13
 14
 15
 16
 17
 18
 19
 20
 21
 22
 23
 24
 25
 26
 27
 28
 29
 30
 31
 32
 33
 34
 35
 36
 37
 38
 39
 40
 41
 42
 43
 44
 45
 46
 47
 48
 49
 50
 51
 52
 53
 54
 55
 56
 57
 58
 59
 60
 61
 62
 63
 64
 65
 66
 67
 68
 69
 70
 71
 72
 73
 74
 75
 76
 77
 78
 79
 80
 81
 82
 83
 84
 85
 86
 87
 88
 89
 90
 91
 92
 93
 94
 95
 96
 97
 98
 99
100
101
/*
 * @Description: sw
 * @Author: 蓝桉
 * pwa配置文件
 */
const workboxVersion = "5.1.3";

importScripts(`https://storage.googleapis.com/workbox-cdn/releases/${workboxVersion}/workbox-sw.js`);

workbox.core.setCacheNameDetails({
  prefix: "蓝桉",
});

workbox.core.skipWaiting();

workbox.core.clientsClaim();

// 注册成功后要立即缓存的资源列表
// 具体缓存列表在gulpfile.js中配置,见下文
workbox.precaching.precacheAndRoute(self.__WB_MANIFEST, {
  directoryIndex: null,
});

// 清空过期缓存
workbox.precaching.cleanupOutdatedCaches();

// 图片资源(可选,不需要就注释掉)
// workbox.routing.registerRoute(
//   /\.(?:png|jpg|jpeg|gif|bmp|webp|svg|ico)$/,
//   new workbox.strategies.CacheFirst({
//     cacheName: 'images',
//     plugins: [
//       new workbox.expiration.ExpirationPlugin({
//         maxEntries: 1000,
//         maxAgeSeconds: 60 * 60 * 24 * 30,
//       }),
//       new workbox.cacheableResponse.CacheableResponsePlugin({
//         statuses: [0, 200],
//       }),
//     ],
//   })
// )

// 字体文件(可选,不需要就注释掉)
workbox.routing.registerRoute(
  /\.(?:eot|ttf|woff|woff2)$/,
  new workbox.strategies.CacheFirst({
    cacheName: "fonts",
    plugins: [
      new workbox.expiration.ExpirationPlugin({
        maxEntries: 1000,
        maxAgeSeconds: 60 * 60 * 24 * 30,
      }),
      new workbox.cacheableResponse.CacheableResponsePlugin({
        statuses: [0, 200],
      }),
    ],
  })
);

// 谷歌字体(可选,不需要就注释掉)
workbox.routing.registerRoute(
  /^https:\/\/fonts\.googleapis\.com/,
  new workbox.strategies.StaleWhileRevalidate({
    cacheName: "google-fonts-stylesheets",
  })
);
workbox.routing.registerRoute(
  /^https:\/\/fonts\.gstatic\.com/,
  new workbox.strategies.CacheFirst({
    cacheName: "google-fonts-webfonts",
    plugins: [
      new workbox.expiration.ExpirationPlugin({
        maxEntries: 1000,
        maxAgeSeconds: 60 * 60 * 24 * 30,
      }),
      new workbox.cacheableResponse.CacheableResponsePlugin({
        statuses: [0, 200],
      }),
    ],
  })
);

// jsdelivr的CDN资源(可选,不需要就注释掉)
// workbox.routing.registerRoute(
//   /^https:\/\/cdn\.jsdelivr\.net/,
//   new workbox.strategies.CacheFirst({
//     cacheName: 'static-libs',
//     plugins: [
//       new workbox.expiration.ExpirationPlugin({
//         maxEntries: 1000,
//         maxAgeSeconds: 60 * 60 * 24 * 30,
//       }),
//       new workbox.cacheableResponse.CacheableResponsePlugin({
//         statuses: [0, 200],
//       }),
//     ],
//   })
// )

workbox.googleAnalytics.initialize();

在[Blogroot]\themes\butterfly\layout\includes\third-party\目录下新建pwanotice.pug文件, 打开[Blogroot]\themes\butterfly\layout\includes\third-party\pwanotice.pug,输入:

 1
 2
 3
 4
 5
 6
 7
 8
 9
10
11
12
13
14
15
16
17
18
19
20
21
22
23
24
25
26
27
28
29
30
31
32
33
34
35
36
37
38
39
40
41
42
43
#app-refresh.app-refresh(style='position: fixed;top: -2.2rem;left: 0;right: 0;z-index: 99999;padding: 0 1rem;font-size: 15px;height: 2.2rem;transition: all 0.3s ease;')
  .app-refresh-wrap(style=' display: flex;color: #fff;height: 100%;align-items: center;justify-content: center;')
    label  有新文章啦! 👉
    a(href='javascript:void(0)' onclick='location.reload()')
      span(style='color: #fff;text-decoration: underline;cursor: pointer;') 🍗点击食用🍔
script.
  if ('serviceWorker' in navigator) {
  if (navigator.serviceWorker.controller) {
  navigator.serviceWorker.addEventListener('controllerchange', function() {
  showNotification()
  })
  }
  window.addEventListener('load', function() {
  navigator.serviceWorker.register('/sw.js')
  })
  }
  function showNotification() {
  if (GLOBAL_CONFIG.Snackbar) {
  var snackbarBg =
  document.documentElement.getAttribute('data-theme') === 'light' ?
  GLOBAL_CONFIG.Snackbar.bgLight :
  GLOBAL_CONFIG.Snackbar.bgDark
  var snackbarPos = GLOBAL_CONFIG.Snackbar.position
  Snackbar.show({
  text: '✨ 有新文章啦! 👉',
  backgroundColor: snackbarBg,
  duration: 500000,
  pos: snackbarPos,
  actionText: '🍗点击食用🍔',
  actionTextColor: '#fff',
  onActionClick: function(e) {
  location.reload()
  },
  })
  } else {
  var showBg =
  document.documentElement.getAttribute('data-theme') === 'light' ?
  '#3b70fc' :
  '#1f1f1f'
  var cssText = `top: 0; background: ${showBg};`
  document.getElementById('app-refresh').style.cssText = cssText
  }
  }

修改[Blogroot]\themes\butterfly\layout\includes\additional-js.pug,在文件底部添加以下内容,注意缩进。butterfly_v3.6.0取消了缓存配置,转为完全默认,需要将{cache:theme.fragment_cache}改为{cache: true}:

1
2
3
4
5
6
7
      if theme.pjax.enable
        !=partial('includes/third-party/pjax', {}, {cache:theme.fragment_cache})

      !=partial('includes/third-party/baidu_push', {}, {cache:theme.fragment_cache})

+     if theme.pwa.enable
+       !=partial('includes/third-party/pwanotice', {}, {cache: true})

将你的图标包移入相应的目录,例如我是/img/siteicon/,所以放到[Blogroot]/source/img/siteicon/目录下。

新建文件名为manifest.json并将其放到[Blogroot]/source目录下,此时还不能直接用,需要添加一些内容,以下是我的manifest.json配置内容,权且作为参考,其中的theme_color建议用取色器取设计的图标的主色调,同时务必配置 start_url 和 name 的配置项,这关系到你之后能否看到浏览器的应用安装按钮。:

 1
 2
 3
 4
 5
 6
 7
 8
 9
10
11
12
13
14
15
16
17
18
19
20
21
22
23
24
25
26
27
28
29
30
31
32
33
34
35
36
37
38
39
40
41
42
43
44
45
46
47
{
  "name": "蓝桉`Blog",
  "short_name": "蓝桉",
  "theme_color": "#3b70fc",
  "background_color": "#3b70fc",
  "display": "standalone",
  "scope": "/",
  "start_url": "/",
  "icons": [
    {
      "src": "/img/siteicon/16.png",
      "sizes": "16x16",
      "type": "image/png"
    },
    {
      "src": "/img/siteicon/32.png",
      "sizes": "32x32",
      "type": "image/png"
    },
    {
      "src": "/img/siteicon/48.png",
      "sizes": "48x48",
      "type": "image/png"
    },
    {
      "src": "/img/siteicon/64.png",
      "sizes": "64x64",
      "type": "image/png"
    },
    {
      "src": "/img/siteicon/128.png",
      "sizes": "128x128",
      "type": "image/png"
    },
    {
      "src": "/img/siteicon/144.png",
      "sizes": "144x144",
      "type": "image/png"
    },
    {
      "src": "/img/siteicon/512.png",
      "sizes": "512x512",
      "type": "image/png"
    }
  ],
  "splash_pages": null
}

打开主题配置文件[Blogroot]/_config.butterfly.yml,找到PWA配置项。添加图标路径。这里的 theme_color 建议改成你图标的主色调,包括manifest.json中的theme_color也是如此。

1
2
3
4
5
6
7
8
pwa:
  enable: true
  manifest: /manifest.json
  theme_color: "#3b70fc"
  apple_touch_icon: /img/siteicon/128.png
  favicon_32_32: /img/siteicon/32.png
  favicon_16_16: /img/siteicon/16.png
  mask_icon: /img/siteicon/128.png
1
hexo cl;hexo g;gulp;hexo s

留言板:薇尔莉特信封

  1. [BlogRoot]运行指令

    1
    
    npm install hexo-butterfly-envelope --save
    
  2. 在站点配置文件_config.yml主题配置文件_config.butterfly.yml添加以下配置项

     1
     2
     3
     4
     5
     6
     7
     8
     9
    10
    11
    12
    13
    14
    15
    16
    17
    18
    19
    20
    
    # envelope_comment
    # see https://akilar.top/posts/e2d3c450/
    envelope_comment:
      enable: true #控制开关
      custom_pic:      
        cover: https://npm.elemecdn.com/hexo-butterfly-envelope/lib/violet.jpg #信笺头部图片
        line: https://npm.elemecdn.com/hexo-butterfly-envelope/lib/line.png #信笺底部图片
        beforeimg: https://npm.elemecdn.com/hexo-butterfly-envelope/lib/before.png # 信封前半部分
        afterimg: https://npm.elemecdn.com/hexo-butterfly-envelope/lib/after.png # 信封后半部分
      message: #信笺正文,多行文本,写法如下
        - 有什么想问的?
        - 有什么想说的?
        - 有什么想吐槽的?
        - 哪怕是有什么想吃的,都可以告诉我哦~
      bottom: 自动书记人偶竭诚为您服务! #仅支持单行文本
      height: #1050px,信封划出的高度
      path: #【可选】comments 的路径名称。默认为 comments,生成的页面为 comments/index.html
      front_matter: #【可选】comments页面的 front_matter 配置
        title: 留言板
        comments: true
    
1
留言板: /comments/ || fas fa-envelope

wowjs动画

  1. 安装插件,在博客根目录[BlogRoot]下打开终端,运行以下指令:

    1
    
    npm install hexo-butterfly-wowjs --save
    
  2. 添加配置信息,以下为写法示例 在站点配置文件_config.yml或者主题配置文件_config.butterfly.yml中添加

     1
     2
     3
     4
     5
     6
     7
     8
     9
    10
    11
    12
    13
    14
    15
    16
    17
    18
    19
    20
    21
    22
    23
    24
    25
    26
    27
    28
    29
    30
    31
    32
    33
    34
    
    wowjs:
      enable: true #控制动画开关。true是打开,false是关闭
      priority: 10 #过滤器优先级
      mobile: false #移动端是否启用,默认移动端禁用
      animateitem:
        - class: recent-post-item #必填项,需要添加动画的元素的class
          style: animate__zoomIn #必填项,需要添加的动画
          duration: 1.5s #选填项,动画持续时间,单位可以是ms也可以是s。例如3s,700ms。
          delay: 200ms #选填项,动画开始的延迟时间,单位可以是ms也可以是s。例如3s,700ms。
          offset: 30 #选填项,开始动画的距离(相对浏览器底部)
          iteration: 1 #选填项,动画重复的次数
        - class: card-widget
          style: animate__zoomIn
          delay: 200ms
        # - class: flink-list-card
        #   style: wowpanels
        - class: flink-list-card
          style: animate__flipInY
          duration: 3s
        - class: flink-list-card
          style: animate__animated
          duration: 3s
        - class: article-sort-item
          style: animate__slideInRight
          duration: 1.5s
        - class: site-card
          style: animate__flipInY
          duration: 3s
        - class: site-card
          style: animate__animated
          duration: 3s
      animate_css: https://cdn.cbd.int/hexo-butterfly-wowjs/lib/animate.min.css
      wow_js: https://cdn.cbd.int/hexo-butterfly-wowjs/lib/wow.min.js
      wow_init_js: https://cdn.cbd.int/hexo-butterfly-wowjs/lib/wow_init.js
    
  3. 参数释义

参数备选值/类型释义
enabletrue/false【必选】控制开关
prioritynumber【可选】过滤器优先级,数值越小,执行越早,默认为10,选填
mobiletrue/false控制移动端是否启用,默认移动端禁用
animateitem.classclass【可选】添加动画类名,只支持给class添加
animateitem.styletext【可选】动画样式,具体类型参考animate.css
animateitem.durationtime,单位为s或ms【可选】动画持续时间,单位可以是ms也可以是s。例如3s,700ms。
animateitem.delaytime,单位为s或ms【可选】动画开始的延迟时间,单位可以是ms也可以是s。例如3s,700ms。
animateitem.offsetnumber,单位为px【可选】开始动画的距离(相对浏览器底部)。
animateitem.iterationnumber,单位为s或ms【可选】动画重复的次数
animate_cssURL【可选】animate.css的CDN链接,默认为https://npm.elemecdn.com/hexo-butterfly-wowjs/lib/animate.min.css
wow_jsURL【可选】wow.min.js的CDN链接,默认为https://npm.elemecdn.com/hexo-butterfly-wowjs/lib/wow.min.js
wow_init_jsURL【可选】wow_init.js的CDN链接,默认为https://npm.elemecdn.com/hexo-butterfly-wowjs/lib/wow_init.js

wowjs详细用法见原帖。

配置自定义css,一图流

参考安知鱼博客

  1. [BlogRoot]\source文件夹下新建一个文件夹css,该文件夹用于存放自定义的css样式,再新建一个名为custom.css,在里面写入以下代码:

      1
      2
      3
      4
      5
      6
      7
      8
      9
     10
     11
     12
     13
     14
     15
     16
     17
     18
     19
     20
     21
     22
     23
     24
     25
     26
     27
     28
     29
     30
     31
     32
     33
     34
     35
     36
     37
     38
     39
     40
     41
     42
     43
     44
     45
     46
     47
     48
     49
     50
     51
     52
     53
     54
     55
     56
     57
     58
     59
     60
     61
     62
     63
     64
     65
     66
     67
     68
     69
     70
     71
     72
     73
     74
     75
     76
     77
     78
     79
     80
     81
     82
     83
     84
     85
     86
     87
     88
     89
     90
     91
     92
     93
     94
     95
     96
     97
     98
     99
    100
    101
    102
    103
    104
    105
    106
    107
    108
    109
    110
    111
    112
    113
    114
    115
    116
    117
    118
    119
    120
    121
    122
    123
    124
    125
    126
    127
    128
    129
    130
    131
    132
    133
    134
    135
    136
    137
    138
    139
    140
    141
    142
    143
    144
    145
    146
    147
    148
    149
    150
    151
    152
    153
    154
    155
    156
    157
    158
    159
    160
    161
    162
    163
    164
    165
    166
    167
    168
    169
    170
    171
    172
    173
    174
    175
    176
    177
    178
    179
    180
    181
    182
    183
    184
    185
    186
    187
    188
    189
    190
    191
    192
    193
    194
    195
    196
    197
    198
    199
    200
    201
    202
    203
    204
    205
    206
    207
    208
    209
    210
    211
    212
    213
    214
    215
    216
    217
    218
    219
    220
    221
    222
    223
    224
    225
    226
    227
    228
    229
    230
    231
    232
    233
    234
    235
    236
    237
    238
    239
    240
    241
    242
    243
    244
    245
    246
    247
    248
    249
    250
    251
    252
    253
    254
    255
    256
    257
    258
    259
    260
    261
    262
    263
    264
    265
    266
    267
    268
    269
    270
    271
    272
    273
    274
    275
    276
    277
    278
    279
    280
    281
    282
    283
    284
    285
    286
    287
    288
    289
    290
    291
    292
    293
    294
    295
    296
    297
    298
    299
    300
    301
    302
    303
    304
    305
    306
    307
    308
    309
    310
    311
    312
    313
    314
    315
    316
    317
    318
    319
    320
    321
    322
    323
    324
    325
    326
    327
    328
    329
    330
    331
    332
    333
    334
    335
    336
    337
    338
    339
    340
    341
    342
    343
    344
    345
    346
    347
    348
    349
    350
    351
    352
    353
    354
    355
    356
    357
    358
    359
    360
    361
    362
    363
    364
    365
    366
    367
    368
    369
    370
    371
    
    /* 自定义样式 */
    /* @font-face {
      font-family: Candyhome;
      src: url(https://npm.elemecdn.com/anzhiyu-blog@1.1.6/fonts/Candyhome.ttf);
      font-display: swap;
      font-weight: lighter;
    } */
    @font-face {
      font-family: ZhuZiAYuanJWD;
      src: url(https://npm.elemecdn.com/anzhiyu-blog@1.1.6/fonts/ZhuZiAWan.woff2);
      font-display: swap;
      font-weight: lighter;
    }
    
    div#menus {
      font-family: "ZhuZiAYuanJWD";
    }
    h1#site-title {
      font-family: ZhuZiAYuanJWD;
      font-size: 3em !important;
    }
    a.article-title,
    a.blog-slider__title,
    a.categoryBar-list-link,
    h1.post-title {
      font-family: ZhuZiAYuanJWD;
    }
    
    .iconfont {
      font-family: "iconfont" !important;
      font-size: 3em;
      /* 可以定义图标大小 */
      font-style: normal;
      -webkit-font-smoothing: antialiased;
      -moz-osx-font-smoothing: grayscale;
    }
    
    /* 时间轴生肖icon */
    svg.icon {
      /* 这里定义svg.icon,避免和Butterfly自带的note标签冲突 */
      width: 1em;
      height: 1em;
      /* width和height定义图标的默认宽度和高度*/
      vertical-align: -0.15em;
      fill: currentColor;
      overflow: hidden;
    }
    
    .icon-zhongbiao::before {
      color: #f7c768;
    }
    
    /* bilibli番剧插件 */
    #article-container .bangumi-tab.bangumi-active {
      background: var(--anzhiyu-theme);
      color: var(--anzhiyu-ahoverbg);
      border-radius: 10px;
    }
    a.bangumi-tab:hover {
      text-decoration: none !important;
    }
    .bangumi-button:hover {
      background: var(--anzhiyu-theme) !important;
      border-radius: 10px !important;
      color: var(--anzhiyu-ahoverbg) !important;
    }
    a.bangumi-button.bangumi-nextpage:hover {
      text-decoration: none !important;
    }
    .bangumi-button {
      padding: 5px 10px !important;
    }
    
    a.bangumi-tab {
      padding: 5px 10px !important;
    }
    svg.icon.faa-tada {
      font-size: 1.1em;
    }
    .bangumi-info-item {
      border-right: 1px solid #f2b94b;
    }
    .bangumi-info-item span {
      color: #f2b94b;
    }
    .bangumi-info-item em {
      color: #f2b94b;
    }
    
    /* 解决artitalk的图标问题 */
    #uploadSource > svg {
      width: 1.19em;
      height: 1.5em;
    }
    
    /*top-img黑色透明玻璃效果移除,不建议加,除非你执着于完全一图流或者背景图对比色明显 */
    #page-header:not(.not-top-img):before {
      background-color: transparent !important;
    }
    
    /* 首页文章卡片 */
    #recent-posts > .recent-post-item {
      background: rgba(255, 255, 255, 0.9);
    }
    
    /* 首页侧栏卡片 */
    #aside-content .card-widget {
      background: rgba(255, 255, 255, 0.9);
    }
    
    /* 文章页面正文背景 */
    div#post {
      background: rgba(255, 255, 255, 0.9);
    }
    
    /* 分页页面 */
    div#page {
      background: rgba(255, 255, 255, 0.9);
    }
    
    /* 归档页面 */
    div#archive {
      background: rgba(255, 255, 255, 0.9);
    }
    
    /* 标签页面 */
    div#tag {
      background: rgba(255, 255, 255, 0.9);
    }
    
    /* 分类页面 */
    div#category {
      background: rgba(255, 255, 255, 0.9);
    }
    
    /*夜间模式伪类遮罩层透明*/
    [data-theme="dark"] #recent-posts > .recent-post-item {
      background: #121212;
    }
    
    [data-theme="dark"] .card-widget {
      background: #121212 !important;
    }
    
    [data-theme="dark"] div#post {
      background: #121212 !important;
    }
    
    [data-theme="dark"] div#tag {
      background: #121212 !important;
    }
    
    [data-theme="dark"] div#archive {
      background: #121212 !important;
    }
    
    [data-theme="dark"] div#page {
      background: #121212 !important;
    }
    
    [data-theme="dark"] div#category {
      background: #121212 !important;
    }
    
    [data-theme="dark"] div#category {
      background: transparent !important;
    }
    /* 页脚透明 */
    #footer {
      background: transparent !important;
    }
    
    /* 头图透明 */
    #page-header {
      background: transparent !important;
    }
    
    #rightside > div > button {
      border-radius: 5px;
    }
    
    /* 滚动条 */
    
    ::-webkit-scrollbar {
      width: 10px;
      height: 10px;
    }
    
    ::-webkit-scrollbar-thumb {
      background-color: #3b70fc;
      border-radius: 2em;
    }
    
    ::-webkit-scrollbar-corner {
      background-color: transparent;
    }
    
    ::-moz-selection {
      color: #fff;
      background-color: #3b70fc;
    }
    
    /* 音乐播放器 */
    
    /* .aplayer .aplayer-lrc {
      display: none !important;
    } */
    
    .aplayer.aplayer-fixed.aplayer-narrow .aplayer-body {
      left: -66px !important;
      transition: all 0.3s;
      /* 默认情况下缩进左侧66px,只留一点箭头部分 */
    }
    
    .aplayer.aplayer-fixed.aplayer-narrow .aplayer-body:hover {
      left: 0 !important;
      transition: all 0.3s;
      /* 鼠标悬停是左侧缩进归零,完全显示按钮 */
    }
    
    .aplayer.aplayer-fixed {
      z-index: 999999 !important;
    }
    
    /* 评论框  */
    .vwrap {
      box-shadow: 2px 2px 5px #bbb;
      background: rgba(255, 255, 255, 0.3);
      border-radius: 8px;
      padding: 30px;
      margin: 30px 0px 30px 0px;
    }
    
    /* 设置评论框 */
    
    .vcard {
      box-shadow: 2px 2px 5px #bbb;
      background: rgba(255, 255, 255, 0.3);
      border-radius: 8px;
      padding: 30px;
      margin: 30px 0px 0px 0px;
    }
    
    /* md网站下划线 */
    #article-container a:hover {
      text-decoration: none !important;
    }
    
    #article-container #hpp_talk p img {
      display: inline;
    }
    
    /* 404页面 */
    #error-wrap {
      position: absolute;
      top: 40%;
      right: 0;
      left: 0;
      margin: 0 auto;
      padding: 0 1rem;
      max-width: 1000px;
      transform: translate(0, -50%);
    }
    
    #error-wrap .error-content {
      display: flex;
      flex-direction: row;
      justify-content: center;
      align-items: center;
      margin: 0 1rem;
      height: 18rem;
      border-radius: 8px;
      background: var(--card-bg);
      box-shadow: var(--card-box-shadow);
      transition: all 0.3s;
    }
    
    #error-wrap .error-content .error-img {
      box-flex: 1;
      flex: 1;
      height: 100%;
      border-top-left-radius: 8px;
      border-bottom-left-radius: 8px;
      background-color: #3b70fc;
      background-position: center;
      background-size: cover;
    }
    
    #error-wrap .error-content .error-info {
      box-flex: 1;
      flex: 1;
      padding: 0.5rem;
      text-align: center;
      font-size: 14px;
      font-family: Titillium Web, "PingFang SC", "Hiragino Sans GB", "Microsoft JhengHei", "Microsoft YaHei", sans-serif;
    }
    #error-wrap .error-content .error-info .error_title {
      margin-top: -4rem;
      font-size: 9em;
    }
    #error-wrap .error-content .error-info .error_subtitle {
      margin-top: -3.5rem;
      word-break: break-word;
      font-size: 1.6em;
    }
    #error-wrap .error-content .error-info a {
      display: inline-block;
      margin-top: 0.5rem;
      padding: 0.3rem 1.5rem;
      background: var(--btn-bg);
      color: var(--btn-color);
    }
    
    #body-wrap.error .aside-list {
      display: flex;
      flex-direction: row;
      flex-wrap: nowrap;
      bottom: 0px;
      position: absolute;
      padding: 1rem;
      width: 100%;
      overflow: scroll;
    }
    
    #body-wrap.error .aside-list .aside-list-group {
      display: flex;
      flex-direction: row;
      flex-wrap: nowrap;
      max-width: 1200px;
      margin: 0 auto;
    }
    
    #body-wrap.error .aside-list .aside-list-item {
      padding: 0.5rem;
    }
    
    #body-wrap.error .aside-list .aside-list-item img {
      width: 100%;
      object-fit: cover;
      border-radius: 12px;
    }
    
    #body-wrap.error .aside-list .aside-list-item .thumbnail {
      overflow: hidden;
      width: 230px;
      height: 143px;
      background: var(--anzhiyu-card-bg);
      display: flex;
    }
    
    #body-wrap.error .aside-list .aside-list-item .content .title {
      -webkit-line-clamp: 2;
      overflow: hidden;
      display: -webkit-box;
      -webkit-box-orient: vertical;
      line-height: 1.5;
      justify-content: center;
      align-items: flex-end;
      align-content: center;
      padding-top: 0.5rem;
      color: white;
    }
    
    #body-wrap.error .aside-list .aside-list-item .content time {
      display: none;
    }
    
    /* 代码框主题 */
    #article-container figure.highlight {
      border-radius: 10px;
    }
    
  2. 在主题配置文件[BlogRoot]\_config.butterfly.yml文件中的inject配置项的head子项加入以下代码,代表引入刚刚创建的custom.css文件(这是相对路径的写法)

    1
    2
    3
    
    inject:
      head:
        - <link rel="stylesheet" href="/css/custom.css" media="defer" onload="this.media='all'">
    
  3. 在主题配置文件[BlogRoot]\_config.butterfly.yml文件中的index_imgfooter_bg配置项取消头图与页脚图的加载项避免冗余加载

    1
    2
    3
    4
    5
    
    # The banner image of home page
    index_img: 
    
    # Footer Background
    footer_bg: false
    
  4. 部分人反映一图流改完了背景图也没了,那大概率是你之前没设置背景图。在主题配置文件[BlogRoot]\_config.butterfly.yml文件中的background配置项设置背景图

    1
    
    background: url(https://source.fomal.cc/img/home_bg.webp)
    

页脚Github徽标(店长)

  1. 安装插件,在博客根目录[BlogRoot]下打开终端,运行以下指令:

    1
    
    npm install hexo-butterfly-footer-beautify --save
    
  2. 添加配置信息,以下为写法示例 在站点配置文件_config.yml或者主题配置文件_config.butterfly.yml中添加(这是我的配置)

     1
     2
     3
     4
     5
     6
     7
     8
     9
    10
    11
    12
    13
    14
    15
    16
    17
    18
    19
    20
    21
    22
    23
    24
    25
    26
    27
    28
    29
    30
    31
    32
    33
    34
    35
    36
    37
    38
    39
    40
    41
    42
    43
    44
    45
    46
    47
    48
    
    # footer_beautify
    # 页脚计时器:[Native JS Timer](https://akilar.top/posts/b941af/)
    # 页脚徽标:[Add Github Badge](https://akilar.top/posts/e87ad7f8/)
    footer_beautify:
      enable:
        timer: true # 计时器开关
        bdage: true # 徽标开关
      priority: 5 #过滤器优先权
      enable_page: all # 应用页面
      exclude: #屏蔽页面
        # - /posts/
        # - /about/
      layout: # 挂载容器类型
        type: id
        name: footer-wrap
        index: 0
      # 计时器部分配置项(看你喜欢哪个,最好下载下来放到自己的项目中不然会增加我网站的负载)
      # 这是我的  
      # runtime_js: https://www.fomal.cc/static/js/runtime.js
      # runtime_css: https://www.fomal.cc/static/css/runtime.min.css 
      # 这是店长的 
      runtime_js: https://npm.elemecdn.com/hexo-butterfly-footer-beautify@1.0.0/lib/runtime.js
      runtime_css: https://npm.elemecdn.com/hexo-butterfly-footer-beautify@1.0.0/lib/runtime.css
      # 徽标部分配置项
      swiperpara: 0 #若非0,则开启轮播功能,每行徽标个数
      bdageitem:
        - link: https://hexo.io/ #徽标指向网站链接
          shields: https://img.shields.io/badge/Frame-Hexo-blue?style=flat&logo=hexo #徽标API
          message: 博客框架为Hexo_v6.2.0 #徽标提示语
        - link: https://butterfly.js.org/
          shields: https://img.shields.io/badge/Theme-Butterfly-6513df?style=flat&logo=bitdefender
          message: 主题版本Butterfly_v4.3.1
        - link: https://vercel.com/
          shields: https://img.shields.io/badge/Hosted-Vercel-brightgreen?style=flat&logo=Vercel
          message: 本站采用多线部署,主线路托管于Vercel
        - link: https://dashboard.4everland.org/
        # https://img.shields.io/badge/Hosted-4EVERLAND-3FE2C1?style=flat&logo=IPFS
          shields: https://img.shields.io/badge/Hosted-4EVERLAND-22DDDD?style=flat&logo=IPFS
          message: 本站采用多线部署,备用线路托管于4EVERLAND
        - link: https://github.com/
          shields: https://img.shields.io/badge/Source-Github-d021d6?style=flat&logo=GitHub
          message: 本站项目由Github托管
        - link: http://creativecommons.org/licenses/by-nc-sa/4.0/
          shields: https://img.shields.io/badge/Copyright-BY--NC--SA%204.0-d42328?style=flat&logo=Claris
          message: 本站采用知识共享署名-非商业性使用-相同方式共享4.0国际许可协议进行许可
      swiper_css: https://npm.elemecdn.com/hexo-butterfly-swiper/lib/swiper.min.css
      swiper_js: https://npm.elemecdn.com/hexo-butterfly-swiper/lib/swiper.min.js
      swiperbdage_init_js: https://npm.elemecdn.com/hexo-butterfly-footer-beautify/lib/swiperbdage_init.min.js
    
  3. 参数释义

参数备选值/类型释义
prioritynumber【可选】过滤器优先级,数值越小,执行越早,默认为10,选填
enable.timertrue/false【必选】计时器控制开关
enable.bdagetrue/false【必选】徽标控制开关
enable_pagepath【可选】填写想要应用的页面,如根目录就填’/‘,分类页面就填’/categories/‘。若要应用于所有页面,就填all,默认为all
excludepath【可选】填写想要屏蔽的页面,可以多个。仅当enable_page为’all’时生效。写法见示例。原理是将屏蔽项的内容逐个放到当前路径去匹配,若当前路径包含任一屏蔽项,则不会挂载。
layout.typeid/class【可选】挂载容器类型,填写id或class,不填则默认为id
layout.nametext【必选】挂载容器名称
layout.index0和正整数【可选】前提是layout.type为class,因为同一页面可能有多个class,此项用来确认究竟排在第几个顺位
runtime_jsurl【必选】页脚计时器脚本,可以下载上文填写示例的链接,参照注释和教程:Native JS Timer自行修改。
runtime_cssurl【可选】自定义样式,预留开发者接口,可自行下载。
swiperparanumber【可选】若非零,则开启轮播功能,此项表示每行最多容纳徽标个数,用来应对徽标过多显得页脚拥挤的问题
bdageitem.linkurl【可选】页脚徽标指向的网站链接
bdageitem.shieldsurl【必选】页脚徽标对应的API,API具体写法示例参照教程Add Github Badge
bdageitem.messagetext【可选】页脚徽标悬停时显示的信息
swiper_cssurl【可选】swiper的依赖
swiper_jsurl【可选】swiper的依赖
swiperbdage_init_jsurl【可选】swiper初始化方法

其中,计时器部分和备案号部分自行下载到本地,然后引入

*首页分类磁贴新版(店长)kill

1
hexo new page categories
  1. 安装插件,在博客根目录[BlogRoot]下打开终端,运行以下指令:

    1
    
    npm install hexo-butterfly-categories-card --save
    
  2. 添加配置信息,以下为写法示例 在站点配置文件_config.yml或者主题配置文件_config.butterfly.yml中添加以下代码,注意要根据他的默认描述排序改为你自己对应的分类名字:

     1
     2
     3
     4
     5
     6
     7
     8
     9
    10
    11
    12
    13
    14
    15
    16
    17
    18
    19
    20
    21
    22
    23
    24
    25
    26
    
    # hexo-butterfly-categories-card
    # see https://akilar.top/posts/a9131002/
    categoryBar:
      enable: true # 开关
      priority: 5 #过滤器优先权
      enable_page: / # 应用页面
      layout: # 挂载容器类型
        type: id
        name: recent-posts
        index: 0
      column: odd # odd:3列 | even:4列
      row: 1 #显示行数,默认两行,超过行数切换为滚动显示
      message:
        - descr: Ubuntu指南
          cover: https://assets.akilar.top/image/cover1.webp
        - descr: 玩转Win10
          cover: https://assets.akilar.top/image/cover2.webp
        - descr: 长篇小说连载
          cover: https://assets.akilar.top/image/cover3.webp
        - descr: 个人日记
          cover: https://assets.akilar.top/image/cover4.webp
        - descr: 诗词歌赋
          cover: https://assets.akilar.top/image/cover5.webp
        - descr: 杂谈教程
          cover: https://assets.akilar.top/image/cover6.webp
      custom_css: https://npm.elemecdn.com/hexo-butterfly-categories-card@1.0.0/lib/categorybar.css
    
  3. 参数释义

参数备选值/类型释义
prioritynumber【可选】过滤器优先级,数值越小,执行越早,默认为10,选填
enabletrue/false【必选】控制开关
enable_pagepath/all【可选】填写想要应用的页面的相对路径(即路由地址),如根目录就填’/‘,分类页面就填’/categories/‘。若要应用于所有页面,就填’all’,默认为’/‘
layout.typeid/class【可选】挂载容器类型,填写id或class,不填则默认为id
layout.nametext【必选】挂载容器名称
layout.index0和正整数【可选】前提是layout.type为class,因为同一页面可能有多个class,此项用来确认究竟排在第几个顺位
columnodd/even【可选】显示列数,考虑到比例问题,只提供3列和4列,odd为3列, even为4列
rownumber【可选】显示行数,默认两行,超过行数切换为滚动显示
message.descrtext分类描述,需要和你自己的文章分类一一对应。
message.coverurl分类背景,需要和你自己的文章分类一一对应。
custom_cssurl【可选】自定义样式,会替换默认的css链接,可以下载文档给出的cdn链接后自主修改

*首页分类磁贴1.0(小冰)

  1. 在博客根目录[BlogRoot]下打开终端,运行以下指令:

    1
    
    npm i hexo-magnet --save
    

    注意,一定要加 --save,不然本地预览的时候可能不会显示!!!

  2. 在网站配置文件_config.yml新增以下项 (注意不是主题配置文件),这里的分类名字必须和你文章的分类名字一一对应:

     1
     2
     3
     4
     5
     6
     7
     8
     9
    10
    11
    12
    13
    14
    15
    16
    17
    18
    19
    20
    21
    22
    23
    24
    25
    26
    27
    28
    29
    30
    31
    32
    33
    34
    35
    36
    
    magnet:
      enable: true
      priority: 1
      enable_page: /
      type: categories
      devide: 2
      display:
        - name: 教程
          display_name: 小冰の魔改教程
          icon: 📚
        - name: 游戏评测
          display_name: 小冰の游戏评测
          icon: 🎮
        - name: 生活趣闻
          display_name: 小冰の生活趣闻
          icon: 🐱‍👓
        - name: vue
          display_name: 小冰の编程学习
          icon: 👩‍💻
        - name: 学习
          display_name: 小冰の读书笔记
          icon: 📒
        - name: 随想
          display_name: 小冰の胡思乱想
          icon: 💡
      color_setting:
        text_color: black
        text_hover_color: white
        background_color: "#f2f2f2"
        background_hover_color: "#b30070"
      layout:
        type: id
        name: recent-posts
        index: 0
      temple_html: '<div class="recent-post-item" style="width:100%;height: auto"><div id="catalog_magnet">${temple_html_item}</div></div>'
      plus_style: ""
    
  3. 配置项的含义:

    • enable

      参数:true/false 含义:是否开启插件

    • enable_page

      参数:/ 含义:路由地址,如 / 代表主页。/me/ 代表自我介绍页等等

    • priority

      参数:1 含义:插件的叠放顺序,数字越大,叠放约靠前。

    • type

      参数:categories/tags 含义:选择筛选分类还是标签

    • devide

      参数:2 含义:表示分隔的列数,2 表示分为两列展示

    • display

      参数:

      1
      2
      3
      
      - name: 教程 # 这里是tags或者categories的名称
        display_name: 小冰の魔改教程 # 这里是替换的名称
        icon: 📚 # 这里是展示的图标
      

      含义:配置项,可自行设置,按照设置的顺序展示

    • color_setting

      参数:

      1
      2
      3
      4
      
      text_color: black # 文字默认颜色
      text_hover_color: white # 文字鼠标悬浮颜色
      background_color: "#f2f2f2" # 文字背景默认颜色
      background_hover_color: "#b30070" # 文字背景悬浮颜色
      

      含义:颜色配置项,可自行设置

    • layout

      参数:type; (class&id) 参数:name; 参数:index;(数字) 含义:如果说 magnet 是一幅画,那么这个 layout 就是指定了哪面墙来挂画 而在 HTML 的是世界里有两种墙分别 type 为 id 和 class。 其中在定义 class 的时候会出现多个 class 的情况,这时就需要使用 index,确定是哪一个。 最后墙的名字即是 name;

      1
      2
      3
      4
      5
      6
      7
      8
      
      <div name="我是墙" id="recent-posts">
        <!-- id=>type  recent-posts=>name    -->
        <div name="我是画框">
          <div name="我是纸">
            <!--这里通过js挂载magnet,也就是画画-->
          </div>
        </div>
      </div>
      
    • temple_html

      参数:html 模板字段 含义:包含挂载容器

      1
      2
      3
      4
      5
      
      <div class="recent-post-item" style="width:100%;height: auto"> <!--文章容器-->
        <div id="catalog_magnet">  <!--挂载容器-->
          ${temple_html_item}
        </div>
      </div>
      
    • plus_style

      参数:“” 含义:提供可自定义的 style,如加入黑夜模式。

  4. 执行 hexo 三连

    1
    2
    3
    
    hexo clean
    hexo g
    hexo s
    
  5. 我们可以看到黑夜模式看起来特别的别扭,因此还要做一下黑夜模式的颜色适配,在custom.css文件中添加以下代码适配黑夜模式(具体颜色可以自己调节):

     1
     2
     3
     4
     5
     6
     7
     8
     9
    10
    11
    
    /* 小冰分类分类磁铁黑夜模式适配 */
    /* 一般状态 */
    [data-theme="dark"] .magnet_link_context {
      background: #1e1e1e;
      color: antiquewhite;
    }
    /* 鼠标悬浮状态 */
    [data-theme="dark"] .magnet_link_context:hover {
      background: #3ecdf1;
      color: #f2f2f2;
    }
    

*文章置顶滚动栏(店长)

  1. 安装插件,在博客根目录[BlogRoot]下打开终端,运行以下指令:

    1
    
    npm install hexo-butterfly-swiper --save
    
  2. 添加配置信息,以下为写法示例 在站点配置文件_config.yml或者主题配置文件_config.butterfly.yml中添加

     1
     2
     3
     4
     5
     6
     7
     8
     9
    10
    11
    12
    13
    14
    15
    16
    
    # hexo-butterfly-swiper
    # see https://akilar.top/posts/8e1264d1/
    swiper:
      enable: true # 开关
      priority: 5 #过滤器优先权
      enable_page: all # 应用页面
      timemode: date #date/updated
      layout: # 挂载容器类型
        type: id
        name: recent-posts
        index: 0
      default_descr: 再怎么看我也不知道怎么描述它的啦!
      swiper_css: https://npm.elemecdn.com/hexo-butterfly-swiper/lib/swiper.min.css #swiper css依赖
      swiper_js: https://npm.elemecdn.com/hexo-butterfly-swiper/lib/swiper.min.js #swiper js依赖
      custom_css: https://npm.elemecdn.com/hexo-butterfly-swiper/lib/swiperstyle.css # 适配主题样式补丁
      custom_js: https://npm.elemecdn.com/hexo-butterfly-swiper/lib/swiper_init.js # swiper初始化方法
    
  3. 参数释义

参数备选值/类型释义
prioritynumber【可选】过滤器优先级,数值越小,执行越早,默认为10,选填
enabletrue/false【必选】控制开关
enable_pagepath/all【可选】填写想要应用的页面的相对路径(即路由地址),如根目录就填’/‘,分类页面就填’/categories/‘。若要应用于所有页面,就填’all’,默认为all
timemodedate/updated【可选】时间显示,date为显示创建日期,updated为显示更新日期,默认为date
layout.typeid/class【可选】挂载容器类型,填写id或class,不填则默认为id
layout.nametext【必选】挂载容器名称
layout.index0和正整数【可选】前提是layout.type为class,因为同一页面可能有多个class,此项用来确认究竟排在第几个顺位
default_descrtext默认文章描述
swiper_cssurl【可选】自定义的swiper依赖项css链接
swiper_jsurl【可选】自定义的swiper依赖项加js链接
custom_cssurl【可选】适配主题样式补丁
custom_jsurl【可选】swiper初始化方法

使用方法:在文章的front_matter中添加swiper_index配置项即可。

1
2
3
4
5
6
7
8
---
title: 文章标题
date: 创建日期
updated: 更新日期
cover: 文章封面
description: 文章描述
swiper_index: 1 #置顶轮播图顺序,非负整数,数字越大越靠前
---

*自定义字体

  1. 准备好字体文件后,在[BlogRoot]\source\css\custom.css(没有就自己创建)中添加以下代码:

     1
     2
     3
     4
     5
     6
     7
     8
     9
    10
    11
    12
    
    @font-face {
      /* 为载入的字体取名字(随意) */
      font-family: 'YSHST';	
      /* 字体文件地址(相对或者绝对路径都可以) */
      src: url(/font/优设好身体.woff2);
      /* 定义加粗样式(加粗多少) */
      font-weight: normal;
      /* 定义字体样式(斜体/非斜体) */
      font-style: normal;
      /* 定义显示样式 */
      font-display: block;
    }
    
  2. 各个属性的定义:

    1. font-family属性值中使用webfont来声明使用的是服务器端字体,即设置文本的字体名称。
    2. src属性值中首先指定了字体文件所在的路径。
    3. format声明字体文件的格式,可以省略文件格式的声明,单独使用src属性值。
    4. font-style:设置文本样式。取值:normal:不使用斜体;italic:使用斜体;oblique:使用倾斜体;inherit:从父元素继承。
    5. 支持格式:.eot(老版本IE),.otf,.ttf,.woff,*.woff2(推荐)
  3. 在主题配置文件_config.butterfly.yml中的font配置项以及blog_title_font配置项写上你刚刚引入的字体名称,系统会根据先后次序从前到后依次加载这些字体:

     1
     2
     3
     4
     5
     6
     7
     8
     9
    10
    11
    12
    
    # Global font settings
    # Don't modify the following settings unless you know how they work (非必要不要修改)
    font:
      global-font-size: '15px'
      code-font-size: '14px'
      font-family: YSHST, -apple-system, 'Quicksand', 'Nimbus Roman No9 L', 'PingFang SC', 'Hiragino Sans GB', 'Noto Serif SC', 'Microsoft Yahei', 'WenQuanYi Micro Hei', 'ST Heiti', sans-serif;
      code-font-family: Consolas, YSHST, "Microsoft YaHei", Menlo, "PingFang SC", "Microsoft JhengHei", sans-serif
    
    # 左上角網站名字 主頁居中網站名字
    blog_title_font:
      font_link: 
      font-family: YSHST, -apple-system, BlinkMacSystemFont, "Segoe UI" , "Helvetica Neue" , Lato, Roboto, "PingFang SC" , "Microsoft JhengHei" , "Microsoft YaHei" , sans-serif
    
  4. 重启项目即可看到

    1
    
    hexo cl; hexo s
    

文章双侧栏显示(小冰)

  1. 在博客根目录[BlogRoot]下打开终端,运行以下指令:

    1
    
    npm i hexo-butterfly-article-double-row --save
    
  2. 在网站配置文件_config.yml新增以下项 (注意不是主题配置文件):

    1
    2
    
    butterfly_article_double_row:
      enable: true
    
  3. 这时候插件有个bug,就是最后一页文章数目为奇数的时候,会出现这种情况

    image

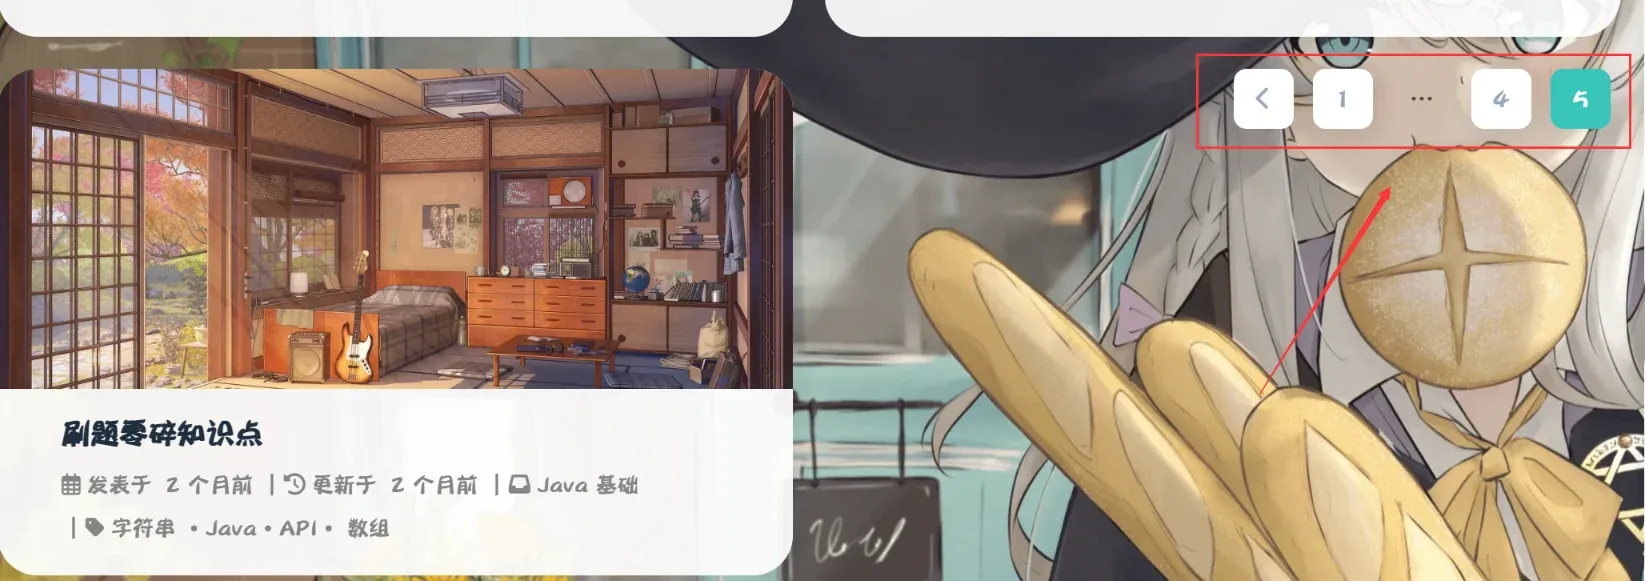
    会显得很不舒服,感谢唐志远大佬修复了这个bug,只需要在custom.css文件添加以下代码即可:

    1
    2
    3
    4
    5
    
    /* 翻页按钮居中 */
    #pagination {
      width: 100%;
      margin: auto;
    }
    
  4. 执行 hexo 三连:

    1
    2
    3
    
    hexo clean
    hexo g
    hexo s
    

*GitCalendar(店长)

安装

  1. 安装插件,在博客根目录[BlogRoot]下打开终端,运行以下指令:

    1
    
    npm install hexo-filter-gitcalendar --save
    
  2. 添加配置信息,以下为写法示例 在站点配置文件_config.yml或者主题配置文件如_config.butterfly.yml中添加

     1
     2
     3
     4
     5
     6
     7
     8
     9
    10
    11
    12
    13
    14
    15
    16
    17
    18
    19
    20
    21
    22
    23
    
    # hexo-filter-gitcalendar
    gitcalendar:
      enable: true # 开关
      priority: 5 #过滤器优先权
      enable_page: / # 应用页面
      # butterfly挂载容器
      layout: # 挂载容器类型
        type: id
        name: recent-posts
        index: 0
      user: Fomalhaut-Blog #git用户名
      apiurl: 'https://gitcalendar.fomal.cc'	# 这是我的API,最好自己弄一个
      minheight:
        pc: 280px #桌面端最小高度
        mibile: 0px #移动端最小高度
      color: "['#d9e0df', '#c6e0dc', '#a8dcd4', '#9adcd2', '#89ded1', '#77e0d0', '#5fdecb', '#47dcc6', '#39dcc3', '#1fdabe', '#00dab9']" # 目前我在用的
      # "['#e4dfd7', '#f9f4dc', '#f7e8aa', '#f7e8aa', '#f8df72', '#fcd217', '#fcc515', '#f28e16', '#fb8b05', '#d85916', '#f43e06']" #橘黄色调
      # color: "['#ebedf0', '#fdcdec', '#fc9bd9', '#fa6ac5', '#f838b2', '#f5089f', '#c4067e', '#92055e', '#540336', '#48022f', '#30021f']" #浅紫色调
      # color: "['#ebedf0', '#f0fff4', '#dcffe4', '#bef5cb', '#85e89d', '#34d058', '#28a745', '#22863a', '#176f2c', '#165c26', '#144620']" #翠绿色调
      # color: "['#ebedf0', '#f1f8ff', '#dbedff', '#c8e1ff', '#79b8ff', '#2188ff', '#0366d6', '#005cc5', '#044289', '#032f62', '#05264c']" #天青色调
      container: .recent-post-item(style='width:100%;height:auto;padding:10px;') #父元素容器,需要使用pug语法
      gitcalendar_css: https://npm.elemecdn.com/hexo-filter-gitcalendar/lib/gitcalendar.css
      gitcalendar_js: https://npm.elemecdn.com/hexo-filter-gitcalendar/lib/gitcalendar.js	
    
  3. 参数释义

参数备选值/类型释义
prioritynumber【可选】过滤器优先级,数值越小,执行越早,默认为10,选填
enabletrue/false【必选】控制开关
enable_pagepath/all【可选】填写想要应用的页面的相对路径(即路由地址),如根目录就填’/‘,分类页面就填’/categories/‘。若要应用于所有页面,就填’all’,默认为’/‘
layout.typeid/class【可选】挂载容器类型,填写id或class,不填则默认为id
layout.nametext【必选】挂载容器名称
layout.index0和正整数【可选】前提是layout.type为class,因为同一页面可能有多个class,此项用来确认究竟排在第几个顺位
usertext【必选】git用户名
apiurlurl【可选】默认使用提供文档提供的api,但还是建议自建api,参考教程:自建API部署
minheight.pc280px【可选】桌面端最小高度,默认为280px
minheight.mobile0px【可选】移动端最小高度,默认为0px
colorlist【可选】一个包含11个色值的数组,文档给出了四款预设值
containerpug【可选】预留的父元素容器,用以适配多主题,需要用pug语法填写,目前已适配butterflyvolantismaterymengd主题,这四个主题,插件会自自动识别_config.yml内填写的theme配置项。其余主题需要自己填写父元素容器。
gitcalendar_cssURL【可选】自定义CSS样式链接
gitcalendar_jsURL【可选】自定义js链接

自定义挂载容器

很多人反映不想挂在首页,想挂在关于或者统计等页面,只需要做2步:

  1. 在对应页面创建一个DOM让插件有地方挂载,例如演示的就是在关于页面(/about/)的文件中直接写入一个div

    1
    2
    
    <!-- GitCalendar容器 -->
    <div id="gitZone"></div>
    
  2. 在对应配置项改为与你容器id以创建页面路径相关的(是改不是加!!!)

    1
    2
    3
    4
    5
    6
    
    enable_page: /about/ # 应用页面(记住最后带/)
    
    layout: # 挂载容器类型
      type: id
      name: gitZone
      index: 0
    
  3. 重启项目就会看见

    1
    
    hexo cl; hexo s
    

自建API部署

虽然Vercel的访问应当没有次数限制,但是不排除存在因访问次数过多而限流等限制。所以还是建议各位自建API。使用Vercel部署,完全免费,且无需服务器。

将此项目fork到你的Github仓库

  1. 访问Vercel官网,点击右上角的sign up进行注册,注册并登录后点击右上角创建一个项目,并选择以Github继续。
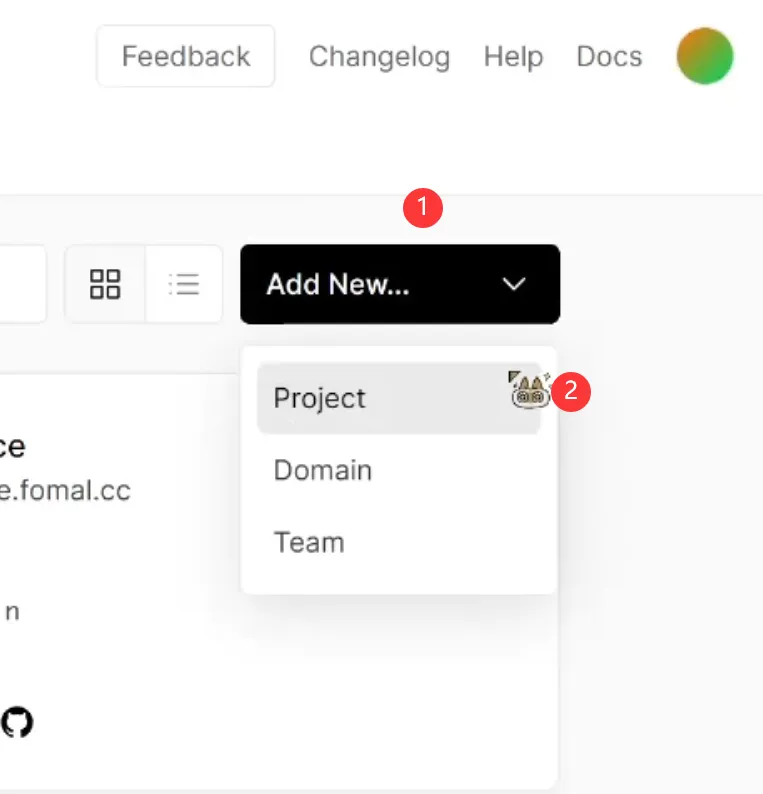
 pp

  2. 此时应该会看到你刚刚fork过来的你仓库的项目,看不到就输入关键字进行搜索。

  3. 点击该仓库右边的Import进行导入,VercelPROJECT NAME可以自定义,不用太过在意,但是之后不支持修改,若要改名,只能删除PROJECT以后重建一个了,下方三个选项保持默认就好,点击Deploy进行部署。
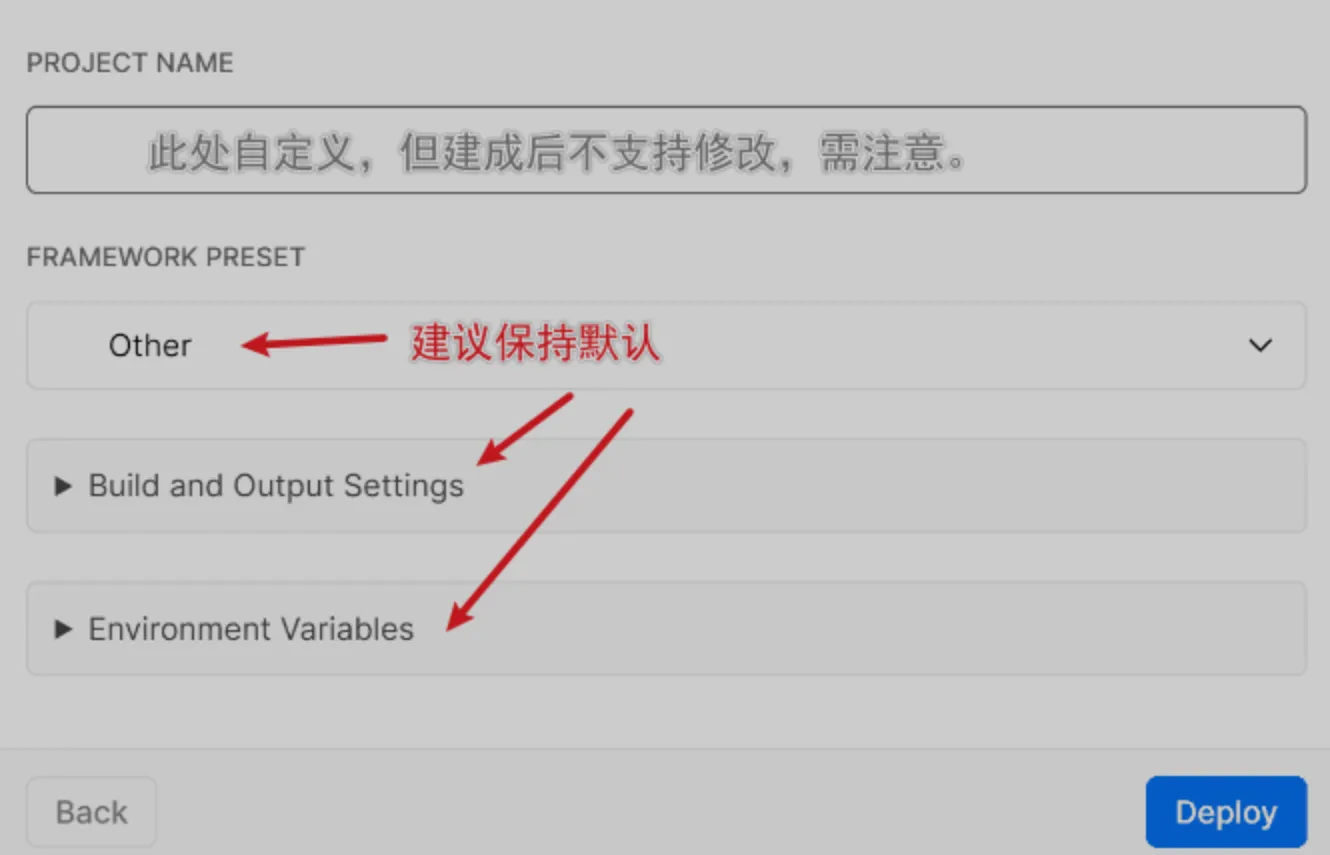
    image-20221029221751149

  4. 到此时,Vercel的部署已经完成,可以使用Vercel提供的默认域名来访问api链接。例如我获取到的默认域名为github-calendar-api.vercel.app,则用它来替换冰老师教程中的自建API,填写到[BlogRoot]\_config.butterfly.yml中关于gitcalendarapiurl中。注意源码修改版不要带协议,不要带后缀。就填写给你的默认域名就好。而插件版需要带协议

1
2
3
4
5
6
gitcalendar:
  enable: true
  simplemode: true
  user: Akilarlxh
  apiurl: github-calendar-api.vercel.app
  color: "['#e4dfd7', '#f9f4dc', '#f7e8aa', '#f7e8aa', '#f8df72', '#fcd217', '#fcc515', '#f28e16', '#fb8b05', '#d85916', '#f43e06']"

*导航栏魔改

[BlogRoot]\source\css\custom.css中引入如下css代码,然后在主题配置文件_config.butterfly.yml中引入该文件:

 1
 2
 3
 4
 5
 6
 7
 8
 9
10
11
12
13
14
15
/* 一级菜单居中 */
#nav .menus_items {
  position: absolute !important;
  width: fit-content !important;
  left: 50% !important;
  transform: translateX(-50%) !important;
}
/* 子菜单横向展示 */
#nav .menus_items .menus_item:hover .menus_item_child {
  display: flex !important;
}
/* 这里的2是代表导航栏的第2个元素,即有子菜单的元素,可以按自己需求修改 */
.menus_items .menus_item:nth-child(2) .menus_item_child {
  left: -125px;
}

此处的css实现了两个作用:菜单栏居中、子菜单横向显示。其中子菜单横向显示要根据自己的实际情况来改,例如你的以及菜单的第2个选项中有子菜单,那就要加一项调节第2个选项中的子菜单,这个具体调节多少要根据你的具体情况为准,可以自己慢慢调到中间。

此时我们的手机端子菜单默认是展开显示的,如下图所示:

image-20221112140953381

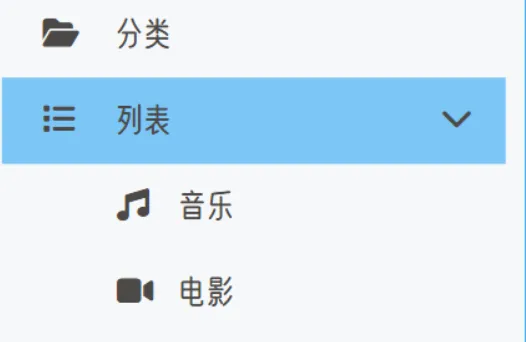
此时我们只需要在主题配置文件_config.butterfly.yml中列表对应的地方加一个hide即可,如下图的列表选项:

 1
 2
 3
 4
 5
 6
 7
 8
 9
10
11
menu:
  首页: / || fas fa-home
  归档: /archives/ || fas fa-archive
  标签: /tags/ || fas fa-tags
  分类: /categories/ || fas fa-folder-open
  列表||fas fa-list || hide:
    音乐: /music/ || fas fa-music
    电影: /movies/ || fas fa-video
  留言板: /comments/ || fas fa-envelope-open
  友链: /link/ || fas fa-link
  关于: /about/ || fas fa-heart

此时有人觉得右边搜索按钮露出搜索两个字很丑,我们也可以把它隐藏了,在[BlogRoot]\themes\Butterfly\layout\includes\header\nav.pug(npm安装的在[BlogRoot]\node_moudules\hexo-theme-butterfly\layout\includes\header\nav.pug)中把以下语句删除或注释掉即可,搜索两个字就不会显示出来(这种语句统一写法是直接删除+就可以,不用补空格)。

 1
 2
 3
 4
 5
 6
 7
 8
 9
10
11
12
13
14
15
nav#nav
  span#blog_name
    a#site-name(href=url_for('/')) #[=config.title]
    
  #menus
    if (theme.algolia_search.enable || theme.local_search.enable)
      #search-button
        a.site-page.social-icon.search
          i.fas.fa-search.fa-fw
-          span=' '+_p('search.title')
    !=partial('includes/header/menu_item', {}, {cache: true})

    #toggle-menu
      a.site-page
        i.fas.fa-bars.fa-fw

*黑夜霓虹灯1.0(js计时器实现)

此教程会有两处地方有霓虹灯效果:一个是大标题和个人信息的动态霓虹灯,默认周期为1200ms;另外的是菜单栏的小字有夜光效果,为你的博客增添几分赛博朋克风~

  1. 首先在自定义的样式文件[BlogRoot]\source\css\custom.css中引入以下代码,变量部分var(--theme-color)可以换为自己喜欢的颜色,例如紫色rgb(179, 71, 241),后面的颜色连续渐变效果根据个人喜好选择,有的人喜欢连续的,有的人喜欢断续的

     1
     2
     3
     4
     5
     6
     7
     8
     9
    10
    11
    12
    13
    14
    15
    16
    17
    18
    19
    20
    
    /* 夜间模式菜单栏发光字 */
    [data-theme="dark"] #nav .site-page,
    [data-theme="dark"] #nav .menus_items .menus_item .menus_item_child li a {
      text-shadow: 0 0 2px var(--theme-color) !important;
    }
    
    /* 手机端适配 */
    [data-theme="dark"] #sidebar #sidebar-menus .menus_items .site-page {
      text-shadow: 0 0 2px var(--theme-color) !important;
    }
    
    /* 闪烁变动颜色连续渐变 */
    #site-name,
    #site-title,
    #site-subtitle,
    #post-info,
    .author-info__name,
    .author-info__description {
      transition: text-shadow 1s linear !important;
    }
    
  2. 新建文件[BlogRoot]\source\js\light.js并写入以下代码,本质就是计时器,大家可以根据自己的喜好调节闪烁周期,默认为1200ms

     1
     2
     3
     4
     5
     6
     7
     8
     9
    10
    11
    12
    13
    14
    15
    16
    17
    18
    19
    20
    21
    22
    23
    24
    25
    26
    27
    28
    29
    30
    31
    32
    33
    34
    35
    36
    37
    38
    39
    40
    41
    42
    43
    44
    45
    46
    47
    48
    49
    
    // 霓虹灯效果
    // 颜色数组
    var arr = ["#39c5bb", "#f14747", "#f1a247", "#f1ee47", "#b347f1", "#1edbff", "#ed709b", "#5636ed"];
    // 颜色索引
    var idx = 0;
    
    // 切换颜色
    function changeColor() {
        // 仅夜间模式才启用
        if (document.getElementsByTagName('html')[0].getAttribute('data-theme') == 'dark') {
            if (document.getElementById("site-name"))
                document.getElementById("site-name").style.textShadow = arr[idx] + " 0 0 15px";
            if (document.getElementById("site-title"))
                document.getElementById("site-title").style.textShadow = arr[idx] + " 0 0 15px";
            if (document.getElementById("site-subtitle"))
                document.getElementById("site-subtitle").style.textShadow = arr[idx] + " 0 0 10px";
            if (document.getElementById("post-info"))
                document.getElementById("post-info").style.textShadow = arr[idx] + " 0 0 5px";
            try {
                document.getElementsByClassName("author-info__name")[0].style.textShadow = arr[idx] + " 0 0 12px";
                document.getElementsByClassName("author-info__description")[0].style.textShadow = arr[idx] + " 0 0 12px";
            } catch {
    
            }
            idx++;
            if (idx == 8) {
                idx = 0;
            }
        } else {
            // 白天模式恢复默认
            if (document.getElementById("site-name"))
                document.getElementById("site-name").style.textShadow = "#1e1e1ee0 1px 1px 1px";
            if (document.getElementById("site-title"))
                document.getElementById("site-title").style.textShadow = "#1e1e1ee0 1px 1px 1px";
            if (document.getElementById("site-subtitle"))
                document.getElementById("site-subtitle").style.textShadow = "#1e1e1ee0 1px 1px 1px";
            if (document.getElementById("post-info"))
                document.getElementById("post-info").style.textShadow = "#1e1e1ee0 1px 1px 1px";
            try {
                document.getElementsByClassName("author-info__name")[0].style.textShadow = "";
                document.getElementsByClassName("author-info__description")[0].style.textShadow = "";
            } catch {
    
            }
        }
    }
    
    // 开启计时器
    window.onload = setInterval(changeColor, 1200);
    
  3. 在主题配置文件_config.butterfly.yml引入以上两个文件,要注意的是,js文件这里必须为defer,不能为ansyc,保证脚本会延迟到整个页面都解析完后再执行,此时才有对应的元素进行操作:

    1
    2
    3
    4
    5
    
    inject:
      head:
        - <link rel="stylesheet" href="/css/custom.css" media="defer" onload="this.media='all'">
      bottom: 
        - <script defer src="/js/light.js"></script> # 霓虹灯(必须defer否则有时候会不生效)
    
  4. 重启项目即可看到效果

    1
    
    hexo cl; hexo s
    

*星空背景和流星特效

  1. [BlogRoot]/source/js目录下新建universe.js,输入以下代码:

    1
    2
    3
    
    JS
    function dark() {window.requestAnimationFrame=window.requestAnimationFrame||window.mozRequestAnimationFrame||window.webkitRequestAnimationFrame||window.msRequestAnimationFrame;var n,e,i,h,t=.05,s=document.getElementById("universe"),o=!0,a="180,184,240",r="226,225,142",d="226,225,224",c=[];function f(){n=window.innerWidth,e=window.innerHeight,i=.216*n,s.setAttribute("width",n),s.setAttribute("height",e)}function u(){h.clearRect(0,0,n,e);for(var t=c.length,i=0;i<t;i++){var s=c[i];s.move(),s.fadeIn(),s.fadeOut(),s.draw()}}function y(){this.reset=function(){this.giant=m(3),this.comet=!this.giant&&!o&&m(10),this.x=l(0,n-10),this.y=l(0,e),this.r=l(1.1,2.6),this.dx=l(t,6*t)+(this.comet+1-1)*t*l(50,120)+2*t,this.dy=-l(t,6*t)-(this.comet+1-1)*t*l(50,120),this.fadingOut=null,this.fadingIn=!0,this.opacity=0,this.opacityTresh=l(.2,1-.4*(this.comet+1-1)),this.do=l(5e-4,.002)+.001*(this.comet+1-1)},this.fadeIn=function(){this.fadingIn&&(this.fadingIn=!(this.opacity>this.opacityTresh),this.opacity+=this.do)},this.fadeOut=function(){this.fadingOut&&(this.fadingOut=!(this.opacity<0),this.opacity-=this.do/2,(this.x>n||this.y<0)&&(this.fadingOut=!1,this.reset()))},this.draw=function(){if(h.beginPath(),this.giant)h.fillStyle="rgba("+a+","+this.opacity+")",h.arc(this.x,this.y,2,0,2*Math.PI,!1);else if(this.comet){h.fillStyle="rgba("+d+","+this.opacity+")",h.arc(this.x,this.y,1.5,0,2*Math.PI,!1);for(var t=0;t<30;t++)h.fillStyle="rgba("+d+","+(this.opacity-this.opacity/20*t)+")",h.rect(this.x-this.dx/4*t,this.y-this.dy/4*t-2,2,2),h.fill()}else h.fillStyle="rgba("+r+","+this.opacity+")",h.rect(this.x,this.y,this.r,this.r);h.closePath(),h.fill()},this.move=function(){this.x+=this.dx,this.y+=this.dy,!1===this.fadingOut&&this.reset(),(this.x>n-n/4||this.y<0)&&(this.fadingOut=!0)},setTimeout(function(){o=!1},50)}function m(t){return Math.floor(1e3*Math.random())+1<10*t}function l(t,i){return Math.random()*(i-t)+t}f(),window.addEventListener("resize",f,!1),function(){h=s.getContext("2d");for(var t=0;t<i;t++)c[t]=new y,c[t].reset();u()}(),function t(){document.getElementsByTagName('html')[0].getAttribute('data-theme')=='dark'&&u(),window.requestAnimationFrame(t)}()};
    dark()
    
  2. [BlogRoot]/source/css目录下新建universe.css,输入以下代码:

     1
     2
     3
     4
     5
     6
     7
     8
     9
    10
    11
    12
    13
    14
    15
    16
    
    /* 背景宇宙星光  */
    #universe{
      display: block;
      position: fixed;
      margin: 0;
      padding: 0;
      border: 0;
      outline: 0;
      left: 0;
      top: 0;
      width: 100%;
      height: 100%;
      pointer-events: none;
      /* 这个是调置顶的优先级的,-1在文章页下面,背景上面,个人推荐这种 */
      z-index: -1;
    }
    
  3. 在主题配置文件_config.butterfly.ymlinject配置项中bottom下填入:

    1
    2
    3
    4
    
    inject:
      bottom:
       - <canvas id="universe"></canvas>
       - <script defer src="/js/universe.js"></script>
    
  4. 在主题配置文件_config.butterfly.ymlinject配置项中head下填入:

    1
    2
    3
    
    inject:
      head:
       - <link rel="stylesheet" href="/css/universe.css">
    
  5. 重新编译即可看到效果。

侧边栏电子时钟(安知鱼)

  1. 如果有安装店长的插件版侧边栏电子钟(与店长的电子钟冲突),在博客根目录[BlogRoot]下打开终端,运行以下指令

    1
    2
    
    # 卸载原版电子钟
    npm uninstall hexo-butterfly-clock
    
  2. 安装插件,在博客根目录[BlogRoot]下打开终端,运行以下指令:

    1
    
    npm install hexo-butterfly-clock-anzhiyu --save
    
  3. 添加配置信息,以下为写法示例 在主题配置文件_config.butterfly.yml(注意一定要主题配置文件)中添加:

     1
     2
     3
     4
     5
     6
     7
     8
     9
    10
    11
    12
    13
    14
    15
    16
    17
    18
    19
    20
    21
    
    # electric_clock (安知鱼电子钟)
    # see https://anzhiy.cn/posts/fc18.html
    electric_clock:
      enable: true # 开关
      priority: 5 #过滤器优先权
      enable_page: / # 应用页面
      exclude:
        # - /posts/
        # - /about/
      layout: # 挂载容器类型
        type: class
        name: sticky_layout
        index: 0
      loading: https://cdn.cbd.int/hexo-butterfly-clock-anzhiyu/lib/loading.gif #加载动画自定义
      clock_css: https://cdn.cbd.int/hexo-butterfly-clock-anzhiyu/lib/clock.min.css
      clock_js: https://cdn.cbd.int/hexo-butterfly-clock-anzhiyu/lib/clock.min.js
      ip_api: https://widget.qweather.net/simple/static/js/he-simple-common.js?v=2.0
      qweather_key:  # 和风天气key
      gaud_map_key:  # 高得地图web服务key
      default_rectangle: false # 开启后将一直显示rectangle位置的天气,否则将获取访问者的地理位置与天气
      rectangle: 113.34532,23.15624 # 获取访问者位置失败时会显示该位置的天气,同时该位置为开启default_rectangle后的位置
    

    其中qweather_key 和gaud_map_key 最好自己去申请对应的 api key,不保证可靠性。

  4. 参数释义

参数备选值/类型释义
prioritynumber【可选】过滤器优先级,数值越小,执行越早,默认为 10,选填
enabletrue/false【必选】控制开关
enable_pagepath/all【可选】填写想要应用的页面的相对路径(即路由地址),如根目录就填’/‘,分类页面就填’/categories/‘。若要应用于所有页面,就填’all’,默认为 all
excludepath【可选】填写想要屏蔽的页面,可以多个。写法见示例。原理是将屏蔽项的内容逐个放到当前路径去匹配,若当前路径包含任一屏蔽项,则不会挂载。
layout.typeid/class【可选】挂载容器类型,填写 id 或 class,不填则默认为 id
layout.nametext【必选】挂载容器名称
layout.index0和正整数【可选】前提是 layout.type 为 class,因为同一页面可能有多个 class,此项用来确认究竟排在第几个顺位
loadingURL【可选】电子钟加载动画的图片
clock_cssURL【可选】电子钟样式 CDN 资源
clock_jsURL【可选】电子钟执行脚本 CDN 资源
ip_apiURL【可选】获取时钟 IP 的 API
qweather_keytext【可选】和风天气 key
gaud_map_keytext【可选】高得地图 web 服务 key
default_rectangletext【可选】开启后将一直显示 rectangle 位置的天气,否则将获取访问者的地理位置与天气
rectangletext【可选】获取访问者位置失败时会显示该位置的天气,同时该位置为开启 default_rectangle 后的位置

一、qweather_key申请地址: https://id.qweather.com/#/login

  1. 登录后进入控制台
  2. 创建应用
  3. 填写应用名称和 key 名称随意
  4. 选择 WebApi
  5. 复制 key

二、gaud_map_key 申请地址: https://lbs.amap.com/

  1. 登录后进入控制台
  2. 创建应用,名称随意,类型选其他
  3. 点击添加, key名称随意,服务平台选择Web服务,点击提交
  4. 复制 key

个人卡片渐变色

[BlogRoot]\source\css\custom.css自定义样式的文件中引入如下代码(最后记得在inject配置项引入!!!):

 1
 2
 3
 4
 5
 6
 7
 8
 9
10
11
12
13
14
15
16
17
18
19
20
21
22
23
24
25
26
27
28
29
30
31
32
33
34
35
36
37
38
39
40
41
42
43
44
45
46
47
48
49
50
51
52
53
54
55
56
57
58
59
60
61
/* 侧边栏个人信息卡片动态渐变色 */
#aside-content > .card-widget.card-info {
  background: linear-gradient(
    -45deg,
    #e8d8b9,
    #eccec5,
    #a3e9eb,
    #bdbdf0,
    #eec1ea
  );
  box-shadow: 0 0 5px rgb(66, 68, 68);
  position: relative;
  background-size: 400% 400%;
  -webkit-animation: Gradient 10s ease infinite;
  -moz-animation: Gradient 10s ease infinite;
  animation: Gradient 10s ease infinite !important;
}
@-webkit-keyframes Gradient {
  0% {
    background-position: 0% 50%;
  }
  50% {
    background-position: 100% 50%;
  }
  100% {
    background-position: 0% 50%;
  }
}
@-moz-keyframes Gradient {
  0% {
    background-position: 0% 50%;
  }
  50% {
    background-position: 100% 50%;
  }
  100% {
    background-position: 0% 50%;
  }
}
@keyframes Gradient {
  0% {
    background-position: 0% 50%;
  }
  50% {
    background-position: 100% 50%;
  }
  100% {
    background-position: 0% 50%;
  }
}

/* 黑夜模式适配 */
[data-theme="dark"] #aside-content > .card-widget.card-info {
  background: #191919ee;
}

/* 个人信息Follow me按钮 */
#aside-content > .card-widget.card-info > #card-info-btn {
  background-color: #3eb8be;
  border-radius: 8px;
}

外挂标签的引入(店长)

  1. 安装插件,在博客根目录[BlogRoot]下打开终端,运行以下指令:

    1
    
    npm install hexo-butterfly-tag-plugins-plus --save
    

    考虑到hexo自带的markdown渲染插件hexo-renderer-marked与外挂标签语法的兼容性较差,建议您将其替换成hexo-renderer-kramed

    1
    2
    
    npm uninstall hexo-renderer-marked --save
    npm install hexo-renderer-kramed --save
    
  2. 添加配置信息,以下为写法示例 在站点配置文件_config.yml或者主题配置文件_config.butterfly.yml中添加

     1
     2
     3
     4
     5
     6
     7
     8
     9
    10
    11
    12
    13
    14
    15
    16
    
    # 外挂标签
    # tag-plugins-plus
    # see https://akilar.top/posts/615e2dec/
    tag_plugins:
      enable: true # 开关
      priority: 5 #过滤器优先权
      issues: false #issues标签依赖注入开关
      link:
        placeholder: /img/siteicon/64.png #link_card标签默认的图标图片
      CDN:
        anima: https://cdn.cbd.int/hexo-butterfly-tag-plugins-plus@latest/lib/assets/font-awesome-animation.min.css #动画标签anima的依赖
        jquery: https://npm.elemecdn.com/jquery@latest/dist/jquery.min.js #issues标签依赖
        issues: https://npm.elemecdn.com/hexo-butterfly-tag-plugins-plus@latest/lib/assets/issues.js #issues标签依赖
        iconfont: /js/ali_font_all.js #参看https://akilar.top/posts/d2ebecef/
        carousel: https://npm.elemecdn.com/hexo-butterfly-tag-plugins-plus@latest/lib/assets/carousel-touch.js
        tag_plugins_css: https://npm.elemecdn.com/hexo-butterfly-tag-plugins-plus@latest/lib/tag_plugins.css
    
  3. 参数释义

参数备选值/类型释义
enabletrue/false【必选】控制开关
prioritynumber【可选】过滤器优先级,数值越小,执行越早,默认为10,选填
issuestrue/false【可选】issues标签控制开关,默认为false
link.placeholder【必选】link卡片外挂标签的默认图标
CDN.animaURL【可选】动画标签anima的依赖
CDN.jqueryURL【可选】issues标签依赖
CDN.issuesURL【可选】issues标签依赖
CDN.iconfontURL【可选】iconfont标签symbol样式引入,如果不想引入,则设为false
CDN.carouselURL【可选】carousel旋转相册标签鼠标拖动依赖,如果不想引入则设为false
CDN.tag_plugins_cssURL【可选】外挂标签样式的CSS依赖,为避免CDN缓存延迟,建议将@latest改为具体版本号

具体样式和写法可见:Markdown语法与外挂标签写法汇总

iconfont选项,可将font自行下载放在source/js/目录下,新建目录

*听话的鼠标魔改

  1. 新建文件[BlogRoot]\source\js\cursor.js,在里面写上如下代码:

     1
     2
     3
     4
     5
     6
     7
     8
     9
    10
    11
    12
    13
    14
    15
    16
    17
    18
    19
    20
    21
    22
    23
    24
    25
    26
    27
    28
    29
    30
    31
    32
    33
    34
    35
    36
    37
    38
    39
    40
    41
    42
    43
    44
    45
    46
    47
    48
    49
    50
    51
    52
    53
    54
    55
    56
    57
    58
    59
    60
    61
    62
    63
    64
    65
    66
    67
    68
    69
    70
    71
    72
    73
    74
    75
    76
    77
    78
    79
    80
    81
    82
    83
    84
    
    JS
    复制成功var CURSOR;
    
    Math.lerp = (a, b, n) => (1 - n) * a + n * b;
    
    const getStyle = (el, attr) => {
        try {
            return window.getComputedStyle
                ? window.getComputedStyle(el)[attr]
                : el.currentStyle[attr];
        } catch (e) {}
        return "";
    };
    
    class Cursor {
        constructor() {
            this.pos = {curr: null, prev: null};
            this.pt = [];
            this.create();
            this.init();
            this.render();
        }
    
        move(left, top) {
            this.cursor.style["left"] = `${left}px`;
            this.cursor.style["top"] = `${top}px`;
        }
    
        create() {
            if (!this.cursor) {
                this.cursor = document.createElement("div");
                this.cursor.id = "cursor";
                this.cursor.classList.add("hidden");
                document.body.append(this.cursor);
            }
    
            var el = document.getElementsByTagName('*');
            for (let i = 0; i < el.length; i++)
                if (getStyle(el[i], "cursor") == "pointer")
                    this.pt.push(el[i].outerHTML);
    
            document.body.appendChild((this.scr = document.createElement("style")));
            // 这里改变鼠标指针的颜色 svg生成
            this.scr.innerHTML = `* {cursor: url("data:image/svg+xml,<svg xmlns='http://www.w3.org/2000/svg' viewBox='0 0 8 8' width='8px' height='8px'><circle cx='4' cy='4' r='4' opacity='.5'/></svg>") 4 4, auto}`;
        }
    
        refresh() {
            this.scr.remove();
            this.cursor.classList.remove("hover");
            this.cursor.classList.remove("active");
            this.pos = {curr: null, prev: null};
            this.pt = [];
    
            this.create();
            this.init();
            this.render();
        }
    
        init() {
            document.onmouseover  = e => this.pt.includes(e.target.outerHTML) && this.cursor.classList.add("hover");
            document.onmouseout   = e => this.pt.includes(e.target.outerHTML) && this.cursor.classList.remove("hover");
            document.onmousemove  = e => {(this.pos.curr == null) && this.move(e.clientX - 8, e.clientY - 8); this.pos.curr = {x: e.clientX - 8, y: e.clientY - 8}; this.cursor.classList.remove("hidden");};
            document.onmouseenter = e => this.cursor.classList.remove("hidden");
            document.onmouseleave = e => this.cursor.classList.add("hidden");
            document.onmousedown  = e => this.cursor.classList.add("active");
            document.onmouseup    = e => this.cursor.classList.remove("active");
        }
    
        render() {
            if (this.pos.prev) {
                this.pos.prev.x = Math.lerp(this.pos.prev.x, this.pos.curr.x, 0.15);
                this.pos.prev.y = Math.lerp(this.pos.prev.y, this.pos.curr.y, 0.15);
                this.move(this.pos.prev.x, this.pos.prev.y);
            } else {
                this.pos.prev = this.pos.curr;
            }
            requestAnimationFrame(() => this.render());
        }
    }
    
    (() => {
        CURSOR = new Cursor();
        // 需要重新获取列表时,使用 CURSOR.refresh()
    })();
    

    其中比较重要的参数就是鼠标的尺寸和颜色,已经在上图中标出,目前发现颜色只支持RGB写法和固有名称写法(例如red这种),其他参数也可以自行摸索:

    1
    
    * {cursor: url("data:image/svg+xml,<svg xmlns='http://www.w3.org/2000/svg' viewBox='0 0 8 8' width='8px' height='8px'><circle cx='4' cy='4' r='4' opacity='1.0' fill='rgb(57, 197, 187)'/></svg>") 4 4, auto}
    
  2. [BlogRoot]\source\css\custom.css添加如下代码:

     1
     2
     3
     4
     5
     6
     7
     8
     9
    10
    11
    12
    13
    14
    15
    16
    17
    18
    19
    20
    21
    22
    23
    24
    25
    26
    27
    28
    29
    30
    31
    32
    33
    34
    35
    36
    
    /* 鼠标样式 */
    #cursor {
      position: fixed;
      width: 16px;
      height: 16px;
      /* 这里改变跟随的底色 */
      background: var(--theme-color);
      border-radius: 8px;
      opacity: 0.25;
      z-index: 10086;
      pointer-events: none;
      transition: 0.2s ease-in-out;
      transition-property: background, opacity, transform;
    }
    
    #cursor.hidden {
      opacity: 0;
    }
    
    #cursor.hover {
      opacity: 0.1;
      transform: scale(2.5);
      -webkit-transform: scale(2.5);
      -moz-transform: scale(2.5);
      -ms-transform: scale(2.5);
      -o-transform: scale(2.5);
    }
    
    #cursor.active {
      opacity: 0.5;
      transform: scale(0.5);
      -webkit-transform: scale(0.5);
      -moz-transform: scale(0.5);
      -ms-transform: scale(0.5);
      -o-transform: scale(0.5);
    }
    

    这里比较重要的参数就是鼠标跟随的圆形颜色,可以根据自己的喜好进行更改:

    1
    2
    3
    4
    
    #cursor {
      /* 这里改变跟随的底色 */
      background: rgb(57, 197, 187);
    }
    
  3. 在主题配置文件_config.butterfly.yml文件的inject配置项引入刚刚创建的css文件和js文件:

    1
    2
    3
    
    inject: 
      bottom:
    +    - <script defer src="/js/cursor.js"></script>
    
  4. 重启项目即可看见效果:

    1
    
    hexo cl; hexo s
    

*页面样式调节

这个教程是通过css样式调节各个页面透明度、模糊度(亚克力效果)、圆角、边框样式等,看起来会更加舒适。

  1. 复制以下代码进去自定义的custom.css文件

     1
     2
     3
     4
     5
     6
     7
     8
     9
    10
    11
    12
    13
    14
    15
    16
    17
    18
    19
    20
    21
    22
    23
    24
    25
    26
    27
    28
    29
    30
    31
    32
    33
    34
    35
    36
    37
    38
    39
    40
    41
    42
    43
    44
    45
    46
    47
    48
    49
    50
    51
    52
    53
    54
    55
    56
    57
    58
    59
    60
    61
    62
    63
    64
    65
    66
    67
    68
    69
    70
    71
    72
    73
    74
    75
    76
    77
    78
    
    :root {
      --trans-light: rgba(255, 255, 255, 0.88);
      --trans-dark: rgba(25, 25, 25, 0.88);
      --border-style: 1px solid rgb(169, 169, 169);
      --backdrop-filter: blur(5px) saturate(150%);
    }
    
    /* 首页文章卡片 */
    #recent-posts > .recent-post-item {
      background: var(--trans-light);
      backdrop-filter: var(--backdrop-filter);
      border-radius: 25px;
      border: var(--border-style);
    }
    
    /* 首页侧栏卡片 */
    #aside-content .card-widget {
      background: var(--trans-light);
      backdrop-filter: var(--backdrop-filter);
      border-radius: 18px;
      border: var(--border-style);
    }
    
    /* 文章页、归档页、普通页面 */
    div#post,
    div#page,
    div#archive {
      background: var(--trans-light);
      backdrop-filter: var(--backdrop-filter);
      border: var(--border-style);
      border-radius: 20px;
    }
    
    /* 导航栏 */
    #page-header.nav-fixed #nav {
      background: rgba(255, 255, 255, 0.75);
      backdrop-filter: var(--backdrop-filter);
    }
    
    [data-theme="dark"] #page-header.nav-fixed #nav {
      background: rgba(0, 0, 0, 0.7) !important;
    }
    
    /* 夜间模式遮罩 */
    [data-theme="dark"] #recent-posts > .recent-post-item,
    [data-theme="dark"] #aside-content .card-widget,
    [data-theme="dark"] div#post,
    [data-theme="dark"] div#archive,
    [data-theme="dark"] div#page {
      background: var(--trans-dark);
    }
    
    
    /* 夜间模式页脚页头遮罩透明 */
    [data-theme="dark"] #footer::before {
      background: transparent !important;
    }
    [data-theme="dark"] #page-header::before {
      background: transparent !important;
    }
    
    /* 阅读模式 */
    .read-mode #aside-content .card-widget {
      background: rgba(158, 204, 171, 0.5) !important;
    }
    .read-mode div#post {
      background: rgba(158, 204, 171, 0.5) !important;
    }
    
    /* 夜间模式下的阅读模式 */
    [data-theme="dark"] .read-mode #aside-content .card-widget {
      background: rgba(25, 25, 25, 0.9) !important;
      color: #ffffff;
    }
    [data-theme="dark"] .read-mode div#post {
      background: rgba(25, 25, 25, 0.9) !important;
      color: #ffffff;
    }
    
  2. 参数说明:

    • --trans-light:白天模式带透明度的背景色,如rgba(255, 255, 255, 0.88)底色是纯白色,其中0.88就透明度,在0-1之间调节,值越大越不透明;
    • --trans-dark: 夜间模式带透明度的背景色,如rgba(25, 25, 25, 0.88)底色是柔和黑色,其中0.88就透明度,在0-1之间调节,值越大越不透明;
    • --border-style: 边框样式,1px solid rgb(169, 169, 169)指宽度为1px的灰色实体边框;
    • --backdrop-filter: 背景过滤器,如blur(5px) saturate(150%)表示饱和度为150%的、高斯模糊半径为5px的过滤器,这是亚克力效果的一种实现方法;
    • 大家可以根据自己喜好进行调节,不用拘泥于我的样式!
  3. 记住在主题配置文件_config.butterfly.ymlinject配置项中引入该css文件:

    1
    2
    3
    
    inject: 
      head: 
    +    - <link rel="stylesheet" href="/css/custom.css">
    
  4. 重启项目即可看见效果:

    1
    
    hexo cl; hexo s
    

引入iconfont自定义图标(店长)

新建图标项目

  1. 访问阿里巴巴矢量图标库,注册登录。

  2. 搜索自己心仪的图标,然后选择添加入库,加到购物车。

  3. 选择完毕后点击右上角的购物车图标,打开侧栏,选择添加到项目,如果没有项目就新建一个。

    p4

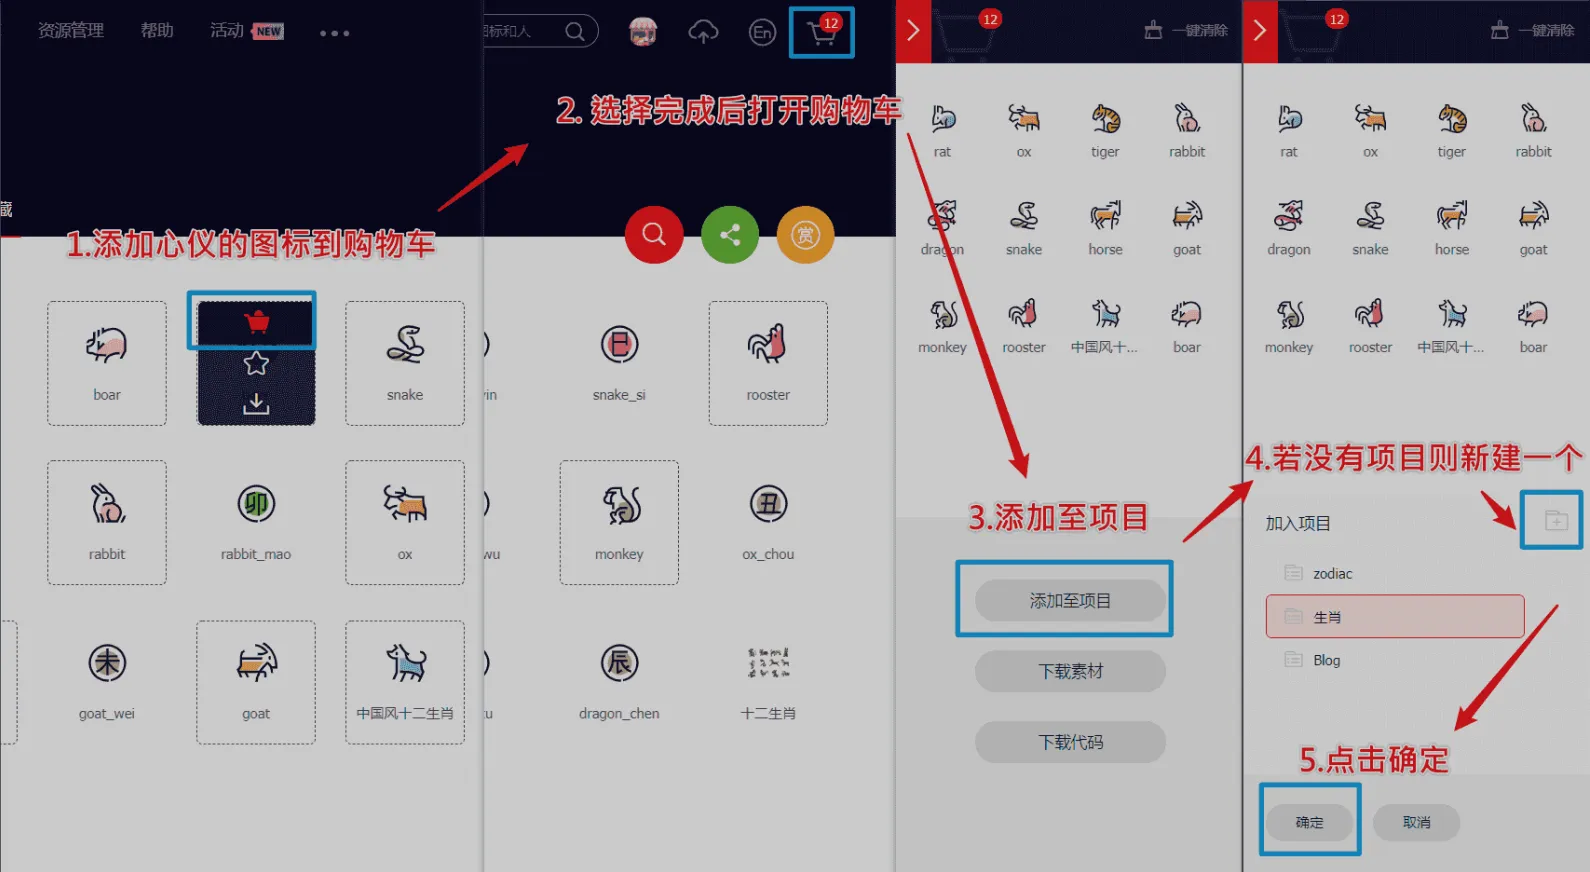
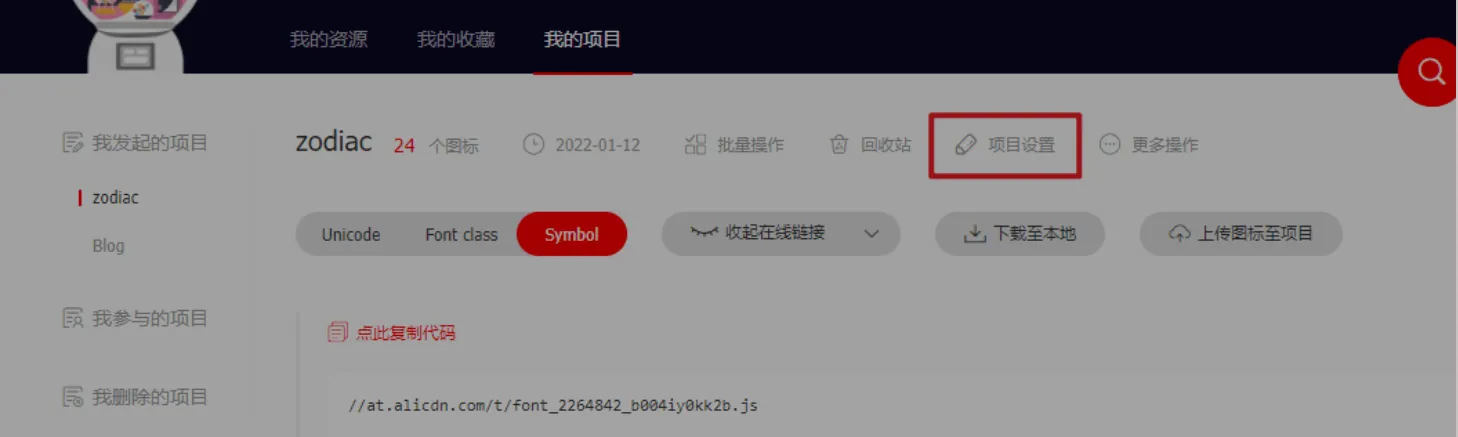
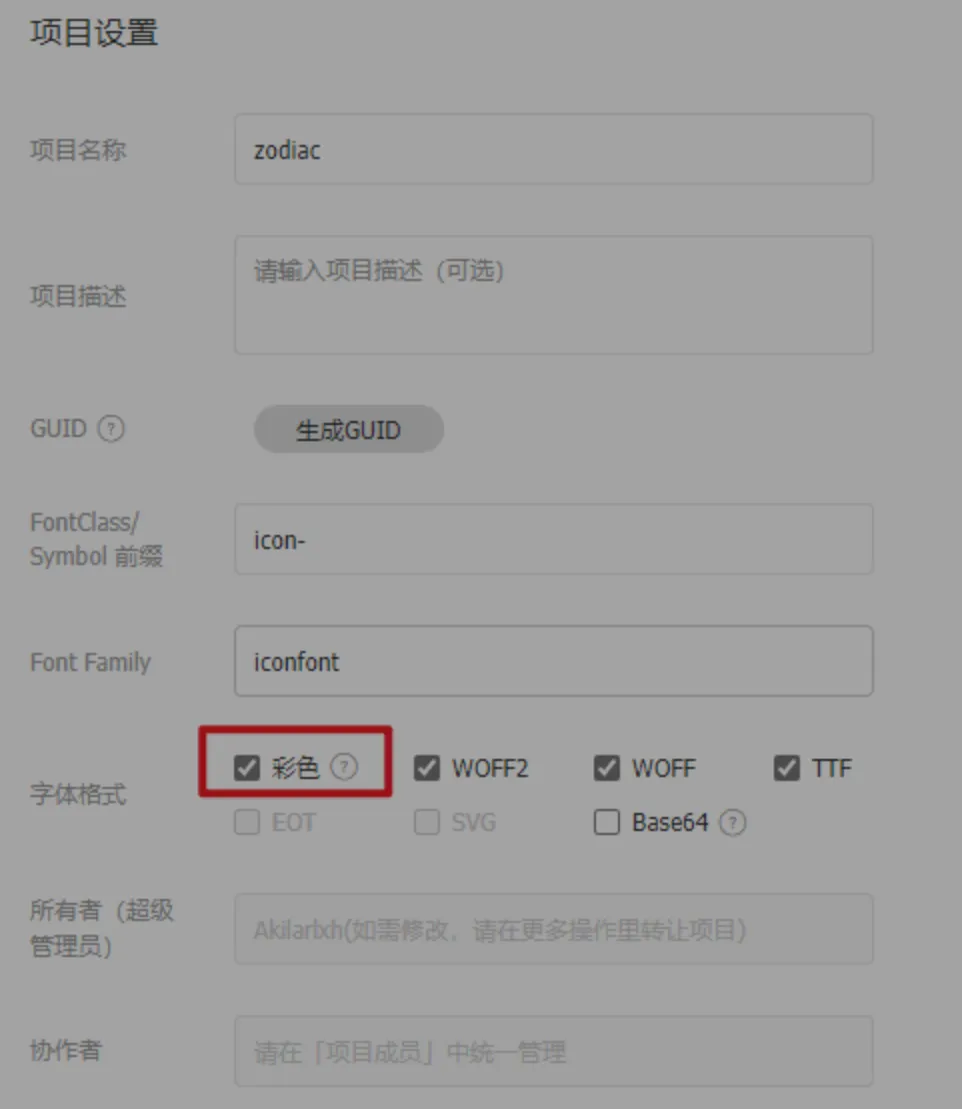
  4. 可以通过上方顶栏菜单->资源管理->我的项目,找到之前添加的图标项目。(现在的iconfont可以在图标库的项目设置里直接打开彩色设置,然后采用fontclass的引用方式即可使用多彩图标。但是单一项目彩色图标上限是40个图标,酌情采用。)

    image-20221029212836645

    image-20221029212857202

引入图标

线上引入方案,我使用的是官方文档中最便捷的font-class方案。这一方案偶尔会出现图标加载不出的情况。但是便于随时对图标库进行升级,换一下在线链接即可,适合新手使用。最新版本的iconfont支持直接在项目设置中开启彩色图标,从而实现直接用class添加多彩色图标。(推荐直接用这个即可)

  1. [BlogRoot]\themes\butterfly\source\css\custom.css中填写如下内容,引入Unicode和Font-class的线上资源:

    1
    
    @import "//at.alicdn.com/t/font_2264842_b004iy0kk2b.css";
    

    更推荐在在主题配置文件inject配置项进行全局引入:

    1
    2
    3
    4
    5
    
    inject:
      head:
        - <link rel="stylesheet" href="//at.alicdn.com/t/font_2264842_b004iy0kk2b.css" media="defer" onload="this.media='all'">
      bottom: 
        - <script async src="//at.alicdn.com/t/font_2264842_b004iy0kk2b.js"></script> 
    
  2. 同时可以在自定义CSS中添加如下样式来控制图标默认大小和颜色等属性(若已经在项目设置中勾选了彩色选项,则无需再定义图标颜色),写法与字体样式类似,这恐怕也是它被称为iconfont(图标字体)的原因:

    1
    2
    3
    4
    5
    6
    7
    8
    
    .iconfont {
      font-family: "iconfont" !important;
      /* 这里可以自定义图标大小 */
      font-size: 3em;
      font-style: normal;
      -webkit-font-smoothing: antialiased;
      -moz-osx-font-smoothing: grayscale;
    }
    
  3. 可以通过自己的阿里图标库的font-class方案查询复制相应的icon-xxxx

菜单栏多色动态图标(店长)

前置教程:Hexo引入阿里矢量图标库-iconfont inject基于Butterfly的外挂标签引入-Tag Plugins Plus中关于动态标签anima的内容。请确保您已经完成了前置教程,并实现了在文章中使用symbol写法来引入iconfont图标。同时引入了fontawesome_animation的前置依赖。 主要检查您的inject配置项中是否有这两个依赖

1
2
3
4
5
6
7
inject:
  head:
    #动画标签anima的依赖
    - <link rel="stylesheet" href="https://fastly.jsdelivr.net/gh/l-lin/font-awesome-animation/dist/font-awesome-animation.min.css"  media="defer" onload="this.media='all'">
  bottom:
    # 阿里矢量图标,这串是我的图标库,你的链接会有所不同。
    - <script async src="//at.alicdn.com/t/font_2032782_ev6ytrh30f.js"></script>
  1. 替换[BlogRoot]\themes\butterfly\layout\includes\header\menu_item.pug为以下代码,本方案默认使用观感最佳的悬停父元素触发子元素动画效果,默认动画为faa-tada。注意:可以把之前的代码注释掉,再在后面加上如下代码,以便于回滚,此代码在butterfly 4.3.1 上可以运行并保留hide字段隐藏子菜单的功能,其他版本自行测试。代码的本质并不复杂,就是扫描配置文件对应的配置项,然后根据||的分割标志筛选出对应的图标名称、对应链接等,从而渲染出html页面。

     1
     2
     3
     4
     5
     6
     7
     8
     9
    10
    11
    12
    13
    14
    15
    16
    17
    18
    19
    20
    21
    22
    23
    24
    25
    26
    27
    28
    29
    30
    31
    32
    33
    34
    35
    36
    37
    38
    39
    40
    41
    42
    43
    44
    45
    46
    
    if theme.menu
      .menus_items
        each value, label in theme.menu
          if typeof value !== 'object'
            .menus_item
              - const valueArray = value.split('||')
              a.site-page.faa-parent.animated-hover(href=url_for(trim(value.split('||')[0])))
                if valueArray[1]
                  i.fa-fw(class=trim(valueArray[1]))
                  - var icon_value = trim(value.split('||')[1])
                  - var anima_value = value.split('||')[2] ? trim(value.split('||')[2]) : 'faa-tada'
                  if icon_value.substring(0,2)=="fa"      
                    i.fa-fw(class=icon_value + ' ' + anima_value)
                  else if icon_value.substring(0,4)=="icon"          
                    svg.icon(aria-hidden="true" class=anima_value)
                      use(xlink:href=`#`+ icon_value)
                span=' '+label
          else
            .menus_item
              - const labelArray = label.split('||')
              - const hideClass = labelArray[3] && trim(labelArray[3]) === 'hide' ? 'hide' : ''
              a.site-page.group.faa-parent.animated-hover(class=`${hideClass}` href='javascript:void(0);')
                if labelArray[1]
                  - var icon_label = trim(label.split('||')[1])
                  - var anima_label = label.split('||')[2] ? trim(label.split('||')[2]) : 'faa-tada'
                  if icon_label.substring(0,2)=="fa"      
                    i.fa-fw(class=icon_label + ' ' + anima_label)
                  else if icon_label.substring(0,4)=="icon"    
                    svg.icon(aria-hidden="true" class=anima_label)
                      use(xlink:href=`#`+ icon_label)
                span=' '+ trim(labelArray[0])
                i.fas.fa-chevron-down
              ul.menus_item_child
                each val,lab in value 
                  - const valArray = val.split('||')
                  li
                    a.site-page.child.faa-parent.animated-hover(href=url_for(trim(val.split('||')[0])))
                      if valArray[1]
                        - var icon_val = trim(val.split('||')[1])
                        - var anima_val = val.split('||')[2] ? trim(val.split('||')[2]) : 'faa-tada'
                        if icon_val.substring(0,2)=="fa"      
                          i.fa-fw(class=icon_val + ' ' + anima_val)
                        else if icon_val.substring(0,4)=="icon"
                          svg.icon(aria-hidden="true" class=anima_val)
                            use(xlink:href=`#`+ icon_val)                    
                      span=' '+ lab
    
  2. 以下是填写示例,在[BlogRoot]\_config.butterfly.yml中修改。icon-xxx字样的为iconfontsymbol引入方案的id值,可以在你的iconfont图标库内查询,其中hide属性也是可以用的。

     1
     2
     3
     4
     5
     6
     7
     8
     9
    10
    11
    12
    13
    14
    15
    16
    
    menu:
      首页: / || fas fa-home || faa-tada
      时间轴: /archives/ || fas fa-archive
      闲言碎语: /artitalk/ || fas fa-comment-dots
      音乐馆: /music/ || fas fa-music
      分类: /categories/ || fas fa-folder-open
      # List||fas fa-list:
      #   Music: /music/ || fas fa-music
      #   Movie: /movies/ || fas fa-video
    
      朋友圈: /fcircle/ || fab fa-artstation
      留言板: /comments/ || fas fa-envelope
      友人帐: /link/ || fas fa-link
      # 闲言碎语: /hpptalk/ || fas fa-comment-dots
      追番: /bangumis/ || icon-bilibili1
      关于: /about/ || icon-zhifeiji
    
  3. 要注意的是,这里的动态图标是svg.icon的标签,因此上面调节.iconfont的css并不使用,我们需要在自定义样式文件custom.css里加上一些样式来限制图标的大小和颜色等,具体大小自行调节。

    1
    2
    3
    4
    5
    6
    7
    
    svg.icon {
      width: 1.28em;
      height: 1.28em;
      vertical-align: -0.15em;
      fill: currentColor;
      overflow: hidden;
    }
    
  4. 重启项目即可看到效果:

    1
    
    hexo cl; hexo s
    

Social卡片彩色图标引入(店长)

代码原理和上面的菜单栏基本一致,所以各个前置教程都不再重复,这里只提供代码魔改内容和配置项编写方案。(记住要引入了自己的图标再来看这个教程!!!)

  1. 重写[BlogRoot]\themes\butterfly\layout\includes\header\social.pug,替换为以下代码:

     1
     2
     3
     4
     5
     6
     7
     8
     9
    10
    
    each value, title in theme.social
      a.social-icon.faa-parent.animated-hover(href=url_for(trim(value.split('||')[0])) target="_blank" title=title === undefined ? '' : trim(title))
        if value.split('||')[1]
          - var icon_value = trim(value.split('||')[1])
          - var anima_value = value.split('||')[2] ? trim(value.split('||')[2]) : 'faa-tada'
          if icon_value.substring(0,2)=="fa"      
            i.fa-fw(class=icon_value + ' ' + anima_value)
          else if icon_value.substring(0,4)=="icon"          
            svg.icon(aria-hidden="true" class=anima_value)
              use(xlink:href=`#`+ icon_value)
    
  2. 以下为对应的social配置项。写法沿用menu_item的写法示例,修改[BlogRoot]\_config.butterfly.ymlsocial配置项,具体的链接改为自己的。

    1
    2
    3
    4
    5
    6
    
    social:
      Github: https://github.com/ktzxy || icon-gitHub || faa-tada
      Email: https://mail.qq.com/cgi-bin/qm_share?t=qm_mailme&email=222251511764@qq.com || icon-youxiang || faa-tada
      RSS: atom.xml || icon-rss || faa-tada
      BiliBili: https://space.bilibili.com/496148176 || icon-bilibili || faa-tada
      QQ: tencent://Message/?Uin=2251511764&amp;websiteName=local.edu.com:8888=&amp;Menu=yes || icon-QQ1 || faa-tada
    
  3. 要注意的是,这里的动态图标是svg.icon的标签,因此上面调节.iconfont的css并不使用,我们需要在自定义样式文件custom.css里加上一些样式来限制图标的大小和颜色等,具体大小自行调节(如果上面弄过菜单栏的图标大小,这里也就不需要再重复写了)。

    1
    2
    3
    4
    5
    6
    7
    
    svg.icon {
      width: 1.28em;
      height: 1.28em;
      vertical-align: -0.15em;
      fill: currentColor;
      overflow: hidden;
    }
    
  4. 进阶操作:不知道大家发现没有,这个css对菜单栏的图标和对社交图标同时生效,但是有时候我们想这两者有不一样的大小,怎么办?其实很简单,只要我们给这两部分的图标元素贴上不同的“标签”就可以,这个标签可以是id,也可以是class,但是众所周知html中的id是唯一的,我们这里有多个图标,因此贴上不通的class比较合适,因此我们改造一下[BlogRoot]\themes\butterfly\layout\includes\header\social.pug这个文件

     1
     2
     3
     4
     5
     6
     7
     8
     9
    10
    11
    
    each value, title in theme.social
      a.social-icon.faa-parent.animated-hover(href=url_for(trim(value.split('||')[0])) target="_blank" title=title === undefined ? '' : trim(title))
        if value.split('||')[1]
          - var icon_value = trim(value.split('||')[1])
          - var anima_value = value.split('||')[2] ? trim(value.split('||')[2]) : 'faa-tada'
          if icon_value.substring(0,2)=="fa"      
            i.fa-fw(class=icon_value + ' ' + anima_value)
          else if icon_value.substring(0,4)=="icon"          
    -        svg.icon(aria-hidden="true" class=anima_value)
    +        svg.social_icon(aria-hidden="true" class=anima_value)
              use(xlink:href=`#`+ icon_value)
    

    上面的改动会将图标渲染成class=social_icon的标签,现在我们可以区分菜单栏还是社交的图标的,如果想调节社交图标的大小就用以下的css

    1
    2
    3
    4
    5
    6
    7
    
    svg.social_icon {
      width: 1.20em;
      height: 1.20em;
      vertical-align: -0.15em;
      fill: currentColor;
      overflow: hidden;
    }
    

    举一反三,要想专门用css改动菜单栏图标大小,只需要将[BlogRoot]\themes\butterfly\layout\includes\header\menu_item.pug文件中的svg.icon替换成svg.menu_icon,然后用以下的css

    1
    2
    3
    4
    5
    6
    7
    
    svg.menu_icon {
      width: 1.28em;
      height: 1.28em;
      vertical-align: -0.15em;
      fill: currentColor;
      overflow: hidden;
    }
    
  5. 重启项目即可看到效果:

    1
    
    hexo cl; hexo s
    

*侧边栏图标和文字自定义

  1. 进入[BlogRoot]\themes\butterfly\layout\includes\widget\card_webinfo.pug,进行以下修改,因为默认的图标是font-awesome的黑白图标,就是i.fas.fa-chart-line那一行,删除,然后引入新的图标标签,其中图标的样式、名称等参考自己的需要进行更改,样式主要是widthheightpositiontop这几个属性,这里的animated-hoverfaa-tada是给对应的元素套上对应的class,如果装了动画依赖,扫描到这些class的元素会自动挂载动画样式,如果不想要可以去除。

     1
     2
     3
     4
     5
     6
     7
     8
     9
    10
    11
    12
    13
    14
    15
    16
    17
    18
    19
    20
    21
    22
    23
    24
    25
    26
    27
    28
    29
    30
    31
    32
    33
    34
    35
    36
    37
    
    if theme.aside.card_webinfo.enable
      .card-widget.card-webinfo
        .item-headline
    -      i.fas.fa-chart-line
    +      a.faa-parent.animated-hover
    +       svg.faa-tada.icon(style="height:25px;width:25px;fill:currentColor;position:relative;top:5px" aria-hidden="true")
    +        use(xlink:href='#icon-shujutongji2')
          span= _p('aside.card_webinfo.headline')
        .webinfo
          if theme.aside.card_webinfo.post_count
            .webinfo-item
              .item-name= _p('aside.card_webinfo.article_name') + " :"
              .item-count= site.posts.length
          if theme.runtimeshow.enable
            .webinfo-item
              .item-name= _p('aside.card_webinfo.runtime.name') + " :"
              .item-count#runtimeshow(data-publishDate=date_xml(theme.runtimeshow.publish_date))
                i.fa-solid.fa-spinner.fa-spin
          if theme.wordcount.enable && theme.wordcount.total_wordcount
            .webinfo-item
              .item-name=_p('aside.card_webinfo.site_wordcount') + " :"
              .item-count=totalcount(site)
          if theme.busuanzi.site_uv
            .webinfo-item
              .item-name= _p('aside.card_webinfo.site_uv_name') + " :"
              .item-count#busuanzi_value_site_uv
                i.fa-solid.fa-spinner.fa-spin
          if theme.busuanzi.site_pv
            .webinfo-item
              .item-name= _p('aside.card_webinfo.site_pv_name') + " :"
              .item-count#busuanzi_value_site_pv
                i.fa-solid.fa-spinner.fa-spin
          if theme.aside.card_webinfo.last_push_date
            .webinfo-item
              .item-name= _p('aside.card_webinfo.last_push_date.name') + " :"
              .item-count#last-push-date(data-lastPushDate=date_xml(Date.now()))
                i.fa-solid.fa-spinner.fa-spin
    
  2. 接下来就是改文了,注意到第8行的span= _p('aside.card_webinfo.headline'),这行代码就是渲染图标后面的文字,我们其实可以直接改成span= _p('小站资讯'),这样就已经按照自己的文字显示了,但是为了更好维护,我们遵循主题的设计原则,注意到变量aside.card_webinfo.headline,这其实是在写好的语言包中扫描对应的值,因为不同的语言对应不同的文字,如果我们设置了语言为zh-CN那么就到[BlogRoot]\themes\butterfly\languages\zh-CN.yml进行修改。yml文件是以缩进区分层级的,我们只需要寻找aside->card_webinfo->headline这一项修改为自己喜欢的内容即可

     1
     2
     3
     4
     5
     6
     7
     8
     9
    10
    11
    12
    13
    14
    15
    16
    17
    18
    19
    20
    21
    22
    23
    24
    25
    26
    27
    28
    29
    30
    31
    32
    
    aside:
      articles: 文章
      tags: 标签
      categories: 分类
      card_announcement: 公告栏
      card_categories: 分类
      card_tags: 标签
      card_archives: 归档
      card_recent_post: 最新文章
      card_friend_link: 通讯录
      card_webinfo:
    -    headline: 网站资讯
    +    headline: 网站资讯
        article_name: 文章数目
        runtime:
          name: 已运行时间
          unit: 
        last_push_date:
          name: 最后更新时间
        site_wordcount: 本站总字数
        site_uv_name: 本站访客数
        site_pv_name: 本站总访问量
      more_button: 查看更多
      card_newest_comments:
        headline: 最新评论
        loading_text: 正在加载中...
        error: 无法获取评论,请确认相关配置是否正确
        zero: 没有评论
        image: 图片
        link: 链接
        code: 代码
      card_toc: 目录
    
  3. 最后重新编译运行即可看见效果。

    1
    
    hexo cl; hexo s
    

*渐变色版权美化(店长+微调)

  1. 修改[BlogRoot]\themes\butterfly\layout\includes\post\post-copyright.pug,直接复制以下内容替换原文件内容。此处多次用到了三元运算符作为默认项设置,在确保有主题配置文件的默认项的情况下,也可以在相应文章的front-matter中重新定义作者,原文链接,开源许可协议等内容。

     1
     2
     3
     4
     5
     6
     7
     8
     9
    10
    11
    12
    13
    14
    15
    16
    17
    18
    19
    20
    21
    22
    23
    24
    25
    26
    27
    28
    29
    30
    31
    32
    33
    
    PLAINTEXT
    if theme.post_copyright.enable && page.copyright !== false
      - let author = page.copyright_author ? page.copyright_author : config.author
      - let url = page.copyright_url ? page.copyright_url : page.permalink
      - let license = page.license ? page.license : theme.post_copyright.license
      - let license_url = page.license_url ? page.license_url : theme.post_copyright.license_url
      .post-copyright
        .post-copyright__title
          span.post-copyright-info
            h #[=page.title]
        .post-copyright__type
          span.post-copyright-info
            a(href=url_for(url))= theme.post_copyright.decode ? decodeURI(url) : url
        .post-copyright-m
          .post-copyright-m-info
            .post-copyright-a
                h 作者
                .post-copyright-cc-info
                    h=author
            .post-copyright-c
                h 发布于
                .post-copyright-cc-info
                    h=date(page.date, config.date_format)
            .post-copyright-u
                h 更新于
                .post-copyright-cc-info
                    h=date(page.updated, config.date_format)
            .post-copyright-c
                h 许可协议
                .post-copyright-cc-info
                    a.icon(rel='noopener' target='_blank' title='Creative Commons' href='https://creativecommons.org/')
                      i.fab.fa-creative-commons
                    a(rel='noopener' target='_blank' title=license href=url_for(license_url))=license
    
  2. 修改[BlogRoot]\themes\butterfly\source\css\_layout\post.styl,直接复制以下内容,替换原文件,这个文件就是自己调节样式的。其中,184行是白天模式的背景色,这里默认是我网站的渐变色,大家可以根据自己的喜好调节;253行是夜间模式的发光光圈颜色,大家也可以自行替换成自己喜欢的颜色:

      1
      2
      3
      4
      5
      6
      7
      8
      9
     10
     11
     12
     13
     14
     15
     16
     17
     18
     19
     20
     21
     22
     23
     24
     25
     26
     27
     28
     29
     30
     31
     32
     33
     34
     35
     36
     37
     38
     39
     40
     41
     42
     43
     44
     45
     46
     47
     48
     49
     50
     51
     52
     53
     54
     55
     56
     57
     58
     59
     60
     61
     62
     63
     64
     65
     66
     67
     68
     69
     70
     71
     72
     73
     74
     75
     76
     77
     78
     79
     80
     81
     82
     83
     84
     85
     86
     87
     88
     89
     90
     91
     92
     93
     94
     95
     96
     97
     98
     99
    100
    101
    102
    103
    104
    105
    106
    107
    108
    109
    110
    111
    112
    113
    114
    115
    116
    117
    118
    119
    120
    121
    122
    123
    124
    125
    126
    127
    128
    129
    130
    131
    132
    133
    134
    135
    136
    137
    138
    139
    140
    141
    142
    143
    144
    145
    146
    147
    148
    149
    150
    151
    152
    153
    154
    155
    156
    157
    158
    159
    160
    161
    162
    163
    164
    165
    166
    167
    168
    169
    170
    171
    172
    173
    174
    175
    176
    177
    178
    179
    180
    181
    182
    183
    184
    185
    186
    187
    188
    189
    190
    191
    192
    193
    194
    195
    196
    197
    198
    199
    200
    201
    202
    203
    204
    205
    206
    207
    208
    209
    210
    211
    212
    213
    214
    215
    216
    217
    218
    219
    220
    221
    222
    223
    224
    225
    226
    227
    228
    229
    230
    231
    232
    233
    234
    235
    236
    237
    238
    239
    240
    241
    242
    243
    244
    245
    246
    247
    248
    249
    250
    251
    252
    253
    254
    255
    256
    257
    258
    259
    260
    261
    262
    263
    264
    265
    266
    
    STYLUS
    
    beautify()
      headStyle(fontsize)
        padding-left: unit(fontsize + 12, 'px')
    
        &:before
          margin-left: unit((-(fontsize + 6)), 'px')
          font-size: unit(fontsize, 'px')
    
        &:hover
          padding-left: unit(fontsize + 18, 'px')
    
      h1,
      h2,
      h3,
      h4,
      h5,
      h6
        transition: all .2s ease-out
    
        &:before
          position: absolute
          top: calc(50% - 7px)
          color: $title-prefix-icon-color
          content: $title-prefix-icon
          line-height: 1
          transition: all .2s ease-out
          @extend .fontawesomeIcon
    
        &:hover
          &:before
            color: $light-blue
    
      h1
        headStyle(20)
    
      h2
        headStyle(18)
    
      h3
        headStyle(16)
    
      h4
        headStyle(14)
    
      h5
        headStyle(12)
    
      h6
        headStyle(12)
    
      ol,
      ul
        p
          margin: 0 0 8px
    
      li
        &::marker
          color: $light-blue
          font-weight: 600
          font-size: 1.05em
    
        &:hover
          &::marker
            color: var(--pseudo-hover)
    
      ul > li
        list-style-type: circle
    
    #article-container
      word-wrap: break-word
      overflow-wrap: break-word
    
      a
        color: $theme-link-color
    
        &:hover
          text-decoration: underline
    
      img
        display: block
        margin: 0 auto 20px
        max-width: 100%
        transition: filter 375ms ease-in .2s
    
      p
        margin: 0 0 16px
    
      iframe
        margin: 0 0 20px
    
      if hexo-config('anchor')
        a.headerlink
          &:after
            @extend .fontawesomeIcon
            float: right
            color: var(--headline-presudo)
            content: '\f0c1'
            font-size: .95em
            opacity: 0
            transition: all .3s
    
          &:hover
            &:after
              color: var(--pseudo-hover)
    
        h1,
        h2,
        h3,
        h4,
        h5,
        h6
          &:hover
            a.headerlink
              &:after
                opacity: 1
    
      ol,
      ul
        ol,
        ul
          padding-left: 20px
    
        li
          margin: 4px 0
    
        p
          margin: 0 0 8px
    
      if hexo-config('beautify.enable')
        if hexo-config('beautify.field') == 'site'
          beautify()
        else if hexo-config('beautify.field') == 'post'
          &.post-content
            beautify()
    
      > :last-child
        margin-bottom: 0 !important
    
    #post
      .tag_share
        .post-meta
          &__tag-list
            display: inline-block
    
          &__tags
            display: inline-block
            margin: 8px 8px 8px 0
            padding: 0 12px
            width: fit-content
            border: 1px solid $light-blue
            border-radius: 12px
            color: $light-blue
            font-size: .85em
            transition: all .2s ease-in-out
    
            &:hover
              background: $light-blue
              color: var(--white)
    
        .post_share
          display: inline-block
          float: right
          margin: 8px 0
          width: fit-content
    
          .social-share
            font-size: .85em
    
            .social-share-icon
              margin: 0 4px
              width: w = 1.85em
              height: w
              font-size: 1.2em
              line-height: w
    
      .post-copyright
        position: relative
        margin: 40px 0 10px
        padding: 10px 16px
        border: 1px solid var(--light-grey)
        transition: box-shadow .3s ease-in-out
        overflow: hidden
        border-radius: 12px!important
        background: linear-gradient(45deg, #f6d8f5, #c2f1f0, #f0debf);
    
        &:before
          background var(--heo-post-blockquote-bg)
          position absolute
          right -26px
          top -120px
          content '\f25e'
          font-size 200px
          font-family 'Font Awesome 5 Brands'
          opacity .2
    
        &:hover
          box-shadow: 0 0 8px 0 rgba(232, 237, 250, .6), 0 2px 4px 0 rgba(232, 237, 250, .5)
    
        .post-copyright
          &-meta
            color: $light-blue
            font-weight: bold
    
          &-info
            padding-left: 6px
    
            a
              text-decoration: none
              word-break: break-word
    
              &:hover
                text-decoration: none
    
      .post-copyright-cc-info
        color: $theme-color;
    
      .post-outdate-notice
        position: relative
        margin: 0 0 20px
        padding: .5em 1.2em
        border-radius: 3px
        background-color: $noticeOutdate-bg
        color: $noticeOutdate-color
    
        if hexo-config('noticeOutdate.style') == 'flat'
          padding: .5em 1em .5em 2.6em
          border-left: 5px solid $noticeOutdate-border
    
          &:before
            @extend .fontawesomeIcon
            position: absolute
            top: 50%
            left: .9em
            color: $noticeOutdate-border
            content: '\f071'
            transform: translateY(-50%)
    
      .ads-wrap
        margin: 40px 0
    .post-copyright-m-info
      .post-copyright-a,
      .post-copyright-c,
      .post-copyright-u
        display inline-block
        width fit-content
        padding 2px 5px
    [data-theme="dark"]
      #post
        .post-copyright
          background #07080a
          text-shadow #bfbeb8 0 0 2px
          border 1px solid rgb(19 18 18 / 35%)
          box-shadow 0 0 5px var(--theme-color)
          animation flashlight 1s linear infinite alternate
      .post-copyright-info
        color #e0e0e4
    
    #post
      .post-copyright__title
        font-size 22px
      .post-copyright__notice
        font-size 15px
      .post-copyright
        box-shadow 2px 2px 5px
    
  3. 默认项的配置

    • 作者:[BlogRoot]\_config.yml中的author配置项

      1
      2
      3
      4
      5
      6
      7
      8
      
      # Site
      title: Akilarの糖果屋
      subtitle: Akilar.top
      description:
      keywords:
      author: Akilar #默认作者
      language: zh-CN
      timezone: ''
      
    • 许可协议:[BlogRoot]\_config.butterfly.yml中的licenselicense_url配置项

      1
      2
      3
      4
      5
      
      post_copyright:
        enable: true
        decode: true
        license: CC BY-NC-SA 4.0
        license_url: https://creativecommons.org/licenses/by-nc-sa/4.0/
      
  4. 页面覆写配置项,修改对应文章的front-matter

     1
     2
     3
     4
     5
     6
     7
     8
     9
    10
    
    MARKDOWN
    ---
    title: Copyright-beautify # 文章名称
    date: 2021-03-02 13:52:46 # 文章发布日期
    updated: 2021-03-02 13:52:46 # 文章更新日期
    copyright_author: Nesxc # 作者覆写
    copyright_url: https://www.nesxc.com/post/hexocc.html # 原文链接覆写
    license: # 许可协议名称覆写
    license_url: # 许可协议链接覆写
    ---
    

顶部渐变条色加载条

  1. 新建[BlogRoot]\source\css\progress_bar.css文件,写入以下内容(或者你在[BlogRoot]\source\css\custom.css直接加也行,最后在配置文件记得引入即可)

     1
     2
     3
     4
     5
     6
     7
     8
     9
    10
    11
    12
    13
    14
    15
    16
    17
    18
    19
    20
    21
    22
    23
    24
    25
    26
    27
    28
    29
    30
    31
    32
    33
    34
    35
    36
    37
    38
    39
    40
    41
    42
    43
    44
    45
    46
    47
    48
    49
    50
    51
    52
    53
    54
    55
    
    .pace {
        -webkit-pointer-events: none;
        pointer-events: none;
        -webkit-user-select: none;
        -moz-user-select: none;
        user-select: none;
        z-index: 2000;
        position: fixed;
        margin: auto;
        top: 4px;
        left: 0;
        right: 0;
        height: 8px;
        border-radius: 8px;
        width: 7rem;
        background: #eaecf2;
        border: 1px #e3e8f7;
        overflow: hidden
    }
    
    .pace-inactive .pace-progress {
        opacity: 0;
        transition: .3s ease-in
    }
    
    .pace .pace-progress {
        -webkit-box-sizing: border-box;
        -moz-box-sizing: border-box;
        -ms-box-sizing: border-box;
        -o-box-sizing: border-box;
        box-sizing: border-box;
        -webkit-transform: translate3d(0, 0, 0);
        -moz-transform: translate3d(0, 0, 0);
        -ms-transform: translate3d(0, 0, 0);
        -o-transform: translate3d(0, 0, 0);
        transform: translate3d(0, 0, 0);
        max-width: 200px;
        position: absolute;
        z-index: 2000;
        display: block;
        top: 0;
        right: 100%;
        height: 100%;
        width: 100%;
        /* linear-gradient(to right, #3494e6, #ec6ead) */
        background: linear-gradient(to right, #43cea2, #3866ca);
        animation: gradient 2s ease infinite;
        background-size: 200%
    }
    
    .pace.pace-inactive {
        opacity: 0;
        transition: .3s;
        top: -8px
    }
    
  2. 在主题配置文件_config.butterfly.ymlinject配置项加入刚刚的css样式和必须的js依赖:

    1
    2
    3
    4
    5
    6
    7
    
    inject:
      head:
        - xxx
        - <link rel="stylesheet" href="/css/progress_bar.css" media="defer" onload="this.media='all'"> 
      bottom: 
      	- xxx
        - <script async src="//npm.elemecdn.com/pace-js@1.2.4/pace.min.js"></script>
    

*Bilibili视频适配%

*文章页局部 html 代码不渲染

在你的 md 文章页中,部分内容不想经过 Hexo 渲染,则包一层 raw 标签:

1
2
3
4
{% raw %}
<div class="">你的一些代码...</div>
<script>你的一些代码...</script>
{% endraw %}

那么标签内的代码就不会被框架渲染了~

文章H1~H6标题小风车转动效果

  1. 修改主题配置文件_config.butterfly.yml文件的beautify配置项:

    1
    2
    3
    4
    5
    6
    
    beautify:
      enable: true
      field: post # site/post
      # title-prefix-icon: '\f0c1' 原内容
      title-prefix-icon: '\f863'
      title-prefix-icon-color: "#F47466"
    
  2. [BlogRoot]\source\css\custom.css 中加入以下代码,可以自己调节一下转速:

     1
     2
     3
     4
     5
     6
     7
     8
     9
    10
    11
    12
    13
    14
    15
    16
    17
    18
    19
    20
    21
    22
    23
    24
    25
    26
    27
    28
    29
    30
    31
    32
    33
    34
    35
    36
    37
    38
    39
    40
    41
    42
    43
    44
    45
    46
    47
    48
    49
    50
    51
    52
    53
    54
    55
    56
    57
    58
    59
    60
    61
    62
    63
    64
    65
    66
    67
    68
    69
    70
    71
    72
    73
    74
    75
    76
    77
    78
    79
    80
    81
    82
    83
    84
    85
    86
    87
    88
    
    /* 文章页H1-H6图标样式效果 */
    /* 控制风车转动速度 4s那里可以自己调节快慢 */
    h1::before,
    h2::before,
    h3::before,
    h4::before,
    h5::before,
    h6::before {
      -webkit-animation: ccc 4s linear infinite;
      animation: ccc 4s linear infinite;
    }
    /* 控制风车转动方向 -1turn 为逆时针转动,1turn 为顺时针转动,相同数字部分记得统一修改 */
    @-webkit-keyframes ccc {
      0% {
        -webkit-transform: rotate(0deg);
        transform: rotate(0deg);
      }
      to {
        -webkit-transform: rotate(-1turn);
        transform: rotate(-1turn);
      }
    }
    @keyframes ccc {
      0% {
        -webkit-transform: rotate(0deg);
        transform: rotate(0deg);
      }
      to {
        -webkit-transform: rotate(-1turn);
        transform: rotate(-1turn);
      }
    }
    /* 设置风车颜色 */
    #content-inner.layout h1::before {
      color: #ef50a8;
      margin-left: -1.55rem;
      font-size: 1.3rem;
      margin-top: -0.23rem;
    }
    #content-inner.layout h2::before {
      color: #fb7061;
      margin-left: -1.35rem;
      font-size: 1.1rem;
      margin-top: -0.12rem;
    }
    #content-inner.layout h3::before {
      color: #ffbf00;
      margin-left: -1.22rem;
      font-size: 0.95rem;
      margin-top: -0.09rem;
    }
    #content-inner.layout h4::before {
      color: #a9e000;
      margin-left: -1.05rem;
      font-size: 0.8rem;
      margin-top: -0.09rem;
    }
    #content-inner.layout h5::before {
      color: #57c850;
      margin-left: -0.9rem;
      font-size: 0.7rem;
      margin-top: 0rem;
    }
    #content-inner.layout h6::before {
      color: #5ec1e0;
      margin-left: -0.9rem;
      font-size: 0.66rem;
      margin-top: 0rem;
    }
    /* s设置风车hover动效 6s那里可以自己调节快慢*/
    #content-inner.layout h1:hover,
    #content-inner.layout h2:hover,
    #content-inner.layout h3:hover,
    #content-inner.layout h4:hover,
    #content-inner.layout h5:hover,
    #content-inner.layout h6:hover {
      color: var(--theme-color);
    }
    #content-inner.layout h1:hover::before,
    #content-inner.layout h2:hover::before,
    #content-inner.layout h3:hover::before,
    #content-inner.layout h4:hover::before,
    #content-inner.layout h5:hover::before,
    #content-inner.layout h6:hover::before {
      color: var(--theme-color);
      -webkit-animation: ccc 6s linear infinite;
      animation: ccc 6s linear infinite;
    }
    
  3. 在主题配置文件_config.butterfly.ymlinject配置项进行引入(不再赘述)。

挂绳小猫咪(tzy大佬)

  1. 制作一个盛放内容的盒子,在[BlogRoot]/node_modules/hexo-theme-butterfly/layout/includes/head.pug(如果是git clone 安装在[BlogRoot]/themes/butterfly/layout/includes/head.pug)最后一行加入如下代码:

    1
    
    #myscoll
    

    其实随便放在哪里都行,只要能加载出来就行

  2. [BlogRoot]/node_modules/hexo-theme-butterfly/source/js文件夹下新建一个cat.js,将以下代码复制到文件中。

      1
      2
      3
      4
      5
      6
      7
      8
      9
     10
     11
     12
     13
     14
     15
     16
     17
     18
     19
     20
     21
     22
     23
     24
     25
     26
     27
     28
     29
     30
     31
     32
     33
     34
     35
     36
     37
     38
     39
     40
     41
     42
     43
     44
     45
     46
     47
     48
     49
     50
     51
     52
     53
     54
     55
     56
     57
     58
     59
     60
     61
     62
     63
     64
     65
     66
     67
     68
     69
     70
     71
     72
     73
     74
     75
     76
     77
     78
     79
     80
     81
     82
     83
     84
     85
     86
     87
     88
     89
     90
     91
     92
     93
     94
     95
     96
     97
     98
     99
    100
    101
    102
    103
    104
    105
    106
    107
    108
    109
    110
    111
    112
    113
    114
    115
    116
    117
    118
    119
    120
    121
    122
    123
    124
    125
    126
    127
    128
    129
    130
    131
    132
    133
    134
    135
    136
    137
    138
    139
    140
    141
    142
    143
    144
    145
    146
    147
    
    if (document.body.clientWidth > 992) {
        function getBasicInfo() {
            /* 窗口高度 */
            var ViewH = $(window).height();
            /* document高度 */
            var DocH = $("body")[0].scrollHeight;
            /* 滚动的高度 */
            var ScrollTop = $(window).scrollTop();
            /* 可滚动的高度 */
            var S_V = DocH - ViewH;
            var Band_H = ScrollTop / (DocH - ViewH) * 100;
            return {
                ViewH: ViewH,
                DocH: DocH,
                ScrollTop: ScrollTop,
                Band_H: Band_H,
                S_V: S_V
            }
        };
        function show(basicInfo) {
            if (basicInfo.ScrollTop > 0.001) {
                $(".neko").css('display', 'block');
            } else {
                $(".neko").css('display', 'none');
            }
        }
        (function ($) {
            $.fn.nekoScroll = function (option) {
                var defaultSetting = {
                    top: '0',
                    scroWidth: 6 + 'px',
                    z_index: 9999,
                    zoom: 0.9,
                    borderRadius: 5 + 'px',
                    right: 60 + 'px',
                    // 这里可以换为你喜欢的图片,例如我就换为了雪人,但是要抠图
                    nekoImg: "https://bu.dusays.com/2022/07/20/62d812db74be9.png",
                    hoverMsg: "喵喵喵~",
                    color: "#6f42c1",
                    during: 500,
                    blog_body: "body",
                };
                var setting = $.extend(defaultSetting, option);
                var getThis = this.prop("className") !== "" ? "." + this.prop("className") : this.prop("id") !== "" ? "#" +
                    this.prop("id") : this.prop("nodeName");
                if ($(".neko").length == 0) {
                    this.after("<div class=\"neko\" id=" + setting.nekoname + " data-msg=\"" + setting.hoverMsg + "\"></div>");
                }
                let basicInfo = getBasicInfo();
                $(getThis)
                    .css({
                        'position': 'fixed',
                        'width': setting.scroWidth,
                        'top': setting.top,
                        'height': basicInfo.Band_H * setting.zoom * basicInfo.ViewH * 0.01 + 'px',
                        'z-index': setting.z_index,
                        'background-color': setting.bgcolor,
                        "border-radius": setting.borderRadius,
                        'right': setting.right,
                        'background-image': 'url(' + setting.scImg + ')',
                        'background-image': '-webkit-linear-gradient(45deg, rgba(255, 255, 255, 0.1) 25%, transparent 25%, transparent 50%, rgba(255, 255, 255, 0.1) 50%, rgba(255, 255, 255, 0.1) 75%, transparent 75%, transparent)', 'border-radius': '2em',
                        'background-size': 'contain'
                    });
                $("#" + setting.nekoname)
                    .css({
                        'position': 'fixed',
                        'top': basicInfo.Band_H * setting.zoom * basicInfo.ViewH * 0.01 - 50 + 'px',
                        'z-index': setting.z_index * 10,
                        'right': setting.right,
                        'background-image': 'url(' + setting.nekoImg + ')',
                    });
                show(getBasicInfo());
                $(window)
                    .scroll(function () {
                        let basicInfo = getBasicInfo();
                        show(basicInfo);
                        $(getThis)
                            .css({
                                'position': 'fixed',
                                'width': setting.scroWidth,
                                'top': setting.top,
                                'height': basicInfo.Band_H * setting.zoom * basicInfo.ViewH * 0.01 + 'px',
                                'z-index': setting.z_index,
                                'background-color': setting.bgcolor,
                                "border-radius": setting.borderRadius,
                                'right': setting.right,
                                'background-image': 'url(' + setting.scImg + ')',
                                'background-image': '-webkit-linear-gradient(45deg, rgba(255, 255, 255, 0.1) 25%, transparent 25%, transparent 50%, rgba(255, 255, 255, 0.1) 50%, rgba(255, 255, 255, 0.1) 75%, transparent 75%, transparent)', 'border-radius': '2em',
                                'background-size': 'contain'
                            });
                        $("#" + setting.nekoname)
                            .css({
                                'position': 'fixed',
                                'top': basicInfo.Band_H * setting.zoom * basicInfo.ViewH * 0.01 - 50 + 'px',
                                'z-index': setting.z_index * 10,
                                'right': setting.right,
                                'background-image': 'url(' + setting.nekoImg + ')',
                            });
                        if (basicInfo.ScrollTop == basicInfo.S_V) {
                            $("#" + setting.nekoname)
                                .addClass("showMsg")
                        } else {
                            $("#" + setting.nekoname)
                                .removeClass("showMsg");
                            $("#" + setting.nekoname)
                                .attr("data-msg", setting.hoverMsg);
                        }
                    });
                this.click(function (e) {
                    btf.scrollToDest(0, 500)
                });
                $("#" + setting.nekoname)
                    .click(function () {
                        btf.scrollToDest(0, 500)
                    });
                return this;
            }
        })(jQuery);
    
        $(document).ready(function () {
            //部分自定义
            $("#myscoll").nekoScroll({
                bgcolor: 'rgb(0 0 0 / .5)', //背景颜色,没有绳子背景图片时有效
                borderRadius: '2em',
                zoom: 0.9
            }
            );
            //自定义(去掉以下注释,并注释掉其他的查看效果)
            /*
            $("#myscoll").nekoScroll({
                nekoname:'neko1', //nekoname,相当于id
                nekoImg:'img/猫咪.png', //neko的背景图片
                scImg:"img/绳1.png", //绳子的背景图片
                bgcolor:'#1e90ff', //背景颜色,没有绳子背景图片时有效
                zoom:0.9, //绳子长度的缩放值
                hoverMsg:'你好~喵', //鼠标浮动到neko上方的对话框信息
                right:'100px', //距离页面右边的距离
                fontFamily:'楷体', //对话框字体
                fontSize:'14px', //对话框字体的大小
                color:'#1e90ff', //对话框字体颜色
                scroWidth:'8px', //绳子的宽度
                z_index:100, //不用解释了吧
                during:1200, //从顶部到底部滑动的时长
            });
            */
        })
    }
    
  3. [BlogRoot]/node_modules/hexo-theme-butterfly/source/css文件夹下新建一个cat.css,将以下代码复制到文件中。当然你也可以选择不新建 css 文件,复制代码到custom.css也行,总之有地方引入就行。

     1
     2
     3
     4
     5
     6
     7
     8
     9
    10
    11
    12
    13
    14
    15
    16
    17
    18
    19
    20
    21
    22
    23
    24
    25
    26
    27
    28
    29
    30
    31
    32
    33
    34
    35
    36
    37
    38
    39
    40
    41
    42
    43
    44
    45
    46
    47
    48
    49
    50
    51
    52
    53
    54
    55
    56
    57
    58
    59
    60
    61
    62
    63
    64
    65
    66
    67
    68
    69
    70
    71
    72
    73
    74
    75
    76
    77
    
    body::-webkit-scrollbar {
        width: 0;
    }
    
    .neko {
        width: 64px;
        height: 64px;
        background-image: url("https://bu.dusays.com/2022/07/20/62d812db74be9.png");
        position: absolute;
        right: 32px;
        background-repeat: no-repeat;
        background-size: contain;
        transform: translateX(50%);
        cursor: pointer;
        font-family: tzy;
        font-weight: 600;
        font-size: 16px;
        color: #6f42c1;
        display: none;
    }
    
    .neko::after {
        display: none;
        width: 100px;
        height: 100px;
        background-image: url("https://bu.dusays.com/2022/07/20/62d812d95e6f5.png");
        background-size: contain;
        z-index: 9999;
        position: absolute;
        right: 50%;
        text-align: center;
        line-height: 100px;
        top: -115%;
    
    }
    
    .neko.showMsg::after {
        content: attr(data-msg);
        display: block;
        overflow: hidden;
        text-overflow: ellipsis;
    }
    
    .neko:hover::after {
        content: attr(data-msg);
        display: block;
        overflow: hidden;
        text-overflow: ellipsis;
    }
    
    .neko.fontColor::after {
        color: #333;
    }
    
    /**
     * @description: 滚动条样式  跟猫二选一
     */
    @media screen and (max-width:992px) {
        ::-webkit-scrollbar {
            width: 8px !important;
            height: 8px !important
        }
    
        ::-webkit-scrollbar-track {
            border-radius: 2em;
        }
    
        ::-webkit-scrollbar-thumb {
            background-color: rgb(255 255 255 / .3);
            background-image: -webkit-linear-gradient(45deg, rgba(255, 255, 255, 0.1) 25%, transparent 25%, transparent 50%, rgba(255, 255, 255, 0.1) 50%, rgba(255, 255, 255, 0.1) 75%, transparent 75%, transparent);
            border-radius: 2em
        }
    
        ::-webkit-scrollbar-corner {
            background-color: transparent
        }
    }
    
  4. 在主题配置文件_config.butterfly.yml中引入cat.jscat.css,当然还有在bottom的最前面引入jQuery,因为cat.js的语法依赖jQuery

    1
    2
    3
    4
    5
    6
    
    inject:
      head:
        - <link rel="stylesheet" href="/css/cat.css">
      bottom:
        - <script defer src="https://npm.elemecdn.com/jquery@latest/dist/jquery.min.js"></script>
        - <script defer data-pjax src="/js/cat.js"></script>
    
  5. 最后重新编译运行即可看见效果。

    1
    
    hexo cl; hexo s
    

打赏按钮投币彩蛋效果

收款码样式 可上传到草料网进行样式修改

修改[Blogroot]\themes\butterfly\languages\zh-CN.yml

 1
 2
 3
 4
 5
 6
 7
 8
 9
10
date_suffix:
  just: 刚刚
  min: 分钟前
  hour: 小时前
  day: 天前
  month: 个月前

- donate: 打赏
+ donate: 不给糖果就捣蛋
share: 分享

修改[Blogroot]\themes\butterfly\layout\includes\post\reward.pug,整体替换为以下内容:

 1
 2
 3
 4
 5
 6
 7
 8
 9
10
11
12
13
14
15
16
17
18
19
20
21
link(rel='stylesheet' href=url_for(theme.CDN.option.coin_css) media="defer" onload="this.media='all'")
.post-reward
  button.tip-button.reward-button
    span.tip-button__text= _p('donate')
    .coin-wrapper
      .coin
        .coin__middle
        .coin__back
        .coin__front
    .reward-main
      ul.reward-all
        each item in theme.reward.QR_code
          - var clickTo = (item.itemlist||item).link ? (item.itemlist||item).link : (item.itemlist||item).img
          li.reward-item
            a(href=clickTo target='_blank')
              img.post-qr-code-img(src=url_for((item.itemlist||item).img) alt=(item.itemlist||item).text)
            .post-qr-code-desc=(item.itemlist||item).text
if theme.reward.coinAudio
  - var coinAudio = theme.reward.coinAudio ? url_for(theme.reward.coinAudio) : 'https://cdn.cbd.int/akilar-candyassets@1.0.36/audio/coin.mp3'
  audio#coinAudio(src=coinAudio)
script(defer src=url_for(theme.CDN.option.coin_js))

新建[Blogroot]source\css\coin\coin.css

  1
  2
  3
  4
  5
  6
  7
  8
  9
 10
 11
 12
 13
 14
 15
 16
 17
 18
 19
 20
 21
 22
 23
 24
 25
 26
 27
 28
 29
 30
 31
 32
 33
 34
 35
 36
 37
 38
 39
 40
 41
 42
 43
 44
 45
 46
 47
 48
 49
 50
 51
 52
 53
 54
 55
 56
 57
 58
 59
 60
 61
 62
 63
 64
 65
 66
 67
 68
 69
 70
 71
 72
 73
 74
 75
 76
 77
 78
 79
 80
 81
 82
 83
 84
 85
 86
 87
 88
 89
 90
 91
 92
 93
 94
 95
 96
 97
 98
 99
100
101
102
103
104
105
106
107
108
109
110
111
112
113
114
115
116
117
118
119
120
121
122
123
124
125
126
127
128
129
130
131
132
133
134
135
136
137
138
139
140
141
142
143
144
145
146
147
148
149
150
151
152
153
154
155
156
157
158
159
160
161
162
163
164
165
166
167
168
169
170
171
172
173
174
175
176
177
178
179
180
181
182
183
184
185
186
187
188
189
190
191
192
193
194
195
196
197
198
199
200
201
202
203
204
205
206
207
208
209
210
211
212
213
214
215
216
217
218
219
220
.tip-button {
  border: 0;
  border-radius: 0.25rem;
  cursor: pointer;
  font-size: 20px;
  font-weight: 600;
  height: 2.6rem;
  margin-bottom: -4rem;
  outline: 0;
  position: relative;
  top: 0;
  transform-origin: 0% 100%;
  transition: transform 50ms ease-in-out;
  width: auto;
  -webkit-tap-highlight-color: transparent;
}
.tip-button:active {
  transform: rotate(4deg);
}
.tip-button.clicked {
  animation: 150ms ease-in-out 1 shake;
  pointer-events: none;
}
.tip-button.clicked .tip-button__text {
  opacity: 0;
  transition: opacity 100ms linear 200ms;
}
.tip-button.clicked::before {
  height: 0.5rem;
  width: 60%;
  background: $button-hover-color;
}
.tip-button.clicked .coin {
  transition: margin-bottom 1s linear 200ms;
  margin-bottom: 0;
}
.tip-button.shrink-landing::before {
  transition: width 200ms ease-in;
  width: 0;
}
.tip-button.coin-landed::after {
  opacity: 1;
  transform: scale(1);
  transform-origin: 50% 100%;
}
.tip-button.coin-landed .coin-wrapper {
  background: radial-gradient(circle at 35% 97%, rgba(3, 16, 50, 0.4) 0.04rem, transparent 0.04rem), radial-gradient(
      circle at 45% 92%,
      rgba(3, 16, 50, 0.4) 0.04rem,
      transparent 0.02rem
    ), radial-gradient(circle at 55% 98%, rgba(3, 16, 50, 0.4) 0.04rem, transparent 0.04rem), radial-gradient(circle at
        65% 96%, rgba(3, 16, 50, 0.4) 0.06rem, transparent 0.06rem);
  background-position: center bottom;
  background-size: 100%;
  bottom: -1rem;
  opacity: 0;
  transform: scale(2) translateY(-10px);
}
.tip-button__text {
  color: #fff;
  margin-right: 1.8rem;
  opacity: 1;
  position: relative;
  transition: opacity 100ms linear 500ms;
  z-index: 3;
}
.tip-button::before {
  border-radius: 0.25rem;
  bottom: 0;
  content: "";
  display: block;
  height: 100%;
  left: 50%;
  position: absolute;
  transform: translateX(-50%);
  transition: height 250ms ease-in-out 400ms, width 250ms ease-in-out 300ms;
  width: 100%;
  z-index: 2;
}
.tip-button::after {
  bottom: -1rem;
  color: white;
  content: "ヾ(≧O≦)〃嗷~"; /*点击后显示的内容*/
  height: 110%;
  left: 0;
  opacity: 0;
  position: absolute;
  pointer-events: none;
  text-align: center;
  transform: scale(0);
  transform-origin: 50% 20%;
  transition: transform 200ms cubic-bezier(0, 0, 0.35, 1.43);
  width: 100%;
  z-index: 1;
}

.coin-wrapper {
  background: none;
  bottom: 0;
  height: 18rem;
  left: 0;
  opacity: 1;
  overflow: hidden;
  pointer-events: none;
  position: absolute;
  transform: none;
  transform-origin: 50% 100%;
  transition: opacity 200ms linear 100ms, transform 300ms ease-out;
  width: 100%;
}

.coin {
  --front-y-multiplier: 0;
  --back-y-multiplier: 0;
  --coin-y-multiplier: 0;
  --coin-x-multiplier: 0;
  --coin-scale-multiplier: 0;
  --coin-rotation-multiplier: 0;
  --shine-opacity-multiplier: 0.4;
  --shine-bg-multiplier: 50%;
  bottom: calc(var(--coin-y-multiplier) * 1rem - 3.5rem);
  height: 3.5rem;
  margin-bottom: 3.05rem;
  position: absolute;
  right: calc(var(--coin-x-multiplier) * 34% + 16%);
  transform: translateX(50%) scale(calc(0.4 + var(--coin-scale-multiplier))) rotate(calc(var(
            --coin-rotation-multiplier
          ) * -1deg));
  transition: opacity 100ms linear 200ms;
  width: 3.5rem;
  z-index: 3;
}
.coin__front,
.coin__middle,
.coin__back,
.coin::before,
.coin__front::after,
.coin__back::after {
  border-radius: 50%;
  box-sizing: border-box;
  height: 100%;
  left: 0;
  position: absolute;
  width: 100%;
  z-index: 3;
}
.coin__front {
  background: radial-gradient(circle at 50% 50%, transparent 50%, rgba(115, 124, 153, 0.4) 54%, #c2cadf 54%),
    linear-gradient(210deg, #8590b3 32%, transparent 32%), linear-gradient(150deg, #8590b3 32%, transparent 32%),
    linear-gradient(to right, #8590b3 22%, transparent 22%, transparent 78%, #8590b3 78%), linear-gradient(
      to bottom,
      #fcfaf9 44%,
      transparent 44%,
      transparent 65%,
      #fcfaf9 65%,
      #fcfaf9 71%,
      #8590b3 71%
    ), linear-gradient(to right, transparent 28%, #fcfaf9 28%, #fcfaf9 34%, #8590b3 34%, #8590b3 40%, #fcfaf9 40%, #fcfaf9
        47%, #8590b3 47%, #8590b3 53%, #fcfaf9 53%, #fcfaf9 60%, #8590b3 60%, #8590b3 66%, #fcfaf9 66%, #fcfaf9 72%, transparent
        72%);
  background-color: #8590b3;
  background-size: 100% 100%;
  transform: translateY(calc(var(--front-y-multiplier) * 0.3181818182rem / 2)) scaleY(var(--front-scale-multiplier));
}
.coin__front::after {
  background: rgba(0, 0, 0, 0.2);
  content: "";
  opacity: var(--front-y-multiplier);
}
.coin__middle {
  background: #737c99;
  transform: translateY(calc(var(--middle-y-multiplier) * 0.3181818182rem / 2)) scaleY(var(--middle-scale-multiplier));
}
.coin__back {
  background: radial-gradient(circle at 50% 50%, transparent 50%, rgba(115, 124, 153, 0.4) 54%, #c2cadf 54%),
    radial-gradient(circle at 50% 40%, #fcfaf9 23%, transparent 23%), radial-gradient(circle at 50% 100%, #fcfaf9 35%, transparent
        35%);
  background-color: #8590b3;
  background-size: 100% 100%;
  transform: translateY(calc(var(--back-y-multiplier) * 0.3181818182rem / 2)) scaleY(var(--back-scale-multiplier));
}
.coin__back::after {
  background: rgba(0, 0, 0, 0.2);
  content: "";
  opacity: var(--back-y-multiplier);
}
.coin::before {
  background: radial-gradient(circle at 25% 65%, transparent 50%, rgba(255, 255, 255, 0.9) 90%), linear-gradient(55deg, transparent
        calc(var(--shine-bg-multiplier) + 0%), #e9f4ff calc(var(--shine-bg-multiplier) + 0%), transparent calc(var(
              --shine-bg-multiplier
            ) + 50%));
  content: "";
  opacity: var(--shine-opacity-multiplier);
  transform: translateY(calc(var(--middle-y-multiplier) * 0.3181818182rem / -2)) scaleY(var(--middle-scale-multiplier))
    rotate(calc(var(--coin-rotation-multiplier) * 1deg));
  z-index: 10;
}
.coin::after {
  background: #737c99;
  content: "";
  height: 0.3181818182rem;
  left: 0;
  position: absolute;
  top: 50%;
  transform: translateY(-50%);
  width: 100%;
  z-index: 2;
}

@keyframes shake {
  0% {
    transform: rotate(4deg);
  }
  66% {
    transform: rotate(-4deg);
  }
  100% {
    transform: rotate();
  }
}

新建[Blogroot]\source\js\coin\coin.js

 1
 2
 3
 4
 5
 6
 7
 8
 9
10
11
12
13
14
15
16
17
18
19
20
21
22
23
24
25
26
27
28
29
30
31
32
33
34
35
36
37
38
39
40
41
42
43
44
45
46
47
48
49
50
51
52
53
54
55
56
57
58
59
60
61
62
63
64
65
66
67
68
69
70
71
72
73
74
75
76
77
78
79
80
81
82
83
84
85
86
87
88
89
90
var tipButtons = document.querySelectorAll(".tip-button");

function coinAudio() {
  var coinAudio = document.getElementById("coinAudio");
  if (coinAudio) {
    coinAudio.play(); //有音频时播放
  }
}
// Loop through all buttons (allows for multiple buttons on page)
tipButtons.forEach(button => {
  var coin = button.querySelector(".coin");

  // The larger the number, the slower the animation
  coin.maxMoveLoopCount = 90;

  button.addEventListener("click", () => {
    if (/Android|webOS|BlackBerry/i.test(navigator.userAgent)) return true; //媒体选择
    if (button.clicked) return;
    button.classList.add("clicked");

    // Wait to start flipping th coin because of the button tilt animation
    setTimeout(() => {
      // Randomize the flipping speeds just for fun
      coin.sideRotationCount = Math.floor(Math.random() * 5) * 90;
      coin.maxFlipAngle = (Math.floor(Math.random() * 4) + 3) * Math.PI;
      button.clicked = true;
      flipCoin();
      coinAudio();
    }, 50);
  });

  var flipCoin = () => {
    coin.moveLoopCount = 0;
    flipCoinLoop();
  };

  var resetCoin = () => {
    coin.style.setProperty("--coin-x-multiplier", 0);
    coin.style.setProperty("--coin-scale-multiplier", 0);
    coin.style.setProperty("--coin-rotation-multiplier", 0);
    coin.style.setProperty("--shine-opacity-multiplier", 0.4);
    coin.style.setProperty("--shine-bg-multiplier", "50%");
    coin.style.setProperty("opacity", 1);
    // Delay to give the reset animation some time before you can click again
    setTimeout(() => {
      button.clicked = false;
    }, 300);
  };

  var flipCoinLoop = () => {
    coin.moveLoopCount++;
    var percentageCompleted = coin.moveLoopCount / coin.maxMoveLoopCount;
    coin.angle = -coin.maxFlipAngle * Math.pow(percentageCompleted - 1, 2) + coin.maxFlipAngle;

    // Calculate the scale and position of the coin moving through the air
    coin.style.setProperty("--coin-y-multiplier", -11 * Math.pow(percentageCompleted * 2 - 1, 4) + 11);
    coin.style.setProperty("--coin-x-multiplier", percentageCompleted);
    coin.style.setProperty("--coin-scale-multiplier", percentageCompleted * 0.6);
    coin.style.setProperty("--coin-rotation-multiplier", percentageCompleted * coin.sideRotationCount);

    // Calculate the scale and position values for the different coin faces
    // The math uses sin/cos wave functions to similate the circular motion of 3D spin
    coin.style.setProperty("--front-scale-multiplier", Math.max(Math.cos(coin.angle), 0));
    coin.style.setProperty("--front-y-multiplier", Math.sin(coin.angle));

    coin.style.setProperty("--middle-scale-multiplier", Math.abs(Math.cos(coin.angle), 0));
    coin.style.setProperty("--middle-y-multiplier", Math.cos((coin.angle + Math.PI / 2) % Math.PI));

    coin.style.setProperty("--back-scale-multiplier", Math.max(Math.cos(coin.angle - Math.PI), 0));
    coin.style.setProperty("--back-y-multiplier", Math.sin(coin.angle - Math.PI));

    coin.style.setProperty("--shine-opacity-multiplier", 4 * Math.sin((coin.angle + Math.PI / 2) % Math.PI) - 3.2);
    coin.style.setProperty("--shine-bg-multiplier", -40 * (Math.cos((coin.angle + Math.PI / 2) % Math.PI) - 0.5) + "%");

    // Repeat animation loop
    if (coin.moveLoopCount < coin.maxMoveLoopCount) {
      if (coin.moveLoopCount === coin.maxMoveLoopCount - 6) button.classList.add("shrink-landing");
      window.requestAnimationFrame(flipCoinLoop);
    } else {
      button.classList.add("coin-landed");
      coin.style.setProperty("opacity", 0);
      setTimeout(() => {
        button.classList.remove("clicked", "shrink-landing", "coin-landed");
        setTimeout(() => {
          resetCoin();
        }, 300);
      }, 1500);
    }
  };
});

修改_config.butterfly.yml,添加音频文件配置项,添加 CDN 配置项:

 1
 2
 3
 4
 5
 6
 7
 8
 9
10
11
12
13
14
15
16
17
18
19
20
21
  # Sponsor/reward
  reward:
    enable: true
+   coinAudio: https://cdn.cbd.int/akilar-candyassets@1.0.36/audio/aowu.m4a
    QR_code:
      - img: https://npm.elemecdn.com/anzhiyu-blog@1.1.6/img/post/common/qrcode-weichat.png
        link:
        text: wechat
      - img: https://npm.elemecdn.com/anzhiyu-blog@1.1.6/img/post/common/qrcode-alipay.png
        link:
        text: alipay
  CDN:
    # main
    main_css: /css/index.css
    jquery: https://cdn.cbd.int/jquery@latest/dist/jquery.min.js
    main: /js/main.js
    utils:/js/utils.js
    option:
+     # 打赏按钮投币效果
+     coin_js: /js/coin/coin.js
+     coin_css: /css/coin/coin.css

现在的打赏按钮样式需要稍作适配,当前若提示语太长,悬停时会无法显示完全。需要微调一下,修改[Blogroot]\themes\butterfly\source\css_layout\reward.styl,整体替换为以下内容

 1
 2
 3
 4
 5
 6
 7
 8
 9
10
11
12
13
14
15
16
17
18
19
20
21
22
23
24
25
26
27
28
29
30
31
32
33
34
35
36
37
38
39
40
41
42
43
44
45
46
47
48
49
50
51
52
53
54
55
56
57
58
59
60
61
62
63
64
65
66
67
68
69
70
71
.post-reward
  position: relative
  margin-top: 4rem
  width: 100%
  text-align: center

  .reward-button
    display: inline-block
    padding: .2rem 1.2rem
    background: var(--btn-bg)
    color: var(--btn-color)
    cursor: pointer
    transition: all .4s

    &:hover
      box-shadow: inset 15em 0 0 0 var(--btn-hover-color)

      .reward-main
        display: block

    .reward-main
      position: absolute
      bottom: 40px
      left: -25%
      z-index: 100
      display: none
      padding: 0 0 15px
      width: 150%

      .reward-all
        display: inline-block
        margin: 0
        padding: 1rem .5rem
        border-radius: 4px
        background: var(--reward-pop)

        &:before
          position: absolute
          bottom: -10px
          left: 0
          width: 100%
          height: 20px
          content: ''

        &:after
          position: absolute
          right: 0
          bottom: 2px
          left: 0
          margin: 0 auto
          width: 0
          height: 0
          border-top: 13px solid var(--reward-pop)
          border-right: 13px solid transparent
          border-left: 13px solid transparent
          content: ''

        .reward-item
          display: inline-block
          padding: 0 8px
          list-style-type: none
          vertical-align: top

          img
            width: 130px
            height: 130px

          .post-qr-code-desc
            padding-top: .4rem
            width: 130px
            color: $reward-pop-up-color

404 页面展示最近文章

替换themes\butterfly\layout\includes\404.pug为以下代码

 1
 2
 3
 4
 5
 6
 7
 8
 9
10
11
12
13
14
15
16
17
18
19
20
21
22
23
24
25
26
27
28
29
30
31
32
33
34
35
36
37
- var top_img = theme.error_404.background || theme.default_top_img
- var bg_img = `background-image: url('${url_for(top_img)}')`

#body-wrap.error
  div(style='display: none')
    include ./header/index.pug

  #error-wrap
    .error-content
      .error-img(style=bg_img)
      .error-info
        h1.error_title= '404'
        .error_subtitle= theme.error_404.subtitle
        a.button--animated(href=config.root)
          i.fas.fa-rocket
          = _p('返回主页')

  .aside-list
    .aside-list-group
        - let postLimit = theme.aside.card_recent_post.limit === 0 ? site.posts.length : theme.aside.card_recent_post.limit || 5
        - let sort = theme.aside.card_recent_post.sort === 'updated' ? 'updated' : 'date'
        - site.posts.sort(sort, -1).limit(postLimit).each(function(article){
          - let link = article.link || article.path
          - let title = article.title || _p('no_title')
          - let no_cover = article.cover === false || !theme.cover.aside_enable ? 'no-cover' : ''
          - let post_cover = article.cover
          .aside-list-item(class=no_cover)
            if post_cover && theme.cover.aside_enable
              a.thumbnail(href=url_for(link) title=title)
                img(src=url_for(post_cover) onerror=`this.onerror=null;this.src='${url_for(theme.error_img.post_page)}'` alt=title)
            .content
              a.title(href=url_for(link) title=title)= title
              if theme.aside.card_recent_post.sort === 'updated'
                time(datetime=date_xml(article.updated) title=_p('post.updated') + ' ' + full_date(article.updated)) #[=date(article.updated, config.date_format)]
              else
                time(datetime=date_xml(article.date) title=_p('post.created') + ' ' + full_date(article.date)) #[=date(article.date, config.date_format)]
        - })

标签云增加文章数上下标

搜索 cloudTags 函数,可以在 \themes\butterfly\scripts\helpers\page.js 找到绘制标签云的代码,增加 ${tag.length} 或 ${tag.length} 可绘制表示标签文章数的上下标。

 1
 2
 3
 4
 5
 6
 7
 8
 9
10
11
12
13
14
15
16
17
18
19
20
21
22
23
24
25
26
27
28
29
30
31
32
33
hexo.extend.helper.register('cloudTags', function (options = {}) {
  const theme = hexo.theme.config
  const env = this
  let source = options.source
  const minfontsize = options.minfontsize
  const maxfontsize = options.maxfontsize
  const limit = options.limit
  const unit = options.unit || 'px'

  let result = ''
  if (limit > 0) {
    source = source.limit(limit)
  }

  const sizes = []
  source.sort('length').forEach(tag => {
    const { length } = tag
    if (sizes.includes(length)) return
    sizes.push(length)
  })

  const length = sizes.length - 1
  source.forEach(tag => {
    const ratio = length ? sizes.indexOf(tag.length) / length : 0
    const size = minfontsize + ((maxfontsize - minfontsize) * ratio)
    let style = `font-size: ${parseFloat(size.toFixed(2))}${unit};`
    const color = 'rgb(' + Math.floor(Math.random() * 201) + ', ' + Math.floor(Math.random() * 201) + ', ' + Math.floor(Math.random() * 201) + ')' // 0,0,0 -> 200,200,200
    style += ` color: ${color}`
-   result += `<a href="${env.url_for(tag.path)}" style="${style}">${tag.name}</a>`
+   result += `<a href="${env.url_for(tag.path)}" style="${style}">${tag.name}<sup>${tag.length}</sup></a>`
  })
  return result
})

*自定义右键菜单 %kill

Hexo + Butterfly 自定义右键菜单 | 唐志远の博客 (fe32.top)

butterfly博客自定义右键菜单升级版 | Ariasakaの小窝 (yisous.xyz)

文章统计图

Hexo 博客文章统计图 | Eurkon

*即刻短文

Hexo的Butterfly魔改教程:即刻短文静态部署版 | 张洪Heo (zhheo.com)

*侧边栏标签修改

打开themes/butterfly/scripts/helpers/page.js修改第 52 行左右, 其中 表示上标, 表示下标。开启了排序。

 1
 2
 3
 4
 5
 6
 7
 8
 9
10
11
12
13
  const length = sizes.length - 1
- source.forEach(tag => {
+ source.sort('name').forEach(tag => {
    const ratio = length ? sizes.indexOf(tag.length) / length : 0
    const size = minfontsize + ((maxfontsize - minfontsize) * ratio)
    let style = `font-size: ${parseFloat(size.toFixed(2))}${unit};`
    const color = 'rgb(' + Math.floor(Math.random() * 201) + ', ' + Math.floor(Math.random() * 201) + ', ' + Math.floor(Math.random() * 201) + ')' // 0,0,0 -> 200,200,200
    style += ` color: ${color}`
-   result += `<a href="${env.url_for(tag.path)}" style="${style}">${tag.name}</a>`
+   result += `<a href="${env.url_for(tag.path)}" style="${style}">${tag.name}<sup>${tag.length}</sup></a>`
  })
  return result
})

加入以下css

 1
 2
 3
 4
 5
 6
 7
 8
 9
10
11
12
13
14
15
16
17
18
19
20
21
22
23
24
25
/* tags样式 */
#aside-content .card-tag-cloud a {
  color: var(--anzhiyu-fontcolor) !important;
  font-size: 1.05rem !important;
  border-radius: 8px;
  display: inline-block;
  margin-right: 4px;
}
#aside-content .card-tag-cloud a:hover {
  background: var(--anzhiyu-theme);
  color: var(--anzhiyu-white) !important;
  box-shadow: var(--anzhiyu-shadow-theme);
}
@media screen and (min-width: 1300px) {
  #aside-content .card-tag-cloud a:hover {
    transform: scale(1.03);
  }
  #aside-content .card-tag-cloud a:active {
    transform: scale(0.97);
  }
}
#aside-content .card-tag-cloud a sup {
  opacity: 0.4;
  margin-left: 2px;
}

*侧边栏归档修改

打开themes/butterfly/scripts/helpers/aside_archives.js修改第 92 行左右, 其中 表示上标, 表示下标。开启了排序。

1
2
3
4
5
6
7
8
9
result += transform ? transform(item.name) : item.name
result += '</span>'

if (showCount) {
- result += `<span class="card-archive-list-count">${item.count}</span>`
+ result += `<div class="card-archive-list-count-group"><span class="card-archive-list-count">${item.count}</span><span>篇</span></div>`
}
result += '</a>'
result += '</li>'

加入以下 css

 1
 2
 3
 4
 5
 6
 7
 8
 9
10
11
12
13
14
15
16
17
18
19
20
21
22
23
24
25
26
27
28
29
30
31
32
33
34
35
36
37
38
39
40
41
42
43
44
45
46
47
48
49
50
51
52
53
54
55
56
57
58
59
60
61
62
63
64
65
66
67
68
69
70
71
72
73
/* 归档样式 */
span.card-archive-list-count {
  width: auto;
  text-align: left;
  font-size: 1.5rem;
  line-height: 0.9;
  font-weight: 700;
}
.card-archive-list-count-group {
  display: flex;
  flex-direction: row;
  align-items: baseline;
}
#aside-content .card-archives ul.card-archive-list > .card-archive-list-item a span:last-child,
#aside-content .card-categories ul.card-category-list > .card-category-list-item a span:last-child {
  width: fit-content;
  margin-left: 4px;
}
span.card-archive-list-count {
  width: auto;
  text-align: left;
  font-size: 1.1rem;
  line-height: 0.9;
  font-weight: 700;
}
.card-archive-list-date {
  font-size: 14px;
  opacity: 0.6;
}
li.card-archive-list-item {
  width: 100%;
  flex: 0 0 48%;
}
#aside-content .card-archives ul.card-archive-list > .card-archive-list-item a:hover,
#aside-content .card-categories ul.card-category-list > .card-category-list-item a:hover {
  color: var(--anzhiyu-white);
  background-color: var(--anzhiyu-theme);
  box-shadow: var(--anzhiyu-shadow-theme);
  border-radius: 8px;
  padding-left: 0.5rem;
  padding-right: 0.5rem;
}
@media screen and (min-width: 1300px) {
  #aside-content .card-archives ul.card-archive-list > .card-archive-list-item a:hover,
  #aside-content .card-categories ul.card-category-list > .card-category-list-item a:hover {
    transform: scale(1.03);
  }
  #aside-content .card-archives ul.card-archive-list > .card-archive-list-item a:active,
  #aside-content .card-categories ul.card-category-list > .card-category-list-item a:active {
    transform: scale(0.97);
  }
}
#aside-content .card-archives ul.card-archive-list > .card-archive-list-item a,
#aside-content .card-categories ul.card-category-list > .card-category-list-item a {
  border-radius: 8px;
  margin: 4px 0;
  display: flex;
  flex-direction: column;
  align-content: space-between;
  border: var(--style-border);
}
#aside-content .card-archives ul.card-archive-list > .card-archive-list-item a span:first-child,
#aside-content .card-categories ul.card-category-list > .card-category-list-item a span:first-child {
  width: auto;
  flex: inherit;
}
#aside-content .card-archives ul.card-archive-list,
#aside-content .card-categories ul.card-category-list {
  display: flex;
  flex-direction: row;
  justify-content: space-between;
  flex-wrap: wrap;
}

*侧边栏最近文章修改

去除首页最近文章显示,改为文章页显示,修改themes/butterfly/layout/includes/widget/index.pug

 1
 2
 3
 4
 5
 6
 7
 8
 9
10
11
12
13
14
else
//- page
!=partial('includes/widget/card_author', {}, {cache: true})
!=partial('includes/widget/card_announcement', {}, {cache: true})
!=partial('includes/widget/card_top_self', {}, {cache: true})

.sticky_layout
  if showToc
    include ./card_post_toc.pug
- !=partial('includes/widget/card_recent_post', {}, {cache: true})
  !=partial('includes/widget/card_ad', {}, {cache: true})
  !=partial('includes/widget/card_newest_comment', {}, {cache: true})
  !=partial('includes/widget/card_categories', {}, {cache: true})
  !=partial('includes/widget/card_tags', {}, {cache: true})

加入以下 css

 1
 2
 3
 4
 5
 6
 7
 8
 9
10
11
12
13
14
15
16
17
18
19
20
21
22
23
24
25
26
27
28
29
30
31
32
33
34
35
36
37
38
39
40
41
42
43
44
45
46
47
#aside-content .aside-list > .aside-list-item .content > time {
  display: none;
}
#aside-content .aside-list > .aside-list-item .content > .title {
  -webkit-line-clamp: 3;
  font-weight: 700;
  padding: 2px 0;
}
#aside-content .aside-list > .aside-list-item {
  padding: 8px;
  padding-top: 6px !important;
  padding-bottom: 6px !important;
  border-radius: 12px;
  transition: 0.3s;
  margin: 4px 0;
  cursor: pointer;
}
@media screen and (min-width: 1300px) {
  #aside-content .aside-list > .aside-list-item:hover {
    transform: scale(1.03);
  }
  #aside-content .aside-list > .aside-list-item:active {
    transform: scale(0.97);
  }
}
#aside-content .aside-list > .aside-list-item:hover .thumbnail > img {
  transform: scale(1);
}
#aside-content .aside-list > .aside-list-item:not(:last-child) {
  border-bottom: 0 dashed var(--anzhiyu-background) !important;
}
#aside-content .aside-list > .aside-list-item .thumbnail {
  border-radius: 8px;
  border: var(--style-border);
}
#aside-content .aside-list > .aside-list-item:hover {
  background: var(--anzhiyu-blue-main);
  color: var(--anzhiyu-white);
  transition: 0.3s;
  box-shadow: var(--anzhiyu-shadow-main);
}
#aside-content .aside-list > .aside-list-item:hover a {
  color: var(--anzhiyu-white) !important;
}
.card-widget.card-recent-post {
  padding: 0.4rem 0.6rem !important;
}

页面配置

关于页面配置 | 安知鱼主题官方文档 (anheyu.com)

音乐馆

给你的博客加一个优雅的音乐界面 | 安知鱼 (anheyu.com)

自动部署

使用Github Action实现全自动部署 | Akilarの糖果屋

1
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
1
2
3
git add .
git commit -m "github action update"
git push origin main

butterfly 重装日记 | 安知鱼 (anheyu.com)

hexo图床处理

Typora到CSDN博客图片上传问题-CSDN博客

image-20231007204523369

1
https://fastly.jsdelivr.net/gh/shaunzhao-yu/img@main

github faster

github faster | Akilarの糖果屋

评论

基于 Hexo 键入评论功能 | 唐志远の博客 (fe32.top)

悬挂灯笼

博客魔改教程总结(一) | Fomalhaut🥝

在线聊天

基于 Hexo 键入在线聊天功能 | 唐志远の博客 (fe32.top)

节日弹窗和公祭日

博客魔改教程总结(一) | Fomalhaut🥝

文章加密插件

博客魔改教程总结(一) | Fomalhaut🥝

hexo 教程

教程:

Hexo 官方文档:https://hexo.io/zh-cn/docs/ Hexo 官方提供的详细文档,包含了安装、配置和使用 Hexo 的指南。

博客库:

Hexo 官方主题库:https://hexo.io/themes/ Hexo 官方提供的主题库,包含了各种风格的主题,可以根据个人喜好选择。

Hexo 主题 - GitHub:https://github.com/hexojs/hexo/wiki/Themes 在 GitHub 上的 Hexo Wiki 页面,收集了各种开源的 Hexo 主题,你可以在这里找到适合自己的主题。

插件和扩展:

Hexo 官方插件列表:https://hexo.io/plugins/ Hexo 官方提供的插件列表,包含了各种功能和工具,如SEO优化、站点统计、评论系统等。

Hexo 非官方插件列表 - Awesome Hexo:https://github.com/hexojs/awesome-hexo 一个收集了大量 Hexo 非官方插件的 GitHub 项目,其中包括了许多有用的插件和扩展。

Hexo 部署扩展 - GitHub Pages:https://hexo.io/docs/github-pages 如果您计划将博客托管在 GitHub Pages 上,这个官方文档将指导您如何进行部署。

社区和交流:

Hexo 官方论坛:https://github.com/hexojs/hexo/issues Hexo 官方论坛是一个开放的 GitHub 问题页面,您可以在这里提问、报告问题或参与讨论。

Hexo 中文社区 - SegmentFault:https://segmentfault.com/t/hexo SegmentFault 是一个中文开发者社区,在这里您可以找到关于 Hexo 的问题和讨论。

Hexo 官方博客:http s://hexo.io/blog/ Hexo 官方博客上发布了一些有关 Hexo 的最新动态、教程和技巧

参考

评论

前端 - 基于 Hexo 键入评论功能 - 个人文章 - SegmentFault 思否

添加 utterances评论系统

Hexo next主题博客搭建及美化 - 个人文章 - SegmentFault 思否

部署

前端 - 飞只因太美,给你的首页装上吧! - 个人文章 - SegmentFault 思否

Obisidian结合

Hexo + Obsidian + Git 完美的博客部署与编辑方案 - 个人文章 - SegmentFault 思否

语雀结合

Hexo+Travis+yuque-hexo+Serverless自动化部署博客问题解决方案 - 个人文章 - SegmentFault 思否

图床

七牛云

1
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

git

javascript - hexo配合github action 自动构建(多种形式) - 前端与算法 - SegmentFault 思否

参考 服务器部署

安装依赖

1
yum install -y gcc gcc-c++ make zlib zlib-devel libtool openssl openssl-devel

安装PCRE库

 1
 2
 3
 4
 5
 6
 7
 8
 9
10
11
12
13
cd /usr/local/

wget http://downloads.sourceforge.net/project/pcre/pcre/8.37/pcre-8.37.tar.gz

tar -xvf pcre-8.37.tar.gz

cd pcre-8.37

./configure

make && make install

pcre-config --version

安装nginx

安装nginx一定要在local文件夹下

 1
 2
 3
 4
 5
 6
 7
 8
 9
10
11
cd /usr/local/

wget http://nginx.org/download/nginx-1.17.9.tar.gz

tar -xvf nginx-1.17.9.tar.gz

cd nginx-1.17.9

./configure

make && make install

常用命令

1
2
3
4
5
# 启动
/usr/local/nginx/sbin/nginx

# 重启
/usr/local/nginx/sbin/nginx -s reload

修改配置文件server 80 端口下的root项 为/home/www/website;

1
vi /usr/local/nginx/conf/nginx.conf

然后重新加载

安装Git以及Node.js

1
2
3
4
curl -sL https://rpm.nodesource.com/setup_10.x | bash -

yum install -y nodejs
# 如果安装失败看错误集锦

查看是否成功

1
2
3
node -v

npm -v

安装Git及配置仓库

 1
 2
 3
 4
 5
 6
 7
 8
 9
10
11
12
13
14
15
yum install git -y

adduser git

chmod 740 /etc/sudoers # 设置权限

vi /etc/sudoers

使用 set: nu 显示行号,找到100行左右,添加如下信息
在如下位置添加
root ALL=(ALL)  ALL
git     ALL=(ALL)       ALL		#加入这一行
vi指令执行之后按i进入输入模式
编辑完成之后按一下esc
然后输入:wq即可退出

执行以下指令更改文件夹权限

1
2
3
4
chmod 400 /etc/sudoers

sudo passwd git
密码:123456

切换git用户并且建立密钥

 1
 2
 3
 4
 5
 6
 7
 8
 9
10
11
12
13
14
15
16
su git

cd ~

mkdir .ssh

cd .ssh

vi authorized_keys

#内容为自己本地
C:\Users\Administrator\.ssh\id_rsa.pub文件里的内容

chmod 600 ~/.ssh/authorized_keys

chmod 700 ~/.ssh

创建git仓库

1
2
3
4
5
cd ~

git init --bare blog.git

vi ~/blog.git/hooks/post-receive
1
git --work-tree=/home/www/website --git-dir=/home/git/blog.git checkout -f

保存退出

1
chmod +x ~/blog.git/hooks/post-receive

*以上指令都需要在su git 之后执行 如果中途断开重新连接过,需要重新执行 su git指令 进入git账户。

新建/home/www/website文件夹 在root用户下执行,所限先su root切换为root账户

 1
 2
 3
 4
 5
 6
 7
 8
 9
10
11
12
13
su root

输入密码

cd /home

mkdir -p www/website

修改文件夹权限 这步很重要 

chmod 777 /home/www/website

chmod 777 /home/www

上传到服务器

在本地电脑输入

1
ssh -v git@服务器的公网ip

==修改本地配置文件==

注意:删除本地博客中.deploy_git文件,第一次部署忽略

我们需要在config.yml中的最后一行编辑以下信息,然后咱们就可以把自己的博客推送上去了

1
2
3
4
deploy:
  - type: git
    repository: git@这里改为服务器公网IP:/home/git/blog.git
    branch: master

然后就可以通过以下命令进行推送了

1
hexo g -d

写入启动脚本

在/etc/init.d/路径下添加脚本文件,名称为nginx,内容如下

1
vi /etc/init.d/nginx
 1
 2
 3
 4
 5
 6
 7
 8
 9
10
11
12
13
14
15
16
17
18
19
20
21
22
23
24
25
26
27
28
29
30
31
32
33
#!/bin/bash
#Startup script for the nginx Web Server
#chkconfig: 2345 85 15
nginx=/usr/local/nginx/sbin/nginx
conf=/usr/local/nginx/conf/nginx.conf
case $1 in 
start)
echo -n "Starting Nginx"
$nginx -c $conf
echo " done."
;;
stop)
echo -n "Stopping Nginx"
killall -9 nginx
echo " done."
;;
test)
$nginx -t -c $conf
echo "Success."
;;
reload)
echo -n "Reloading Nginx"
ps auxww | grep nginx | grep master | awk '{print $2}' | xargs kill -HUP
echo " done."
;;
restart)
$nginx -s reload
echo "reload done."
;;
*)
echo "Usage: $0 {start|restart|reload|stop|test|show}"
;;
esac

然后执行

1
chmod +x nginx
1
2
3
4
控制指令
启动service nginx start
停止service nginx stop
重启service nginx reload

以下非必要不设置

开放80端口,如果https需要开放443端口

1
2
firewall-cmd --permanent --zone=public --add-port=80/tcp
firewall-cmd --reload

错误集锦

-bash: npm: command not found

 1
 2
 3
 4
 5
 6
 7
 8
 9
10
11
12
13
14
15
16
17
18
19
20
21
22
#从 https://nodejs.org/en/ 下载 tar 文件并解压缩。
curl https://nodejs.org/dist/v17.6.0/node-v17.6.0-linux-x64.tar.xz -o node-v17.6.0-linux-x64.tar.xz
tar -xvf node-v17.6.0-linux-x64.tar.xz

#在 /usr/local/ 下创建一个目录。
sudo mkdir -p /usr/local/nodejs

#在 /usr/local/nodejs/ 下移动节点文件。
sudo mv node-v17.6.0-linux-x64/* /usr/local/nodejs/

#将 /usr/local/nodejs/bin 目录添加到 .bashrc 文件中的 PATH。
sudo vim ~/.bashrc
export PATH=$PATH:/usr/local/nodejs/bin

#重新加载 .bashrc 文件。
source ~/.bashrc

#安装 npm。
curl -L https://npmjs.org/install.sh | sudo sh

node --version
npm --version

$ ssh -v git@121.196.144.77:/home/git/blog.git OpenSSH_9.2p1, OpenSSL 1.1.1t 7 Feb 2023 debug1: Reading configuration data /etc/ssh/ssh_config debug1: resolve_canonicalize: hostname 121.196.144.77:/home/git/blog.git is an unrecognised address ssh: Could not resolve hostname 121.196.144.77:/home/git/blog.git: Name or service not known

1
2
3
4
1.先到本地C:\Users\Administrator\.ssh\文件下,删除known_hosts文件
2.执行ssh -v git@121.196.144.77

提示Welcome to Alibaba Cloud Elastic Compute Service !就算ok了

✘ nginx Error 0.6s ✘ lsky-pro Error 0.6s ✘ mysql Error 0.6s Error response from daemon: Get “https://registry-1.docker.io/v2/": dial tcp: lookup registry-1.docker.io on 192.168.101.2:53: server misbehaving

1
2
3
4
5
vi /etc/resolv.conf

#添加这两行
nameserver 8.8.8.8
nameserver 8.8.4.4

参考 图床部署 弃用

简介

Lsky Pro 是一个用于在线上传、管理图片的图床程序,中文名:兰空图床,你可以将它作为自己的云上相册,亦可以当作你的写作贴图库。

兰空图床始于 2017 年 10 月,最早的版本由 ThinkPHP 5 开发,后又经历了数个版本的迭代,在 2021 年末启动了新的重写计划并于 2022 年 3 月份发布全新的 2.0 版本。

项目地址:https://github.com/lsky-org/lsky-pro

官网地址:https://www.lsky.pro/

文档地址:https://docs.lsky.pro/

Docker镜像地址:https://hub.docker.com/r/dko0/lsky-pro

PicGo插件:https://hellodk.cn/post/964

功能特性

  • 支持本地等多种第三方云储存 AWS S3、阿里云 OSS、腾讯云 COS、七牛云、又拍云、SFTP、FTP、WebDav、Minio
  • 多种数据库驱动支持,MySQL 5.7+、PostgreSQL 9.6+、SQLite 3.8.8+、SQL Server 2017+
  • 支持配置使用多种缓存驱动,Memcached、Redis、DynamoDB、等其他关系型数据库,默认以文件的方式缓存
  • 多图上传、拖拽上传、粘贴上传、动态设置策略上传、复制、一键复制链接
  • 强大的图片管理功能,瀑布流展示,支持鼠标右键、单选多选、重命名等操作
  • 自由度极高的角色组配置,可以为每个组配置多个储存策略,同时储存策略可以配置多个角色组
  • 可针对角色组设置上传文件、文件夹路径命名规则、上传频率限制、图片审核等功能
  • 支持图片水印、文字水印、水印平铺、设置水印位置、X/y 轴偏移量设置、旋转角度等
  • 支持通过接口上传、管理图片、管理相册
  • 支持在线增量更新、跨版本更新
  • 图片广场

环境搭建

  • 安装常用工具包
1
2
3
sudo -i # 切换到root用户
yum update -y
yum install -y wget curl sudo vim git lsof
  • 设置 SWAP 脚本(可选)
1
wget -O box.sh https://raw.githubusercontent.com/BlueSkyXN/SKY-BOX/main/box.sh && chmod +x box.sh && clear && ./box.sh

注意:VPS的内存如果过小,建议设置一下SWAP,一般为内存的1-1.5倍即可,可以让运行更流畅!

安装 Docker 环境

 1
 2
 3
 4
 5
 6
 7
 8
 9
10
11
12
13
14
15
16
17
18
19
20
21
22
23
24
25
26
1.卸载旧的版本
$sudo yum remove docker \
                  docker-client \
                  docker-client-latest \
                  docker-common \
                  docker-latest \
                  docker-latest-logrotate \
                  docker-logrotate \
                  docker-engine
2.需要的安装包
$sudo yum install -y yum-utils
3.设置镜像的仓库(官方)
$sudo yum-config-manager \
    --add-repo \
    https://download.docker.com/linux/centos/docker-ce.repo  (官网速度慢)
$sudo yum-config-manager \
    --add-repo \
    http://mirrors.aliyun.com/docker-ce/linux/centos/docker-ce.repo(推荐使用,阿里云速度快)
4.更新yum软件包索引
$sudo yum makecache fast
5.安装docker  docker-ce 社区版  docker-ee 企业版
$sudo yum install -y docker-ce docker-ce-cli containerd.io docker-buildx-plugin docker-compose-plugin
6.启动docker
$sudo systemctl start docker
7.查看docker是否安装成功
$sudo docker version

卸载

1
2
3
4
5
1.卸载依赖
$sudo yum remove docker-ce docker-ce-cli containerd.io
2.删除资源
$sudo rm -rf /var/lib/docker
# /var/lib/docker     docker的默认工作路径

阿里云镜像加速

 1
 2
 3
 4
 5
 6
 7
 8
 9
10
配置镜像加速器
通过shell脚本追加文本内容
$sudo mkdir -p /etc/docker
$sudo tee /etc/docker/daemon.json <<-'EOF'
{
  "registry-mirrors": ["https://f2k3b83v.mirror.aliyuncs.com"]
}
EOF
$sudo systemctl daemon-reload
$sudo systemctl restart docker

设置开机自动启动

1
#systemctl enable docker

查看docker服务状态

1
#systemctl status docker

查看docker具体信息

1
#docker info

docker-compose

这里采用离线安装,在线安装或多或少有各种问题

所有版本预览Releases · docker/compose (github.com)

 1
 2
 3
 4
 5
 6
 7
 8
 9
10
#最好是进入到/usr/local/bin/目录下安装,我第一次在根目录下安装,报错docker-compose: command not found,第二次在上述目录下安装可以成功
#将文件上传到linux后,重命名
 mv docker-compose-linux-x86_64.docker-compose-linux-x86_64 /usr/local/bin/docker-compose


#添加可执行权限
chmod +x /usr/local/bin/docker-compose

#测试
docker-compose version
1
2
安装docker-compose
$ curl -SL https://github.com/docker/compose/releases/download/v2.4.1/docker-compose-linux-x86_64 -o /usr/local/bin/docker-compose

创建容器

  1. 在系统任意位置创建一个文件夹,此文档以 /opt/docker/lsky 为例
1
2
mkdir -p /opt/docker/lsky && cd /opt/docker/lsky
mkdir -p ./{conf,data,logs}

注意:后续操作中,产生的所有数据都会保存在这个目录,请妥善保存/opt/docker/lsky

  1. 创建 docker-compose.yaml

  2. 1
    
    vim docker-compose.yaml
    
 1
 2
 3
 4
 5
 6
 7
 8
 9
10
11
12
13
14
15
16
17
18
19
20
21
22
23
24
25
26
version: '3'
services:
    lsky-pro:
        container_name: lsky-pro
        image: dko0/lsky-pro
        restart: always
        volumes:
            - ./data/html:/var/www/html  #映射到本地
        ports:
            - 7791:80
        environment:
            - MYSQL_HOST=mysql
            - MYSQL_DATABASE=lsky-pro
            - MYSQL_USER=lsky-pro
            - MYSQL_PASSWORD=lsky-pro
    mysql:
        image: mysql:8.0
        container_name: lsky-pro-db
        restart: always
        environment:
          - MYSQL_DATABASE=lsky-pro
          - MYSQL_USER=lsky-pro
          - MYSQL_PASSWORD=lsky-pro
          - MYSQL_ROOT_PASSWORD=lsky-pro
        volumes:
          - ./data/db:/var/lib/mysql

注意:查看端口是否被占用

lsof -i:7791

  1. 启动服务
1
docker-compose up -d

实时查看日志:

1
docker-compose logs -f
  1. 用浏览器访问 http://ip:端口号 即可http://192.168.101.128:7791
  • 查看服务器 IP:
1
curl ip.sb

如果需要配置域名访问,建议先配置好反向代理以及域名解析再进行初始化。如果通过 http://ip:端口号 的形式无法访问,请到服务器厂商后台将运行的端口号添加到安全组,如果服务器使用了 Linux 面板,请检查此 Linux 面板是否有还有安全组配置,需要同样将端口号添加到安全组。

更新容器

停止运行中的容器组

1
cd /opt/docker/lsky && docker-compose down

备份数据(重要)

1
2
cp -r /opt/docker/lsky /opt/docker/lsky.archive
需要注意的是,lsky.archive 文件名不一定要根据此文档命名,这里仅仅是个示例。

更新服务

修改 docker-compose.yaml 中配置的镜像版本

拉取镜像

1
docker-compose pull lsky-pro

重新启动容器

1
docker-compose up -d

初始化安装

访问网页地址,进入安装界面,按照提示进行安装即可

注意,数据库连接地址,填 docker-compose 文件里的容器名称 lsky-pro-db

[[博客问题记录]]